
Overview
Introduction
SAASPASS provides two-factor authentication authentication for developers to integrate into their apps and websites. By eliminating usernames and passwords, SAASPASS enhances convenience and strengthens security. SAASPASS uses an HTTP API to provide multi-factor authentication for any web, mobile web or mobile application. With HTTP calls, SAASPASS provides a simple and secure interface for developers to integrate.
Explore SAASPASS security with our simulator and sample (Java and .NET) applications. See how the integration can be customized to meet the needs of any application.
The SAASPASS Widgets Page allows developers to create an iFrame embeddable widget customizable for any application. Depending on how you want to use SAASPASS, the iFrame can populate an OTP login field, Instant login/Instant registration barcode, Proximity bluetooth, or any combination of the three.
SAASPASS Services
SAASPASS HTTP API, contains various services to perform application integration and account management functionality.
There are 2 scopes of services: application-scope (called for a specific application) and company-scope (called regardless of application, but for the company).
Application Integration Services
Application Integration Services are about user's login/registration process with SAASPASS for specific application, so they have application-scope.
These services are:
- Login with One-Time Password (OTP Check): Application-scope
- Login with Scan Barcode: Application-scope
- Login with Proximity: Application-scope
- Single Sign-on Login: Application-scope
- Mobile Application Login: Application-scope
- Instant Registration: Application-scope
Service definitions can be found on Application Integration Services section. Each request to these services needs to be authenticated properly. For authentication details, check Authentication section.
Account Management Services
Account Management Services are about managing your accounts remotely, without using the Admin Portal on SAASPASS. Depends on its functionality, a service might have 'application-scope' or company-scope.
Account Management Services are:
- Add Account: Company -scope
- Verify Account: Company-scope
- Remove Account: Company-scope
- Register/Assign Account to Application by Admin: Application-scope
- Register/Assign Account to Application by User: Application-scope
- Unregister/Unassign Account from Application: Application-scope
Service definitions can be found on Account Management Services section. Each request to these services needs to be authenticated properly. For authentication details, check the Authentication section.
Authentication
Token Generation
Introduction
Generate Application-Scope Token
public static string GetApplicationToken()
{
    string urlForToken = "https://www.saaspass.com/sd/rest/applications/" + apiKey + "/tokens?password=" + apiPassword;
    return GetToken(urlForToken);
}

public static string GetToken(string url)
{
    try
    {
        WebRequest request = WebRequest.Create(url);
        WebResponse response = request.GetResponse();
        StreamReader reader = new StreamReader(response.GetResponseStream());
        string tokenJsonString = reader.ReadToEnd();
        if (tokenJsonString != null)
        {
            JToken tokenJtoken = JObject.Parse(tokenJsonString);
            return (string)tokenJtoken.SelectToken("token");
        }
        else
        {
            return null;
        }
    }
    catch (WebException e)
    {
        using (WebResponse response = e.Response)
        {
            HttpWebResponse httpResponse = (HttpWebResponse)response;
            if (httpResponse != null)
            {
                using (Stream data = response.GetResponseStream())
                using (var reader = new StreamReader(data))
                {
                    ErrMessage = reader.ReadToEnd();
                }
            }
        }
        return null;
    }
}
import org.springframework.web.client.RestTemplate;

class TokenGeneration {

    private static final String API_URL = "https://www.saaspass.com/sd/rest";

    public String getAppToken() {
        String url = "%s/applications/%s/tokens?password=%s";
        url = String.format(url, API_URL, APP_API_KEY, APP_PASSWORD);
        RestTemplate restTemplate = new RestTemplate();
        return restTemplate.getForObject(url, TokenResponse.class).token;
    }

    private class TokenResponse {
        private String token;
        public String getToken() { return token; }
    }
import requests
from Constants import Constant
class ApplicationToken():
     appToken = None
     def get(self):
         return self.getToken() if self.appToken == None else self.appToken

     def getToken(self):
         url = '%s/applications/%s/tokens?password=%s' % (Constant.API_URL, Constant.APP_API_KEY, Constant.APP_PASSWORD)
         response = requests.get(url).json()['token']
         self.appToken = response
         return self.appToken

     def invalidate(self):
         self.appToken = None

appToken = ApplicationToken()
<?php
public function getApplicationToken(){
        $url = AppMethods::$mydomain."/".AppMethods::$apiKey . "/tokens?password=" . AppMethods::$apiPassword;
        return AppMethods::getToken($url);
   }


public function getToken($token_url){
    try{
        $ch  = curl_init();
        curl_setopt($ch,CURLOPT_URL,$token_url);
        curl_setopt($ch, CURLOPT_RETURNTRANSFER, true);
        $jsonresponse = curl_exec($ch);

        if(!$jsonresponse == null){
           $jdec = json_decode($jsonresponse);
           if(isset($jdec->{'token'}))
                return $jdec->{'token'};
           else{
                return $jsonresponse;
           }
        }
        else{
            return null;
        }
    }
    catch(Exception $e){
        echo $e->getMessage();
    }

    curl_close($ch);
}
>
Generate Company-Scope Token
public static string GetCompanyToken()
{
    string urlForCompanyToken = "https://www.saaspass.com/sd/rest/" + companyKey + "/tokens?companysecret=" + companySecret;
    return GetToken(urlForCompanyToken);
}
    public String getCompanyToken() {
        String url = "%s/%s/tokens?companysecret=%s";
        url = String.format(url, API_URL, COMPANY_KEY, COMPANY_SECRET);
        RestTemplate restTemplate = new RestTemplate();
        return restTemplate.getForObject(url, TokenResponse.class).token;
    }
}
import requests
from Constants import Constant
class CompanyToken():
     companyToken = None
     def get(self):
         return self.getToken() if self.companyToken == None else self.companyToken

     def getToken(self):
         url = '%s/%s/tokens?companysecret=%s' % (Constant.API_URL, Constant.COMPANY_KEY, Constant.COMPANY_PASSWORD)
         response = requests.get(url).json()['token']
         self.companyToken = response
         return self.companyToken

     def invalidate(self):
         self.companyToken = None

companyToken = CompanyToken()
<?php
public function getCompanyToken(){
        $url = AppMethods::$myDom ."/". AppMethods::$companyKey. "/tokens?companysecret=" . AppMethods::$companySecret;
        return AppMethods::getToken($url);
}


public function getToken($token_url){
    try{
        $ch  = curl_init();
        curl_setopt($ch,CURLOPT_URL,$token_url);
        curl_setopt($ch, CURLOPT_RETURNTRANSFER, true);
        $jsonresponse = curl_exec($ch);

        if(!$jsonresponse == null){
           $jdec = json_decode($jsonresponse);
           if(isset($jdec->{'token'}))
                return $jdec->{'token'};
           else{
                return $jsonresponse;
           }
        }
        else{
            return null;
        }
    }
    catch(Exception $e){
        echo $e->getMessage();
    }

    curl_close($ch);
}
>
To make a request to the SAASPASS HTTP API you need to authenticate it first. The authentication process works by obtaining a proper token first and then providing this token within your actual request. Later, you can use this token for all requests to our API till it is expired. Once it is expired, you need to obtain a new token.
There are two types of tokens in our API: company-scope and application-scope. If the service you are calling has company-scope, you need to provide a token of type company-scope. If the service you are calling has application-scope, you need to provide a token of type application-scope. (These scopes are explained here in the OVERVIEW)
Note: You cannot use a company-scope token to authenticate the call/request to an application-scope service or vice versa.
Ip Filtering
- Even each request is authenticated via token that’s based on your company/application credentials. For more security, it is recommended to define IP Filtering on your applications and/or company to ensure SAASPASS accepts requests from your servers only.
- If you want to have IP Filtering for 'application-scope' services, you can provide this filter on your application configuration page on the admin portal.
- If you want to have IP Filtering for 'company-scope' services, you can provide this filter on your Corporate Settings page on the admin portal.
- If you have IP Filtering, the client that you are calling services from must have a matched IP address. Otherwise you will receive INVALID_IP error. For more detail about error, see RESPONSES & ERROR HANDLING
Generate Application-scope Token
IMPORTANT NOTICE: Your API application key and password are important and very sensitive/private data. Please be very careful on how you handle them and who can see them. We recommend that only administrators and developers see these data.
To view your application's API key and password, go to the Developers Page in the SAASPASS Admin Portal, and you will find it on the left side (API KEY & PASSWORD).
Application-scope Token
| Service Name: | Generate Token (application-scope) |
| URL: | [GET] /applications/{application_api_key}/tokens |
| Description: | Generates application-scope token to be used while calling application-specific services. (Find list of these services: OVERVIEW) |
| Scope: | Your Application |
| Parameters: | application_key as URL parameter: Your application is represented with application_key as a parameter in the URL. |
| Password required An Application password that you can see on the API KEY & PASSWORD section on the left menu of the developer site in the SAASPASS Admin Portal. |
|
| Example Request: | https://www.saaspass.com/sd/rest/applications/00de4v5ocd9v338w/tokens?password=yourpassword |
| Where here the API KEY is '00de4v5ocd9v338w' andthe password is 'yourpassword'. | |
| Response: | If the provided credentials are correct you will get a JSON structure containing the token value. The returned token is valid for a limited time. Once the token expires, you need to re-authenticate. The JSON structure will look like so: |
json{"token":"HJKSDHADUIOEJLDHKJHSDKLJHSDUIQOUWEY"} |
|
| If the call to this resource is unsuccessful, you will get a non-200 HTTP status code relative to the type of error. For more on this topic see our RESPONSES & ERROR HANDLING |
Token Validity:
- A token expires in 1 hour.
- In any time, there can be only 10 active tokens per application. If you generate a new token for an application when you already have 10 active tokens, then our system will expire the oldest one.
Generate Company-scope Token
To view your company credentials, go to the Corporate Settings page in the SAASPASS Admin Portal.
Company-Scope Token
| Service Name: | Generate Token (company-scope) |
| URL: | [GET] /{company_key}/tokens |
| Description: | Generates company-scope token to be used while calling/requesting company-scope services. (Find list of these services: OVERVIEW) |
| Scope: | Your Application |
| Parameters: | company_key as URL parameter: Your company is represented with company_key as a parameter in the URL. Find your key on your admin portal under Corporate Settings>Company Credentials. |
| Password required An Application password that you can see on the API KEY & PASSWORD section on the left menu of the developer site in the SAASPASS Admin Portal. |
|
| Example Request: | https://www.saaspass.com/sd/rest/u45z33dfm0xff129ko/tokens?companysecret=09jdu277dsxff1290zz9021ffx0mfd21z54 |
| Where here the API KEY is '00de4v5ocd9v338w' andthe password is 'yourpassword'. | |
| Response: | Response: If the provided credentials are correct you will get a JSON structure containing the token value. The returned token is valid for limited time. Once the token expires, you need to re-authenticate. The JSON structure will look like so: { "token":"HJKSDHADUIOEJLDHKJHSDKLJHSDUIQOUWEY" }If the call to this resource is unsuccessful, you will get a non-200 HTTP status code relative to the type of error. For more on this topic see our RESPONSES & ERROR HANDLING |
Token Validity:
- A token expires in 1 hour.
- Same token can be used to call different services.
- Same token can be used 100 times. It expires after 100 usages.
Company Credentials
Company credentials are used for authenticating your company requests to SAASPASS HTTP API.
SAASPASS HTTP API provides a group of services which help you to manage your company accounts automatically. You can add, verify and delete a user account by calling SAASPASS API. Your requests will be proceed only if the call provides valid company credentials (company key and company secret).
Company Key
Unique identification value for your company in SAASPASS. This key is randomly generated when company credentials are first time generated by the admin.
It is used within the request calls to SAASPASS HTTP API for any of the company-scope services.
Company Secret
Value requested in the company-scope token generation. It can be regenerated any time. See Token Request section for more details.
Company IP Filtering
Even each request is authenticated via token that based on your company credentials, for more security, it is recommended to define IP Filtering on your company to ensure SAASPASS accepts requests from your servers only.
If you have IP Filtering, the client that you are calling services from must have matched IP address. Otherwise you will receive INVALID_IP error. For more detail about error, see RESPONSES & ERROR HANDLING
Edit Company IP Filtering by clicking on COMPANY CREDENTIALS button.
Application Credentials
Application credentials are used for authenticating your application requests to SAASPASS HTTP API.
SAASPASS HTTP API provides a group of services which you integrate with your application. Your users will be authenticated to log in or register in to your application. Your requests will be proceed only if the call provides valid application credentials (application key and/or application secret).
Application Key
Unique identification value for your application in SAASPASS. This key is randomly generated when application is added to your company.
It is used within the request calls to SAASPASS HTTP API for any of the application-scope services.
Application Password
Value requested in the application-scope token generation. It can be regenerated any time. See Token Request section for more details.
App Integration Services
One-Time Password
OTP Check Request
public static bool OTPCheck(string username, string otp, string apptoken)
{
    string urlForOtp = "https://www.saaspass.com/sd/rest/applications/" + apiKey + "/otpchecks?username=" + username + "&otp=" + otp + "&token=" + apptoken;
    return CheckResponse(urlForOtp);

}

public static bool CheckResponse(string url)
{
    try
    {
        WebRequest webRequest = WebRequest.Create(url);
        if (webRequest.GetResponse() != null)
        {
            HttpWebResponse response = (HttpWebResponse)webRequest.GetResponse();
            if (response.StatusCode == HttpStatusCode.OK)
            {
                if (response.GetResponseStream() != null)
                {
                    StreamReader reader = new StreamReader(response.GetResponseStream());
                    string jsonString = reader.ReadToEnd();
                    if (jsonString != null && !jsonString.Equals(""))
                    {
                        JToken tokenJtoken = JObject.Parse(jsonString);
                        ErrMessage = tokenJtoken.SelectToken("resultMessage") != null ? (string)tokenJtoken.SelectToken("resultMessage") : "";
                        ErrMessage += tokenJtoken.SelectToken("warning") != null ? " - " + (string)tokenJtoken.SelectToken("warning") : "";
                    }
                }
                return true;
            }
            else
                return false;
        }
        else
            return false;
    }
    catch (WebException e)
    {
        using (WebResponse response = e.Response)
        {
            HttpWebResponse httpResponse = (HttpWebResponse)response;
            if (httpResponse != null)
            {
                using (Stream data = response.GetResponseStream())
                using (var reader = new StreamReader(data))
                {
                    if (httpResponse.StatusCode.ToString()=="429")
                    {
                        ErrMessage = " X-Rate-Limit-Limit " + httpResponse.Headers["X-Rate-Limit-Limit"];
                        ErrMessage += " ### X-Rate-Limit-Remaining " + httpResponse.Headers["X-Rate-Limit-Remaining"];
                        ErrMessage += " ### X-Rate-Limit-Resets " + httpResponse.Headers["X-Rate-Limit-Resets"];
                    }
                    else
                        ErrMessage += reader.ReadToEnd();
                }
            }
        }
        return false;
    }
}
import org.springframework.http.ResponseEntity;
import org.springframework.web.client.RestTemplate;

class OneTimePassword {

    private static final String API_URL = "https://www.saaspass.com/sd/rest";

    public boolean otpCheck(String username, String otp) {
        String url = "%s/applications/%s/otpchecks?username=%s&otp=%s&token=%s";
        url = String.format(url, API_URL, APP_API_KEY, username, otp, getAppToken());
        ResponseEntity<?> r = call(url, OtpCheckResponse.class);
        return r.getStatusCode() == OK;
    }

    private <T> ResponseEntity<?> call(String url, Class<T> responseType) {

        RestTemplate restTemplate = new RestTemplate();
        restTemplate.setErrorHandler(new ResponseErrorHandler());

        try {
            return ResponseEntity.ok(restTemplate.getForObject(url, responseType));
        } catch (ApiException e) {
            return ResponseEntity.status(e.getStatusCode()).body(e.getErrorResponse());
        }
    }

    private class OtpCheckResponse {
    }
}
def login(self, username, otp):
   url = "%s/applications/%s/otpchecks?username=%s&otp=%s&token=%s" % (Constant.API_URL, Constant.APP_API_KEY, username, otp, self.appT.get())
   response = requests.get(url)
   if response.status_code == 'EXPIRED_TOKEN':
       self.appT.invalidate()
       appService.login(username,otp)
   else:
       response
   return response if response.status_code == 200 else response.json()


@app.route('/login', methods=['GET','POST'])
def Login():
   form = LoginForm(request.form)
   if request.method == 'POST' and form.validate_on_submit():
      result = appService.login(form.username.data, form.otp.data)
      flash(result)
   return render_template('login.html', title='Login', form=form)
<?php
public static function OTPCheck($user,$otp,$token){
       $url = $mydomain . $apiKey . "/otpchecks?username=" . $user . "&ot=" . $otp . "&token=" . $token;
       return AppMethods::CheckResponse($url);
   }

public function CheckResponse($token_url){
        try{
            $ch  = curl_init();
            curl_setopt($ch,CURLOPT_URL,$token_url);
            curl_setopt($ch, CURLOPT_RETURNTRANSFER, true);
            $data = json_decode(curl_exec($ch),true);
            $httpcode = curl_getinfo($ch, CURLINFO_HTTP_CODE);
            curl_close($ch);
           if($httpcode == '200'){

               return $httpcode;
           }
         else{
            return null;
            }
        }
        catch(Exception $e){
            echo $e->getMessage();
        }
}
>
Introduction
OTP Check services offers integration to log in by manual entry of user credentials.
SAASPASS mobile application offline generates dynamic one-time passwords. There is no need for an internet connection in order to generate a one-time password. This allows the user to log in to the application when the mobile application is offline so unavailable to use other online SAASPASS Services.
One-Time Password (Manual Login)
One-time password login service can be integrated in different ways:
- As Second factor authentication: User enters username, static password and SAASPASS One-time password. SAASPASS checks if one-time password is valid and application system checks static password. SAASPASS never checks static password managed by applications. Check [Working with static passwords] section for more details.
- As Only authentication system: User enters username and SAASPASS One-time password and SAASPASS verifies credentials. SAASPASS recommends this way of integration in order to really allow users to get rid of static passwords; and for admins to work with the easiest way of user management via SAASPASS portal.
To check One-time Password, application should proceed with a GET request to SAASPASS HTTP API.
OTP check request
| Service Name: | OTP Check |
| URL: | [GET] /applications/{application_API_key}/otpchecks |
| Description: | Checks if OTP is valid for the given username. |
| Scope: | Your Application |
| Parameters: | username: required Username of account which trying to log in. |
| otp: required The One-Time Password value to be checked. |
|
| token: required Obtained token to call a service. This token should be application-scope. |
|
| Token Requirement: | It requires application-scope token. Read Authentication section for more info |
| Example Request: | https://www.saaspass.com/sd/rest/applications/00de4v5ocd9v338w/otpchecks?username=john@myemail.com&otp=568214&token=HDFAIOANASDCJBKLHUFUIQWEJKUHSASD |
| Response: | If the call to this resource is successful you will get a 200 (OK) HTTP response. |
| If the call to this resource is unsuccessful, you will get a non-200 HTTP status code relative to the type of error. For more on this topic see our RESPONSES & ERROR HANDLING |
Working with static passwords (SAASPASS as a 2nd factor)
If SAASPASS will work as a 2nd factor together with static password; we highly recommend to check user static credentials (username + password) before calling the SAASPASS HTTP API as the easiest integration way.
In case the application will check static credentials after SAASPASS validation; you have to select "Static Password for user account is required" from "Application Settings".
By checking this option, SAASPASS is aware that application has to check static password after OTP check API call. On mobile app, under user account details page, user finds an input where to store his static password. In this way, application is able to integrate other online services like Scan Barcode or Proximity. For example, user will be able to scan the barcode and SAASPASS will send the static password within the login response without the need of user typing it.
One-Time Password Settings
A manual login form for an application can be reached by anyone. This means anyone may send a random login request with random values for username and passwords.
SAASPASS may be called and username may not be found within the user accounts assinged to that application from the SAASPASS administration portal.
Administrator decides how SAASPASS should respond to such requests. SAASPASS can directly block the login request or return a detailed error to the application; which will handle the login request by itself. This setting is offered depending on the username type. From 'Application Settings' decide what to do for:
- User accounts PENDING on verification but already assigned to the application.
- User accounts NOT assigned to the application but existing under your company in SAASPASS.
- User accounts NOT existing in SAASPASS.
For SECURITY reasons, SAASPASS always recommends (and offer by default) to reject any login request if the account is not active on SAASPASS and assigned to the application.
Scan Barcode
Scan Barcode Login (Instant Login)
///This block of code should be in Example.aspx, which page in the barcode.
protected void Page_Load(object sender, EventArgs e)
{
    try
    {
        Session["appToken"] = GetApplicationToken();
        if (Session["appToken"] != null && !Session["appToken"].Equals(""))
        {
            string session = HttpContext.Current.Session.SessionID;
            barcodeImageGrid.ImageUrl = GetBarcodeImage(Session["appToken"].ToString(), session,"IL");
            ClientAdapter.Instance.Join(session);
            Session["session"] = session;
       }
        else
        {
            Response.Write("Session Expired!");
        }
    }
    catch (Exception){}
}

///This block of code should be in InstantExample.aspx, which page's url is Instant Post URL .
protected void Page_Load(object sender, EventArgs e)
{
    Message message = new Message();
    message.reqSession = Request.Headers["session"];
    message.reqTracker = Request.Headers["tracker"];
    message.reqUsername = Request.Headers["username"];

    if (!TrackerIdValidation(message.reqUsername, message.reqTracker, GetApplicationToken()))
        return;
    else
    {
        if (!string.IsNullOrWhiteSpace(message.reqSession) && !string.IsNullOrEmpty(message.reqTracker) && !string.IsNullOrEmpty(message.reqUsername))
        {
            Session["username"] = message.reqUsername;
            ClientAdapter.Instance.SendMessage(message);
        }
    }
}

public static string GetBarcodeImage(string apptoken, string session, string type)
{
    string urlForBarcode = domain + "/rest/applications/" + apiKey + "/barcodes?type=" + type + "&session=" + session + "&token=" + apptoken;

    try
    {
        WebRequest reqForBarcode = WebRequest.Create(urlForBarcode);
        WebResponse resForBarcode = reqForBarcode.GetResponse();
        StreamReader readBarcode = new StreamReader(resForBarcode.GetResponseStream());
        string barcodeJsonString = readBarcode.ReadToEnd();

        if (!barcodeJsonString.Equals(""))
        {
            JToken barcodeJtoken = JObject.Parse(barcodeJsonString);
            if (barcodeJtoken.SelectToken("bluetoothcode") != null)
                return "saaspass://bluepass?" + (string)barcodeJtoken.SelectToken("bluetoothcode");
            else
                return "data:image/png;base64," + (string)barcodeJtoken.SelectToken("barcodeimage");
        }
        else
            return null;
    }
    catch (WebException e)
    {
        using (WebResponse response = e.Response)
        {
            HttpWebResponse httpResponse = (HttpWebResponse)response;
            if (httpResponse != null)
            {
                using (Stream data = response.GetResponseStream())
                using (var reader = new StreamReader(data))
                {
                    ErrMessage = reader.ReadToEnd();
                }
            }
        }
        return null;
    }
}
import org.springframework.http.ResponseEntity;
import org.springframework.web.client.RestTemplate;

class ScanBarcode {

    private static final String API_URL = "https://www.saaspass.com/sd/rest";

    public String barcodes(BarcodeType type, String session) {

        String url = "%s/applications/%s/barcodes?type=%s&session=%s&token=%s";
        url = String.format(url, API_URL, APP_API_KEY, type, session, getAppToken());

        ResponseEntity<?> r = call(url, BarcodeResponse.class);
        if (r.getStatusCode() != OK) return null;

        BarcodeResponse body = (BarcodeResponse) r.getBody();

        if (body.barcodeimage != null)
            return "data:image/png;base64," + body.barcodeimage;

        if (body.bluetoothcode != null)
            return "saaspass://bluepass?" + body.bluetoothcode;

        return null;
    }

    private <T> ResponseEntity<?> call(String url, Class<T> responseType) {

        RestTemplate restTemplate = new RestTemplate();
        restTemplate.setErrorHandler(new ResponseErrorHandler());

        try {
            return ResponseEntity.ok(restTemplate.getForObject(url, responseType));
        } catch (ApiException e) {
            return ResponseEntity.status(e.getStatusCode()).body(e.getErrorResponse());
        }
    }

    private enum BarcodeType {
        IL, IR, BT, ILIR, ILBT
    }

    private class BarcodeResponse {
        private String barcodeimage;
        private String bluetoothcode;

        public String getBarcodeimage() { return barcodeimage; }
        public String getBluetoothcode() { return bluetoothcode; }
    }
}
class InstantLogin {

    @Autowired
    private SimpMessagingTemplate simpMessagingTemplate;

    @RequestMapping(value = "/instant-login", method = POST)
    private ResponseEntity<?> instantLogin(@RequestHeader String username,
                                           @RequestHeader String session,
                                           @RequestHeader String tracker) {

        HttpStatus status = Tracker.validate(tracker, username);
        if (status != OK) return ResponseEntity.status(status).body(null);

        simpMessagingTemplate.convertAndSend("/topic/instant-login/" + session, username);
        return ResponseEntity.ok(null);
    }
}


// Include this Javascript Code in your login page
const socket = new SockJS(`${BACKEND_URL}/socket`);
const stompClient = Stomp.over(socket);

stompClient.connect({}, () => {
    stompClient.subscribe(
        `/topic/instant-login/${getSession()}`,
        () => window.location = '/'
    );
});
def getbarcodeimage(self, sessionId):
   type = "IL"
   BarcodeURL = "%s/applications/%s/barcodes?session=%s&token=%s&type=%s" % (Constant.API_URL, Constant.APP_API_KEY, sessionId, self.appT.get(), type)
   barcode_image = requests.get(BarcodeURL)
   response = barcode_image.json()['barcodeimage']
   if barcode_image.status_code == 'EXPIRED_TOKEN':
       self.appT.invalidate()
       self.trackerValidation(trackerid, username)
   else:
       response
   return response


def GetBarcode():
      sessionId = uuid.uuid4()
      session['uid'] = str(sessionId)
      result = appService.getbarcodeimage(sessionId)
      print("AAAA")
      return result
app.jinja_env.globals.update(scanbarcode=GetBarcode)

@app.route('/login-post-url', methods=['POST'])
def empty_view():
   sessionID = request.headers.get('session')
   username = request.headers.get('username')
   trackerID = request.headers.get('tracker')
   result = appService.trackerValidation(trackerID, username)
   if result == True :
      socketio.emit('message', {'result': 'OK'}, room=clients[sessionID])
   else: print("Tracker is invalid.")
   content = ""
   return content, status.HTTP_200_OK

@socketio.on('connect')
def connected():
   socket_id = request.sid
   clients[session['uid']] = socket_id

@socketio.on('disconnect')
def disconnected():
   del clients[session['uid']]

# Login.html

<script>
   $(function(){
     $("#barcodeImageGrid").attr('src' , "data:image/png;base64,{{ scanbarcode() }}");
   });
</script>

<script type="text/javascript" charset="utf-8">
var socket = io.connect('http://' + document.domain + ':' + location.port);
   socket.on('message', function( data) {
    console.log(data);
    if(data.result=='OK'){
       $(".alert-info").append('<strong>Login Successful.</strong>').show();
    }
   });
</script>
<?php
$_SESSION['barcode'] = AppMethods::getBarcode(session_id(),$_SESSION['Atoken'],'IL');


 public static function getBarcode($session,$token,$type){
        $url = AppMethods::$mydomain."/".AppMethods::$apiKey."/barcodes?type=$type&session=$session&token=$token";
        return AppMethods::AccManagment($url);
    }
public static function checkTrackerId($tracker,$user,$tokenm){
       $url = AppMethods::$mydomain."/".AppMethods::$apiKey."/trackers/$tracker?token=$tokenm&account=$user";
       return AppMethods::getHttpCode($url);
    }


    public function AccManagment($url){
        $ch  = curl_init($url);
        curl_setopt($ch, CURLOPT_RETURNTRANSFER, true);
        $data = json_decode(curl_exec($ch),true);
        $flag = curl_close($ch);
        if(isset($data['name'])){
        if($data['name'] == 'EXPIRED_TOKEN'){
            $_SESSION['Atoken'] = AppMethods::getApplicationToken();
            $_SESSION['Ctoken'] = AppMethods::getCompanyToken();
            AppMethods::AccManagment($url);
        }
    }
        return $data;
    }


if ($_SERVER['REQUEST_METHOD'] == "POST") {


         $headers = apache_request_headers();
             $username1=$headers['username'];
             $seassion=$headers['session'];
             $trackerID=$headers['tracker'];
         $sess = $seassion .'.json';

            $results = AppMethods::checkTrackerId($trackerID,$username1,$_SESSION['Atoken']);
                if($results==200){
                $jsonString = file_get_contents($sess);
                $data = json_decode($jsonString, true);
                $data[0]['user'] = "Logged in as $username1";

                foreach ($data as $key => $entry) {
                    if ($entry['user'] == 'false') {
                        $data[$key]['user'] = "Logged in as $username1";
                    }
                }
                $newJsonString = json_encode($data);
                file_put_contents($sess, $newJsonString);


                $_SESSION["Logged"] = "Logged in as $username1";
                http_response_code(200);
            }

}
if ($_SERVER['REQUEST_METHOD'] == "GET"){
   $id = session_id();
    $sess = "$id.json";
    if(file_exists($sess)){
        $jsonString = file_get_contents($sess);
        echo $jsonString;
    }

    else{
        echo "itemot e :$sess";
    }
}
>
Introduction
Scan Barcode allows users to login to services and websites that produce a SAASPASS readable encrypted barcode. By scanning a barcode, users login instantly to services or devices that support this format.
Scan Barcode is a simple and quick way to authenticate users to websites, applications and desktop computers with multi-factor authentication.
Scan Barcode Login (Instant Login)
The general process of Scan Barcode is as follows:
Select Scan Barcode as a service from Application Settings. Submit the Instant Login Post URL.
On the login page of your application , embed a session-specific barcode generated by SAASPASS and identified with a session ID. To get this barcode send a REST HTTP GET request to applications/{application_API_key}/barcodes. Check Get barcode request for full details.
When a user scans your application’s Instant Login barcode with its SAASPASS Mobile App, a login request is sent from the user device to SAASPASS servers for authentication. If the authentication is successful SAASPASS will send a POST request to the Login Post URL with session, username and tracker data in the request headers.
In order to be sure that the POST request received on the Instant Login Post URL is really from SAASPASS, check the received tracker value. For that, send a request to applications/{application_API_key}/trackers/{received_tracker_value}. Check TrackerID Validation section for full details.
Once the tracker has been validated, with session and username data, your application should make a reverse AJAX call to the user with the session and log him in. Check Reverse Ajax Implementation section for full details.
Get Barcode Request
| Service Name: | Scan Barcode Login |
| URL: | [GET] /applications/{application_API_key}/barcodes |
| Description: | It generates a barcode for your application to be displayed on the login page. |
| Scope: | Your Application |
| Parameters: | session: required The Session ID for the session that should be logged in. |
| token: required The pre-obtained token to call a service. This token should be application-scope and not expired. |
|
| type: required Specifies the type of barcode to get and use. In order to generate an Instant Login barcode, set this parameter to "IL". |
|
| Token Requirement: | It requires an application-scope token. Read the Authentication section for more info |
| Example Request: | https://www.saaspass.com/sd/rest/applications/00de4v5ocd9v338w/barcodes?session=09EEEF760B0F77B6DB7F7124DC712704\&token=HDFAIOANASDCJBKLHUFUIQWEJKUHSASD&type=IL |
| Response: | If the call to this resource is successful you will get a 200 (OK) HTTP response and a JSON structure containing an encoded barcode. Response that SAASPASS returns has detailed information within below JSON structure: |
{"barcodeimage":"iVBORw0KGgoAAAANSUhEUgAAASwAAAEsCAIAAAD2HxkiAAAJLklEQVR42u3dUXKcyhJFUc1/0n5TuHrkzirBOp8dihYUucrBAds//0TkaH4sgQiEIhCKCIQiEIoIhCIQigiEIhCKCIQiEIoIhCIQigiEIhCKCIQiEIoIhCIQigiEIhCKCIQiEIoIhCIQigiEIhCKyOUIf4I8OYbi86lzr9d2an2eHM9vv/+3P/NfftepO…."} |
|
| barcodeimage (String): Contains Base64 encoded value of the .png barcode.. | |
| To integrate the barcode with your application, add an image HTML tag with the "barcodeimage" value like this: |
|
<img id="barcodeImageGrid" src="data:image/png;base64,iVBORw0KGgoAAAANSUhE...."/> |
|
| If the call to this resource is unsuccessful, you will get a non-200 HTTP status code relative to the type of error. For more on this topic see our RESPONSES & ERROR HANDLING |
Proximity
Proximity Login (Instant Login)
string bluetoothImageBT =GetBarcodeImage(Session["appToken"].ToString(), HttpContext.Current.Session.SessionID, "BT");
ltlProximity.Text = "<iframe name='we' id='12'  frameborder='no' scrolling='auto' height='200px' width='100%' src='"+ bluetoothImage + "' style='left:0; background-color:#B8B8B8;visibility: hidden;'></iframe>";

string bluetoothImageILBT =GetBarcodeImage(Session["appToken"].ToString(), HttpContext.Current.Session.SessionID, "ILBT");
ltlProximity2.Text = "<iframe name='we' id='13'  frameborder='no' scrolling='auto' height='200px' width='100%' src='"+ bluetoothImage + "' style='left:0; background-color:#B8B8B8;visibility: hidden;'></iframe>";


public static string GetBarcodeImage(string apptoken, string session, string type)
{
    string urlForBarcode = domain + "/rest/applications/" + apiKey + "/barcodes?type=" + type + "&session=" + session + "&token=" + apptoken;

    try
    {
        WebRequest reqForBarcode = WebRequest.Create(urlForBarcode);
        WebResponse resForBarcode = reqForBarcode.GetResponse();
        StreamReader readBarcode = new StreamReader(resForBarcode.GetResponseStream());
        string barcodeJsonString = readBarcode.ReadToEnd();

        if (!barcodeJsonString.Equals(""))
        {
            JToken barcodeJtoken = JObject.Parse(barcodeJsonString);
            if (barcodeJtoken.SelectToken("bluetoothcode") != null)
                return "saaspass://bluepass?" + (string)barcodeJtoken.SelectToken("bluetoothcode");
            else
                return "data:image/png;base64," + (string)barcodeJtoken.SelectToken("barcodeimage");
        }
        else
            return null;
    }
    catch (WebException e)
    {
        using (WebResponse response = e.Response)
        {
            HttpWebResponse httpResponse = (HttpWebResponse)response;
            if (httpResponse != null)
            {
                using (Stream data = response.GetResponseStream())
                using (var reader = new StreamReader(data))
                {
                    ErrMessage = reader.ReadToEnd();
                }
            }
        }
        return null;
    }
}
String bluetoothcode = ScanBarcode.barcodes(BarcodeType.BT, session);


<!-- include this snippet in your login page -->
<iframe src="${bluetoothcode}"
        style="display: none;">
</iframe>
Introduction
Proximity combines multi-factor authentication with location-based iBeacon Bluetooth Low Energy (BLE) technology to let users authenticate via their mobile device's proximity to their computer. Proximity authenticates users to websites and applications with this service integrated.
Users can pair, unpair and manage devices with their SAASPASS mobile app. Proximity-based authentication uses the Bluetooth low-energy format so SAASPASS Proximity is extremely battery efficient.
Proximity works on Bluetooth-capable devices. Most Apple devices (iPhone 4S onwards) and the latest Apple Macs support BLE and the list of supported platforms is increasing every day. Most of the latest Android devices support Proximty as well.
Proximity Login (Instant Login)
The general process of Proximity is as follows:
Select Proximity as a service from Application Settings. Submit the Instant Login Post URL.
On the login page of your application , embed a session-specific Proximity code generated by SAASPASS and identified with a session ID. To get this code send a REST HTTP GET request to applications/{application_API_key}/barcodes. Check Get barcode request for full details.
When a user’s device bluetooth senses the proximity code embedded in your application, a login request is sent from the user device to SAASPASS servers for authentication. If the authentication is successful SAASPASS will send a POST request to the Login Post URL with session, username and tracker data in the request headers.
In order to be sure that the POST request received on the Instant Login Post URL is really from SAASPASS, check the received tracker value. For that, send a request to applications/{application_API_key}/trackers/{received_tracker_value}. Check TrackerID Validation section for full details.
Once the tracker has been validated, with s ession and username data, your application should make a reverse AJAX call to the user with the session and log him in. Check Reverse Ajax Implementation section for full details.
Get Barcode Request
| Service Name: | Proximity Login |
| URL: | [GET] /applications/{application_API_key}/barcodes |
| Description: | It generates a Proximity code for your application to be displayed on the login page. |
| Scope: | Your Application |
| Parameters: | session: required The Session ID for the session that should be logged in. |
| token: required The pre-obtained token to call a service. This token should be application-scope and not expired. |
|
| type: required Specifies the type of barcode to get and use. In order to generate a Proximity Login code, set this parameter to "BL". |
|
| Token Requirement: | This API call allows for the possibility of a combined response (for Scan Barcode login and Proximity bluetooth code at once). To get this response, set this parameter to “ILBT�. It requires an application-scope token. Read the Authentication section for more info |
| Example Request: | Proximity bluetooth barcode ‘BT’: |
https://www.saaspass.com/sd/rest/applications/00de4v5ocd9v338w/barcodes?session=09EEEF760B0F77B6DB7F7124DC712704&token=HDFAIOANASDCJBKLHUFUIQWEJKUHSASD&type=BT |
|
| Instant Login + Proximity Bluetooth barcode ‘ILBT’ | |
https://www.saaspass.com/sd/rest/applications/00de4v5ocd9v338w/barcodes?session=09EEEF760B0F77B6DB7F7124DC712704&token=HDFAIOANASDCJBKLHUFUIQWEJKUHSASD&type=ILBT |
|
| Response: | If the call to this resource is successful you will get a 200 (OK) HTTP response and a JSON structure containing a Proximity barcode. Response that SAASPASS returns has detailed information within below JSON structure: |
{"bluetoothcode":"iVBORw0KGgoAAAANSUhEUgAAASwAAAEsCAIAAAD2HxkiAAAJyUlEQVR42u3aUbLbOAxFQe9/05ktzCvhgLTc+HQlCkWimdIlP/+UUkfrYwqUglApCJVSECoFoVIKQqUgVEpBqBSESikIlYJQKQWhUhAqpSBUCkKlFI..."} |
|
| bluetoothcode (String): Contains Base64 encoded value of the Proximity barcode.. | |
| If the call to this resource is unsuccessful, you will get a non-200 HTTP status code relative to the type of error. For more on this topic see our RESPONSES & ERROR HANDLING |
Push Login
Push Login
import static app.error.RestErrorEnum.EXPIRED_TOKEN;

class PushLoginController extends ApiController {

    private static final Logger log = LoggerFactory.getLogger(PushLoginController.class);

    @Value("${saaspass.api.url}")
    private String spApiUrl;

    @Value("${saaspass.app.key}")
    private String spAppKey;

    @Autowired
    private ApplicationTokenService tokenService;

    @Autowired
    private RestTemplate restTemplate;

    @PostMapping("/push-login")
    private ResponseEntity<?> pushLogin(@RequestBody PushLoginRequest request) {
        return execute(request);
    }

    private ResponseEntity<?> execute(PushLoginRequest request) {

        ResponseEntity<?> r = execute(request, tokenService.getValue());

        if (r.getStatusCode() == FORBIDDEN) {
            ErrorResponse error = (ErrorResponse) r.getBody();
            if (error != null && error.getName() == EXPIRED_TOKEN) {
                r = execute(request, tokenService.getNewValue());
            }
        }

        return r;
    }

    private ResponseEntity<?> execute(PushLoginRequest request, String token) {

        try {
            String url = url(request, token);
            PushLoginResponse data = restTemplate.getForObject(url, PushLoginResponse.class);
            return ResponseEntity.ok(data);
        } catch (RestApiException e) {
            return ResponseEntity.status(e.getStatusCode())
                .body(e.getErrorResponse());
        }
    }

    private String url(PushLoginRequest request, String token) {

        String url = String.format(
            "%s/applications/%s/push?username=%s&session=%s&token=%s",
            spApiUrl,
            spAppKey,
            request.getUsername(),
            request.getSession(),
            token
        );

        log.info(url);

        return url;
    }
}
        public static bool PushLogin(string username, string session, string appToken)
        {
            string urlForPushLogin = domain + "/rest/applications/" + apiKey + "/push?username=" + username + "&session=" +session+ "&token=" + appToken;
            return CheckResponse(urlForPushLogin);
        }


        protected void pushLoginButton_Click(object sender, EventArgs e)
        {
            if (!username.Text.Equals(""))
            {
                try
                {
                    if (Session["appToken"] == null)
                    {
                        Session["appToken"] = AppMethods.GetApplicationToken();
                    }
                    else
                    {
                        string session = HttpContext.Current.Session.SessionID;
                        bool pushLogin = AppMethods.PushLogin(username.Text, Session["session"].ToString(), Session["appToken"].ToString());
                        if (pushLogin)
                        {
                            Session["username"] = username.Text.ToString();
                            ClientAdapter.Instance.Join(session);
                            Session["session"] = session;
                        }
                    }

                }
                catch (Exception) { }
            }
        }


public static bool CheckResponse(string url)
{
    try
    {
        WebRequest webRequest = WebRequest.Create(url);
        if (webRequest.GetResponse() != null)
        {
            HttpWebResponse response = (HttpWebResponse)webRequest.GetResponse();
            if (response.StatusCode == HttpStatusCode.OK)
            {
                if (response.GetResponseStream() != null)
                {
                    StreamReader reader = new StreamReader(response.GetResponseStream());
                    string jsonString = reader.ReadToEnd();
                    if (jsonString != null && !jsonString.Equals(""))
                    {
                        JToken tokenJtoken = JObject.Parse(jsonString);
                        ErrMessage = tokenJtoken.SelectToken("resultMessage") != null ? (string)tokenJtoken.SelectToken("resultMessage") : "";
                        ErrMessage += tokenJtoken.SelectToken("warning") != null ? " - " + (string)tokenJtoken.SelectToken("warning") : "";
                    }
                }
                return true;
            }
            else
                return false;
        }
        else
            return false;
    }
    catch (WebException e)
    {
        using (WebResponse response = e.Response)
        {
            HttpWebResponse httpResponse = (HttpWebResponse)response;
            if (httpResponse != null)
            {
                using (Stream data = response.GetResponseStream())
                using (var reader = new StreamReader(data))
                {
                    if (httpResponse.StatusCode.ToString()=="429")
                    {
                        ErrMessage = " X-Rate-Limit-Limit " + httpResponse.Headers["X-Rate-Limit-Limit"];
                        ErrMessage += " ### X-Rate-Limit-Remaining " + httpResponse.Headers["X-Rate-Limit-Remaining"];
                        ErrMessage += " ### X-Rate-Limit-Resets " + httpResponse.Headers["X-Rate-Limit-Resets"];
                    }
                    else
                        ErrMessage += reader.ReadToEnd();
                }
            }
        }
        return false;
    }
}
```csharp


##Single Sign-On

> Get SSO Login Request


```java
import static app.error.RestErrorEnum.EXPIRED_TOKEN;

class PushLoginController extends ApiController {

    private static final Logger log = LoggerFactory.getLogger(PushLoginController.class);

    @Value("${saaspass.api.url}")
    private String spApiUrl;

    @Value("${saaspass.app.key}")
    private String spAppKey;

    @Autowired
    private ApplicationTokenService tokenService;

    @Autowired
    private RestTemplate restTemplate;

    @PostMapping("/push-login")
    private ResponseEntity<?> pushLogin(@RequestBody PushLoginRequest request) {
        return execute(request);
    }

    private ResponseEntity<?> execute(PushLoginRequest request) {

        ResponseEntity<?> r = execute(request, tokenService.getValue());

        if (r.getStatusCode() == FORBIDDEN) {
            ErrorResponse error = (ErrorResponse) r.getBody();
            if (error != null && error.getName() == EXPIRED_TOKEN) {
                r = execute(request, tokenService.getNewValue());
            }
        }

        return r;
    }

    private ResponseEntity<?> execute(PushLoginRequest request, String token) {

        try {
            String url = url(request, token);
            PushLoginResponse data = restTemplate.getForObject(url, PushLoginResponse.class);
            return ResponseEntity.ok(data);
        } catch (RestApiException e) {
            return ResponseEntity.status(e.getStatusCode())
                .body(e.getErrorResponse());
        }
    }

    private String url(PushLoginRequest request, String token) {

        String url = String.format(
            "%s/applications/%s/push?username=%s&session=%s&token=%s",
            spApiUrl,
            spAppKey,
            request.getUsername(),
            request.getSession(),
            token
        );

        log.info(url);

        return url;
    }
}
<?php
public static function PushLogin($username,$ses,$token){
        $url = AppMethods::$mydomain."/".AppMethods::$apiKey."/push?username=$username&session=$ses&token=$token";
        return AppMethods::getHttpCode($url);
    }


public function getHttpCode($url){
        $ch = curl_init($url);
        curl_setopt($ch, CURLOPT_RETURNTRANSFER, true);
        $data = json_decode(curl_exec($ch),true);
        $httpcode = curl_getinfo($ch, CURLINFO_HTTP_CODE);
        curl_close($ch);
        return $httpcode;
    }


if(isset($_GET['pushLogin'])){
        $_SESSION['error'] = AppMethods::PushLogin($_GET['username'],session_id(),$_SESSION['Atoken']);
    }
>
Introduction
Push Login allows users to login to services and websites by Push Notification on their mobile device. By Push Login, users login instantly to services or devices that support this format.
SAASPASS Push Login is a simple and quick way to authenticate users to websites, applications and desktop computers with multi-factor authentication.
Push login (Instant login)
The general process of Push Login is as follows:
Select Push Login as a service from Application Settings. Submit the Instant Login Post URL (Scan Barcode, Proximiy and Push Login use the same URL).
On the login page of your application, embed a Push Login button which allows to send the Login Push Notification to the user. To get this Push Login functionality send a REST HTTP GET request to applications/{application_API_key}/push. Check Get Push Login Request for full details.
When a user accepts the push notification from its SAASPASS Mobile App, a login request is sent from the user device to SAASPASS servers for authentication. If the authentication is successful SAASPASS will send a POST request to the Instant Login Post URL with session, username and tracker data in the request headers.
In order to be sure that the POST request received on the Instant Login Post URL is really from SAASPASS, check the received tracker value. For that, send a request to applications/{application_API_key}/trackers/{received_tracker_value}. Check TrackerID Validation section for full details.
Once the tracker has been validated, with session and username data, your application should make a reverse AJAX call to the user with the session and log him in. Check Reverse Ajax Implementation section for full details.
Get Push Login Request
| Service Name: | Push Login |
| URL: | [GET] /applications/{application_API_key}/push |
| Description: | It generates a Proximity code for your application to be displayed on the login page. |
| Scope: | Your Application |
| Parameters: | username: required Username of account which is trying to log in. |
| token: required The pre-obtained token to call a service. This token should be application-scope and not expired. |
|
| session: required The Session ID for the session that should be logged in. |
|
| Example Request: | https://www.saaspass.com/sd/rest/applications/N09R2JRJHX91H091/push?username=john@myemail.com&session=09EEEF760B0F77B6DB7F7124DC712704&token=HDFAIOANASDCJBKLHUFUIQWEJKUHSASD |
| Response: | If the call to this resource is successful you will get a 200 (OK) HTTP response. |
Single Sign-On
Get SSO Login Request
class SingleSignOn {

    @RequestMapping(value = "/sso", method = GET)
    private ResponseEntity<?> sso(TrackerRequest request) {

        HttpStatus status = Tracker.validate(request.getTracker(), request.getAccount());

        if (status != OK) {
            // ... redirect to error page ...
            return r;
        }

        // ... sign the `account` in, and redirect ...

        return ResponseEntity.ok();
    }

    private class TrackerRequest {
        private String tracker;
        private String account;
        // ... getters and setters ...
    }
}
string tracker = Request.QueryString["tracker"];
string username = Request.QueryString["account"];
if (username!=null && !username.Equals(""))
{
    if (TrackerIdValidation(username, tracker, GetApplicationToken()))
    {
        Session["username"] = username;
        Response.Redirect("/Default.aspx");

    }
    else
    {
        Response.Write("tracker data or account information cannot get.");
    }
}


public static bool TrackerIdValidation(string username, string trackers, string appToken)
{
    string urlForTracker = "https://www.saaspass.com/sd/rest/applications/" + apiKey + "/trackers/" + trackers + "?token=" + appToken + "&account=" + username;
    return CheckResponse(urlForTracker);
}


public static bool CheckResponse(string url)
{
    try
    {
        WebRequest webRequest = WebRequest.Create(url);
        if (webRequest.GetResponse() != null)
        {
            HttpWebResponse response = (HttpWebResponse)webRequest.GetResponse();
            if (response.StatusCode == HttpStatusCode.OK)
            {
                if (response.GetResponseStream() != null)
                {
                    StreamReader reader = new StreamReader(response.GetResponseStream());
                    string jsonString = reader.ReadToEnd();
                    if (jsonString != null && !jsonString.Equals(""))
                    {
                        JToken tokenJtoken = JObject.Parse(jsonString);
                        ErrMessage = tokenJtoken.SelectToken("resultMessage") != null ? (string)tokenJtoken.SelectToken("resultMessage") : "";
                        ErrMessage += tokenJtoken.SelectToken("warning") != null ? " - " + (string)tokenJtoken.SelectToken("warning") : "";
                    }
                }
                return true;
            }
            else
                return false;
        }
        else
            return false;
    }
    catch (WebException e)
    {
        using (WebResponse response = e.Response)
        {
            HttpWebResponse httpResponse = (HttpWebResponse)response;
            if (httpResponse != null)
            {
                using (Stream data = response.GetResponseStream())
                using (var reader = new StreamReader(data))
                {
                    if (httpResponse.StatusCode.ToString()=="429")
                    {
                        ErrMessage = " X-Rate-Limit-Limit " + httpResponse.Headers["X-Rate-Limit-Limit"];
                        ErrMessage += " ### X-Rate-Limit-Remaining " + httpResponse.Headers["X-Rate-Limit-Remaining"];
                        ErrMessage += " ### X-Rate-Limit-Resets " + httpResponse.Headers["X-Rate-Limit-Resets"];
                    }
                    else
                        ErrMessage += reader.ReadToEnd();
                }
            }
        }
        return false;
    }
}
Introduction
SAASPASS Single Sign-on (SSO) provides two-factor authentication for multiple applications at once. SAASPASS Single Sign-on internally stores and translates multiple authentication processes on behalf of a user for a simple and seamless login.
SAASPASS Single Sign-On is great for users because it minimizes the need to memorize passwords and eliminates time spent entering login credentials. SAASPASS SSO is more secure because passwords are less likely to be written down or shared and is always activated with the easiest to use two-step verification.
SAASPASS Single Sign-On is great for enterprises because it reduces costly password reset and IT help desk time waste related to authentication. Since employees typically use multiple applications at work, SSO creates a one-step launch for many computers. You can also log in from the mobile device and tablets using SSO with two-factor authentication using On Device Login.
Single Sign-On (SSO)
The general process of Single Sign-on is as follows:
Select Single Sign-on as a service from Application Settings. Submit the SSO GET URL.
SSO GET URL receives a GET request from SAASPASS containing a tracker value and a user account for a user logging in to your application. At this point, the user has already been successfully authenticated by SAASPASS.
In order to be sure that the GET request received is really from SAASPASS, check the received tracker value. For that, send a request to applications/{application_API_key}/trackers/{received_tracker_value}. Check TrackerID Validation section for full details.
Get SSO Login request
| Service Name: | Single Sign-on |
| Description: | It sends a login request to application for a user account already authenticated by SAASPASS. |
| Scope: | Your Application |
| Parameters: | account: User account for which the tracker was issued. |
| tracker: Obtained token to call a service. This token should be application-scope. |
|
| Token Requirement: | This API call allows for the possibility of a combined response (for Scan Barcode login and Proximity bluetooth code at once). To get this response, set this parameter to “ILBT�. It requires an application-scope token. Read the Authentication section for more info |
| Example GET Request: | https://myapplication.com/sso?tracker=b4097ed670833a83&account=john.s@myapplication.com |
Custom Push Approval
Introduction
Aside login services, Push Approval method can be used to add SAASPASS MFA authentication security to any critical operation such as transactions in your integrated applications. While executing an operation in your application that is integerated to SAASPASS, you can initiate Push Approval request to be sent to user's mobile phone and get the response of user to decide completing the operation or not. Push Login and Push Approval methods can be used in same integrated applications and they are configured in SAASPASS Admin portal.
Sending Push Approval Request
When user attempts to initate a critical operation in your application (i.e. a transaction), you can request Push Approval to be initated by SAASPASS. This request contains custom message that will be displayed on the Push message in user's SAASPASS mobile application. SAASPASS sends Push Approval request to be user's phone and displays Approve-Reject options. The response is sent back to your application on Push Approval Post URL that is configured in your application under SAASPASS Admin portal.
Custom Push Approval Request
| Service Name: | Push Approval |
| URL: | [POST] /applications/{application_API_key}/pushapproval |
| Description: | It initiates Pust Approval for your application's critical operations before performing |
| Scope: | Your Application |
| Parameters: | username: required Username of account which is trying to perform the operation. |
| token: required The pre-obtained token to call a service. This token should be application-scope and not expired. |
|
| session: required The Session ID for the session that should be logged in. |
|
| Body (JSON): | Parameter: 'custom_push_content': required |
| Example body content: {"custom_push_content": "You are about to send 500$ to the account with number 12334913. Do you approve?"} | |
| Example Request: | https://www.saaspass.com/sd/rest/applications/N09R2JRJHX91H091/pushapproval?username=john@myemail.com&session=09EEEF760B0F77B6DB7F7124DC712704&token=HDFAIOANASDCJBKLHUFUIQWEJKUHSASD |
| Response: | If the call to this resource is successful you will get a 200 (OK) HTTP response. |
Posting User's Response
When user accepts the push approval from its SAASPASS Mobile App, this response is sent from the user device to SAASPASS servers for authentication. If the authentication is successful SAASPASS will send a POST request to the Push Approval Post URL with session, username and tracker data in the request headers.
Instant Registration
Instant Registration
///This block of code should be in ExampleRegistration.aspx, which page in the barcode.
protected void getRegistrationBarcode_Click(object sender, EventArgs e)
{
    if (Session["appToken"] != null && !Session["appToken"].Equals(""))
    {
        registerBarcode.ImageUrl = null;
        string session = HttpContext.Current.Session.SessionID;
        registerBarcode.ImageUrl = AppMethods.GetBarcodeImage(Session["appToken"].ToString(), session, "IR");
        ClientAdapter.Instance.Join(session);
        Session["sessionIR"] = session;
    }
    else
    {
        Response.Write("Session Expired!");
        Response.Redirect("/Login.aspx");
    }
}

protected void getRegistrationAndLoginBarcode_Click(object sender, EventArgs e)
{
    if (Session["appToken"] != null && !Session["appToken"].Equals(""))
    {
        registerBarcode.ImageUrl = null;
        string session = HttpContext.Current.Session.SessionID;
        registerBarcode.ImageUrl = AppMethods.GetBarcodeImage(Session["appToken"].ToString(), session, "ILIR");
        ClientAdapter.Instance.Join(session);
        Session["sessionIR"] = session;
    }
    else
    {
        Response.Write("Session Expired!");
        Response.Redirect("/Login.aspx");
    }
}


///This block of code should be in ExampleInstantRegistration.aspx, which page's url is Instant Post URL .
public static string GetBarcodeImage(string apptoken, string session, string type)
{
    string urlForBarcode = domain + "/rest/applications/" + apiKey + "/barcodes?type=" + type + "&session=" + session + "&token=" + apptoken;

    try
    {
        WebRequest reqForBarcode = WebRequest.Create(urlForBarcode);
        WebResponse resForBarcode = reqForBarcode.GetResponse();
        StreamReader readBarcode = new StreamReader(resForBarcode.GetResponseStream());
        string barcodeJsonString = readBarcode.ReadToEnd();

        if (!barcodeJsonString.Equals(""))
        {
            JToken barcodeJtoken = JObject.Parse(barcodeJsonString);
            if (barcodeJtoken.SelectToken("bluetoothcode") != null)
                return "saaspass://bluepass?" + (string)barcodeJtoken.SelectToken("bluetoothcode");
            else
                return "data:image/png;base64," + (string)barcodeJtoken.SelectToken("barcodeimage");
        }
        else
            return null;
    }
    catch (WebException e)
    {
        using (WebResponse response = e.Response)
        {
            HttpWebResponse httpResponse = (HttpWebResponse)response;
            if (httpResponse != null)
            {
                using (Stream data = response.GetResponseStream())
                using (var reader = new StreamReader(data))
                {
                    ErrMessage = reader.ReadToEnd();
                }
            }
        }
        return null;
    }
}
class InstantRegister {

    @Autowired
    private SimpMessagingTemplate simpMessagingTemplate;

    @RequestMapping(value = "/instant-registration", method = POST)
    private ResponseEntity<?> instantRegister(@RequestHeader String username,
                                              @RequestHeader String session,
                                              @RequestHeader String tracker) {

        HttpStatus status = Tracker.validate(tracker, username);
        if (status != OK) return ResponseEntity.status(status).body(null);

        simpMessagingTemplate.convertAndSend("/topic/instant-registration/" + session, username);
        return ResponseEntity.ok(null);
    }
}

// Include this Javascript Code in your login page
const socket = new SockJS(`${BACKEND_URL}/socket`);
const stompClient = Stomp.over(socket);

stompClient.connect({}, () => {
    stompClient.subscribe(
        `/topic/instant-registration/${getSession()}`,
        () => window.location = '/'
    );
});
The general process of Instant Registration is as follows:
Select Instant Registration as a service from Application Settings. Submit the Instant Registration Post URL.
On the login page of your application , embed a session-specific barcode generated by SAASPASS and identified with a session ID. To get this barcode send a REST HTTP GET request to applications/{application_API_key}/barcodes. Check [Get barcode request] for full details.
When a user scans your application’s Instant Registration barcode with its SAASPASS Mobile App, a login request is sent from the user device to SAASPASS servers for authentication and registration. If they are successful SAASPASS will send a POST request to the Instant Registration Post URL with session, username and tracker data in the request headers.
In order to be sure that the POST request received on the Instant Registration Post URL is really from SAASPASS, check the received tracker value. For that, send a request to applications/{application_API_key}/trackers/{received_tracker_value}. Check TrackerID Validation section for full details.
Once the tracker has been validated, with session and username data, your application should make a reverse AJAX call to the user with the session, register and log him in (if your app log the users in right after registration). Check Reverse Ajax Implementation section for full details.
Get barcode request
| Service Name: | Instant Registration |
| URL: | [GET] /applications/{application_API_key}/barcodes |
| Description: | It generates a barcode for your application to be displayed on the registration/login page. |
| Scope: | Your Application |
| Parameters: | session: required The Session ID for the session that should be logged in. |
| token: required Obtained token to call a service. This token should be application-scope. |
|
| type: required Specifies the type of barcode to get and use. In order to generate an Instant Registration barcode, set this parameter to "IR". This API call allows for the possibility of a combined response (for Scan Barcode login and Instant Registration at once). To get this response, set this paramter to “ILIR�. |
|
| Token Requirement: | It requires application-scope token. Read Authentication section for more info |
| Example Request: | Instant Regisatration barcode ‘IR’:https://www.saaspass.com/sd/rest/applications/00de4v5ocd9v338w/barcodes?session=09EEEF760B0F77B6DB7F7124DC712704&token=HDFAIOANASDCJBKLHUFUIQWEJKUHSASD&type=IRInstant Login + Instant Registration barcode ‘ILIR’ https://www.saaspass.com/sd/rest/applications/00de4v5ocd9v338w/barcodes?session=09EEEF760B0F77B6DB7F7124DC712704&token=HDFAIOANASDCJBKLHUFUIQWEJKUHSASD&type=ILIR |
| Response: | If the call to this resource is successful you will get a 200 (OK) HTTP response and a JSON structure containing a Registration barcode. Response that SAASPASS returns has detailed information within below JSON structure: |
{"barcodeimage":"L+RyFZroMiQim/Sc+C4XuHU8DnabV1XxYhK1INk+4TEaPoJfFXiz54bspo5cu2iespNNRK4c9owkmwL5abgt3gI6w6d651NGMLmuXoduQia/OvARrPgXPONC77Vc/vWdannUybJtPzEfl1z3C8mYVpARm4JX..."}barcodeimage (String): Contains Base64 encoded value of the Registration barcode. |
|
| If the call to this resource is unsuccessful, you will get a non-200 HTTP status code relative to the type of error. For more on this topic see our RESPONSES & ERROR HANDLING |
Access Control Policies
Access Control Policies provide option to developers to add specific restrictions to their applications during access requests by users. You can restrict access to your applications by access time, location and device types. To apply a policy to any application, first you need to access SAASPASS Admin Portal and navigate to Custom MFA Application section. Open your application's management page and click Access Control Policy tab. In the access controy policy list, choose a policy that you want to assign. Here you can navigate to Access Control Policies page to view the policy, edit or create another one for your application specifically. If the policy you choose has access restrictions by location or browser of users, then SAASPASS needs to get an additional information during OTP check, barcode generation and push requests from your MFA application. In such requests which explained in above sections, you can send this information about user to SAASPASS by providing them in below headers: 'user-real-ip': User is accessing your MFA application's backend server via some channels and your app server can obtain user's IP during the access. You can provide the IP in this header while you call SAASPASS for OTP check or generating barcode or requesting Push login. This information is used to check user's location against the access policy that is assigned to your application 'user-agent': Similarly, your app server can get user agent information of user's browser during the access. You can provide the user agent in this header while you call SAASPASS for OTP check or generating barcode or requesting Push login.
Mobile Application Login
Introduction
Mobile application login integration allows users of your native mobile apps to log in using SAASPASS mobile app as a user authentication key.
With this service integrated, the user is able to log in to the custom mobile application by 2 different ways:
- Clicking on 'Login with SAASPASS' Button from the custom mobile application login form.
- Clicking on 'Open on Mobile app' button from within the SAASPASS mobile application.
If custom application works with a backend server, current manual login form can still be kept and remain fully functional.
Requirements and Recommendations
For a correct functionality of this service you will need:
- To import SAASPASS SDK to your iOS and/or Android project and follow its instructions to set up the correct communications.
- To use HTTPs or similar protocol for secure communications.
- To keep the SDK up-to-date for the best performance of the login service.
Mobile Application Login Flow
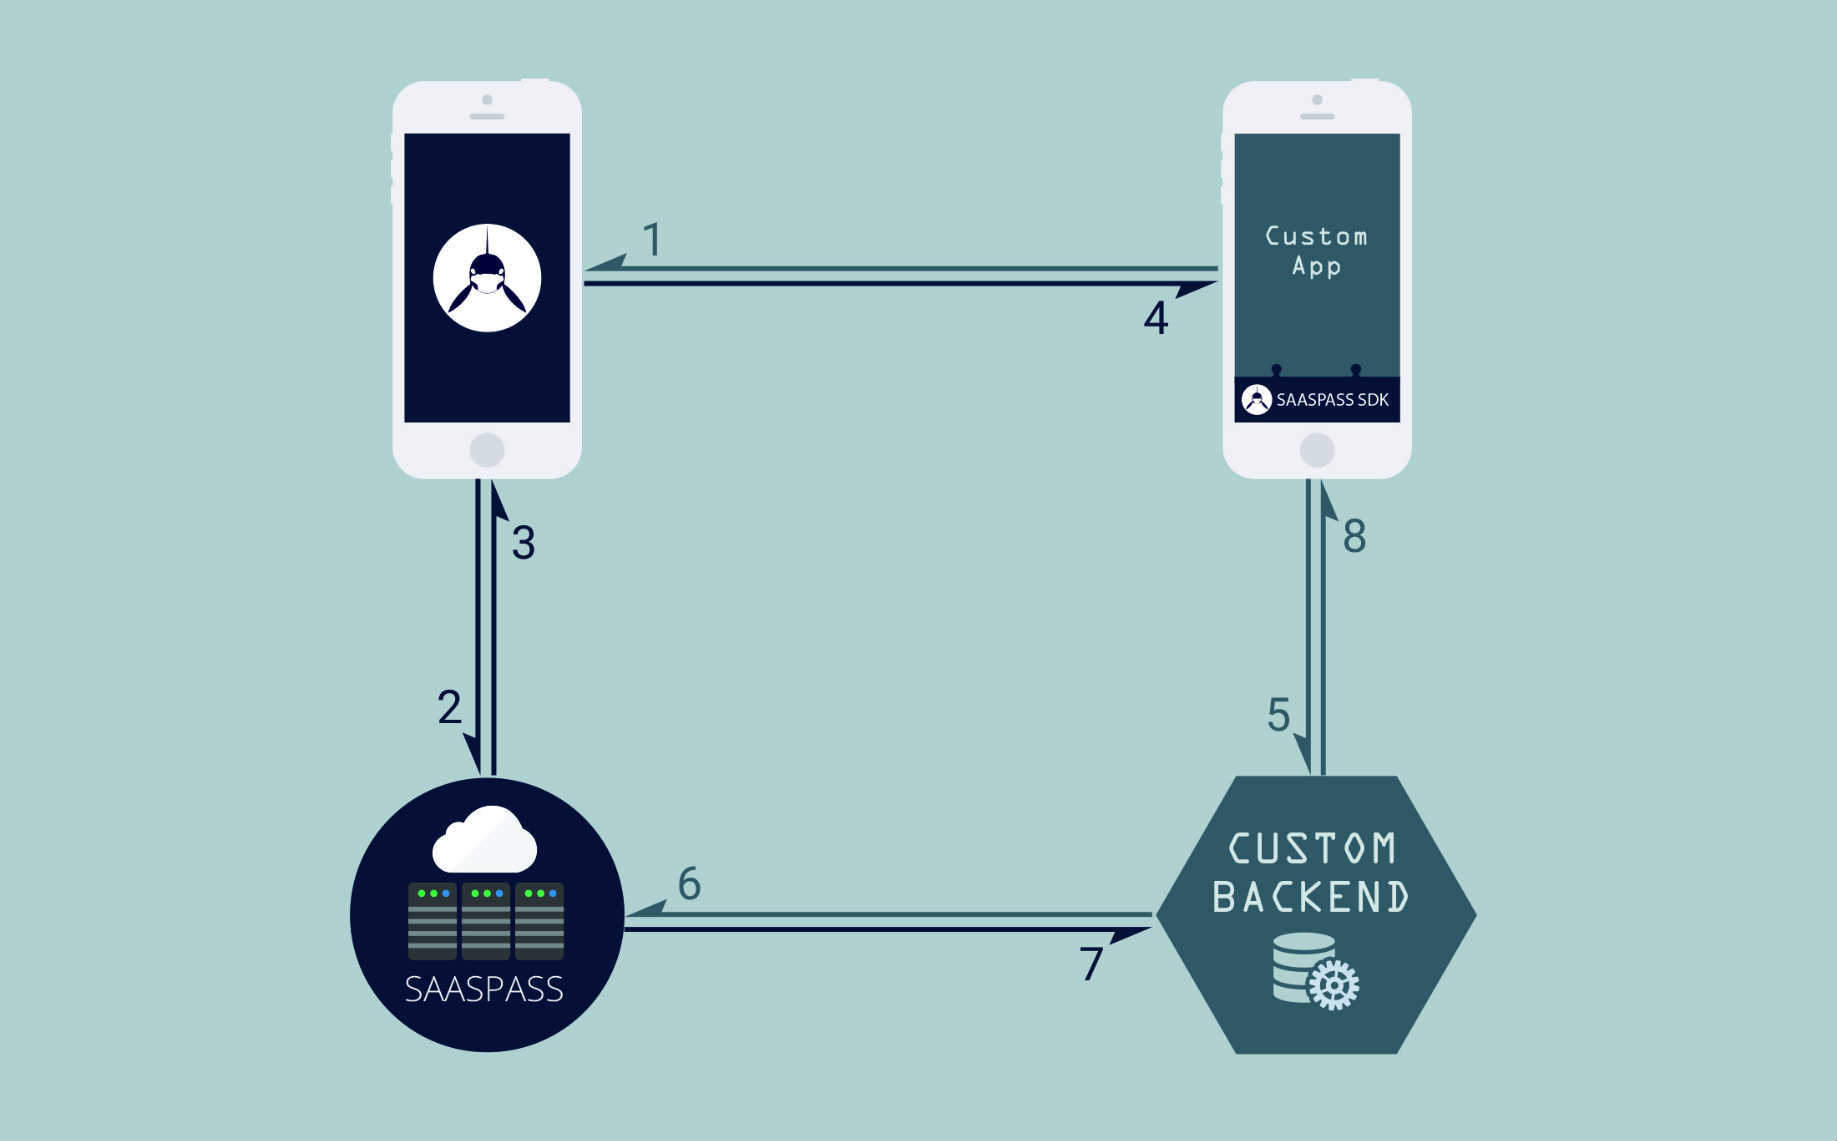
1) Custom Mobile App Calls SAASPASS Mobile App.
On click 'Login with SAASPASS', Custom mobile app calls SAASPASS mobile application:
- If it is found; process continues.
- If application is not found; SAASPASS SDK returns ERROR
2) SAASPASS Mobile App Finds User Account.
SAASPASS recognizes the application requesting for login. It checks if that SAASPASS ID has user accounts for that application:
- If there is no user account; SAASPASS mobile application returns ERROR
- If there is one user account; process continues.
- If there are 2 or more accounts; user selects which account to log in with. After selection, process continues.
SAASPASS mobile app sends login credentials to be checked by SAASPASS Server.
NOTE: If user logs in by 'Open in Mobile App'; login process starts from this point.
3) SAASPASS Server Checks Credentials
If Login credentials are valid:
- SAASPASS Server creates TrackerID
- Returns to SAASPASS mobile application Username and TrackerID
If Login credentials or any other parameter are not valid:
- It returns ERROR to SAASPASS mobile application.
4) SAASPASS Mobile App Returns Response To Custom Mobile App
The same response got from SAASPASS Server is sent to Custom mobile app.
5) Custom Mobile App Handles Login Response
If ERROR is returned custom mobile app interface should inform the user.
- Check the possible ERROR list which may be returned to the custom mobile app.
If Username and TrackerID is returned:
If Custom mobile app works with a Backend Server; send TrackerID to backend server. For security reasons, the backend server should validate the TrackerID with the SAASPASS Server. Check TrackerID Validation section below.
- If TrackerID is valid; log in the user account with the Username returned
- If TrackerID is not valid; login process should be blocked.
If the Custom mobile app doesn't work with a Backend Server; TrackerID can't be validated. User account should be logged in directly.
Flow With Login Form
If the manual login form is kept together with the new SAASPASS mobile login integration; One-Time Password service must be integrated.
- For user accounts which are assigned to the application, one-time password is required.
- If a user account is not assigned; manual login GET request should send otp=null. In this case backend server receives appropriate response for this case and it is up to the backend server to allow the user access or not to the specified account.
- Manage user accounts from within the SAASPASS Admin Portal in the Groups and Users section.
iOS SDK
Introduction
SAASPASS SDK allows to set up the communication between the custom mobile app and the SAASPASS mobile app.
This communication is part of the user authentication process. At the end point, the custom mobile app will receive the login response through the SDK.
Steps for Integration in iOS.
- Download SAASPASS SDK
- Import SDK into your Xcode Project.
- 'Login with SAASPASS' Integration
Terminology
- BundleID of the custom mobile application.
- Suffixes used by the custom mobile application.
iOS SDK
SAASPASS SDK VERSION: 1.0.0
- Follow the instructions below for a proper set up and integration.
- Keep your SDK always up-to-date.
Download iOS SDK Download iOS Sample App
Import SAASPASS SDK To Xcode Project
- Navigate to where you downloaded the SDK and Open it
- Drag the SaasPassSDK.framework to Frameworks in Project Navigator. Create a new group Frameworks if it does not exist.
- Choose Create groups for any added folders.
- Select Copy items into destination group's folder. This copying the SDK into your app.
The SDK automatically loads its framework and resource dependencies.

'Login with Saaspass' - Integration
1) GET THE APPLICATION KEY
2) CONFIGURE THE .plist FOR YOUR PROJECT
Schema:
<key>CFBundleURLTypes</key>
<array>
    <dict>
        <array>
            <key> CFBundleURLSchemes</key>
            <string>saaspasssdk-appKey-urlSchemeSuffix</string>
        </array>
    </dict>
</array>
Parameters:
| appKey | required | Application key given for your Custom application. |
| urlSchemeSuffix | optional | (Suffix) String that is appended to the base URL scheme used for SaasPass login.(Optional) |
3) ADD API KEY AND SUFFIXES TO THE .plist
Example:
<key>CFBundleURLTypes</key>
<array>
<dict>
<array>
<key> CFBundleURLSchemes</key>
<string>saaspasssdk-123456789-testVersion</string>
</array>
</dict>
</array>
4) EXTRA CONFIGURATION FOR IOS9
In iOS 9 you have to whitelist any URL schemes your App wants to query in Info.plist under the LSApplicationQueriesSchemes key (an array of strings).
Add the following to your application's .plist:
<key>LSApplicationQueriesSchemes</key>
<array>
<string>saaspass-auth</string>
</array>
5) CONNECT APPLICATION DELEGATE
To post process the results from SaasPass Login (or any action that requires switching over to the native SAASPASS app) you need to conenct your AppDelegate to the SPSDKManager.
In your AppDelegate.m add:
// AppDelegate.m
#import <SaasPassSDK/SaasPassSDK.h>

-(BOOL)application:(UIApplication *)application openURL:(NSURL *)url sourceApplication:(NSString *)sourceApplication annotation:(id)annotation {

return [[SPSDKManager sharedInstance] application:application openURL:url sourceApplication:sourceApplication annotation:annotation];
}
6) ADD 'LOGIN WITH SAASPASS' BUTTON CODE
To add a SaasPass-branded login button to your app add the following code snippet to a view controller.
// Add this to the header file, e.g. in ViewController.h
#import <SaasPassSDK/SaasPassSDK.h>

// Add this delegate into your view controller
@interface ViewController : UIViewController <SPSDKLoginButtonDelegate>

// Add this to the header of your file, e.g. in ViewController.m
// after #import "ViewController.h"
// Add this to the body

@implementation ViewController

- (void)viewDidLoad {
[super viewDidLoad];
// Add a SAASPASS-branded login button to your app
SPSDKLoginButton *loginButton = [[SPSDKLoginButton alloc] init];
// Set delegate for SPSDKLoginButton
loginButton.delegate = self;
// Optional: Place the button in the center of your view.
loginButton.center = self.view.center;
[self.view addSubview:loginButton];

}
@end
7) ADD 'LOGIN WITH SAASPASS' BUTTON FROM INTERFACE BUILDER
1) Add new UIButton in the Interface Builder and set its type as 'Custom'. 2) In 'Show the attributes inspector', under 'Button' section, select 'Custom' as Type.

3) In 'Show Identity Inspector', under 'Custom Class' section, select 'SPSDKLoginButton' as Class.
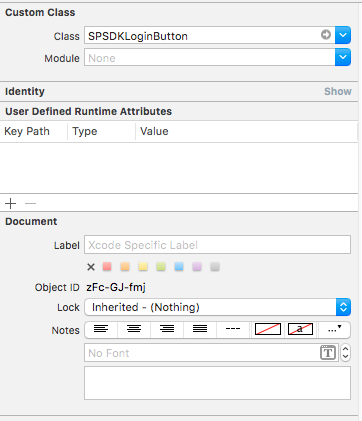
4) In 'Show the Connections Inspector', set the delegate for the SPSDKLoginButton. (You can also set delegate programmatically after adding SPSDKLoginButton as IBOutlet to your ViewController)
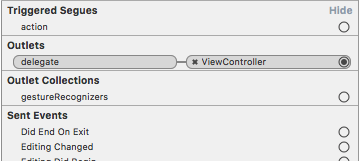
8) HANDLE RECEIVED RESPONSE
Add this method for handling responses or some error in the SPSDKLoginButton delegate:
//Method for received results from login action

-(void) loginButton:(SPSDKLoginButton *)loginButton

didCompleteWithResult:(SPSDKLoginResult *)result withError:(NSError*)error

{
if (error) {
//Process error
} else if (result.isCanceled) {
//Cancelled
}else {
//Logged in
}
}
'Open In Mobile App' - Integration
Once your login is integrated with SAASPASS; your users have a second way to log in to the custom mobile application.
They can open SAASPASS mobile app and tap on the 'Open in mobile app' button displayed in the user account of your application:
Once SAASPASS checks the user credentials, the custom mobile app will get the information of the account to be logged in.
INTEGRATION
Make sure you have completed steps 1 to 5 on ‘Login With SAASPASS’ - Integration section. Later proceed with these extra steps
6) CONNECT APPLICATION DELEGATE AS SPSDKMANAGER DELEGATE
To handle ‘Open In Mobile App’ requests you need to set your AppDelegate as SPSDKManagerDelegate
// Add this delegate into your Application Delegate
@interface AppDelegate : UIResponder <UIApplicationDelegate, SPSDKManagerDelegate>
// Add this on your applicationDidFinishLaunchingWithOptions method
-(BOOL)application:(UIApplication *)application
didFinishLaunchingWithOptions:(NSDictionary *)launchOptions {
// Set delegate method for SPSDKManager
[SPSDKManager sharedInstance].delegate = self;
}
7) HANDLE RECEIVED LOGIN REQUESTS
Add this method for handling ‘Open In Mobile App’ requests in your AppDelegate (SPSDKManagerDelegate)
//Method for handling 'Open In Mobile App' requests
-(void) didLoginRequestReceivedWithResult:(SPSDKLoginResult *)result
withError:(NSError*)error
{
if (error) {
//Process error
} else {
//Log user in
}
}
Android SDK
Introduction
SAASPASS SDK allows to set up the communication between the custom mobile app and the SAASPASS mobile app.
This communication is part of the user authentication process. At the end point, the custom mobile app will receive the login response through the SDK.
Steps for Integration in Android.
- Import SDK in your Android Studio via Gradle dependencies.
- 'Login with SAASPASS' Integration
- 'Open in Mobile App' Integration
Terminology
- App Namespace: Namespace of the custom mobile application.
- Hashkey: Key hash used by the custom mobile application. It is 28 characters long (for more info check how to get a hashkey section below).
Android SDK
SAASPASS SDK VERSION: 1.0.0
- Follow the instructions below for a proper set up and integration.
- Keep your SDK always up-to-date.
Android Studio Set Up
1) Take the downloaded package and place it in the libs folder.
- If you don’t have libs folder under the application module you need to create one.
2) In gradle.build file add the following code:
repositories{
    flatDir {
        dirs 'libs'
    }
}
3) Under dependencies add:
compile(name:'saaspassSDK', ext:'aar')
4) Sync your project and the SDK is ready to use.
'Login with Saaspass' - Integration
1) Get the application key
2) Open the androidmanifest.xml
- In Activity declaration add
as follows:
<activity android:name="com.example.custom.MainActivity" android:label="@string/app_name">
<intent-filter>
<action android:name="android.intent.action.VIEW" />
<category android:name="android.intent.category.DEFAULT" />
<category android:name="android.intent.category.BROWSABLE" />
<data android:scheme="saaspasssdk-applicationKey" />
</intent-filter>
</activity>
If Activity is a LAUNCHER activity, add two intent filters instead:
<activity android:name="com.example.custom.MainActivity" android:label="@string/app_name">
<intent-filter>
<action android:name="android.intent.action.MAIN" />
<category android:name="android.intent.category.LAUNCHER" />
</intent-filter>
<intent-filter>
<action android:name="android.intent.action.VIEW" />
<category android:name="android.intent.category.DEFAULT" />
<category android:name="android.intent.category.BROWSABLE" />
<data android:scheme="saaspasssdk-applicationKey" />
</intent-filter>
</activity>
Enter the Application Key got in step 1 instead of applicationKey
3) Create an activity
Define the 'Login With SAASPASS' button in the Layout:
<com.saaspass.widget.SaasPassLoginButton"
android:id="@+id/btnlogin"
android:layout_width="match_parent"
android:layout_height="wrap_content"
android:layout_alignParentBottom="true"
android:layout_centerHorizontal="true"/>
Add imports:
import com.saaspass.controller.SaasPassInitializer;
import com.saaspass.interfaces.SaasPassCallback;
import com.saaspass.login.LoginResult;
import com.saaspass.widget.SaasPassLoginButton;
In Activity class declare the widgets you defined in the activity's layout as fields of this class:
private SaasPassLoginButton loginButton;
The SDK needs to be initialized. Define the instance in Activity class:
private SaasPassInitializer saasPassInitializer;
In onCreate() using findViewById initialize the widget:
saasPassInitializer = new SaasPassInitializer(this);
loginButton = (SaasPassLoginButton) findViewById(R.id.btnlogin);
loginButton.setOnClickListener(this);
In onCreate() method after initializing SaasPassInitializer put the following code:
loginButton = (SaasPassLoginButton) findViewById(R.id.btnlogin);
loginButton.setOnClickListener(this);
saasPassInitializer.login(this, new SaasPassCallback <LoginResult>() {
@Override
public void onLoadFinishCallback(LoginResult result) {
username = result.getUsername();
trackerId = result.getTrackerId();
//after getting username and trackerId handle the login process
}
@Override
public void onCancel() {
Toast.makeText(getApplicationContext(), "Action Canceled!",Toast.LENGTH_SHORT).show();
}
@Override
public void onError(String error) {
Toast.makeText(getApplicationContext(), error, Toast.LENGTH_SHORT).show();
}
});
In onClick() method for login button create and register callback like follow:
saasPassInitializer.initCallback(this, appKey);
'Open In Mobile App' - Integration
Once your login is integrated with SAASPASS; your users have a second way to log in to the custom mobile application.
They can open SAASPASS mobile app and tap on the 'Open in mobile app' button displayed in the user account of your application:
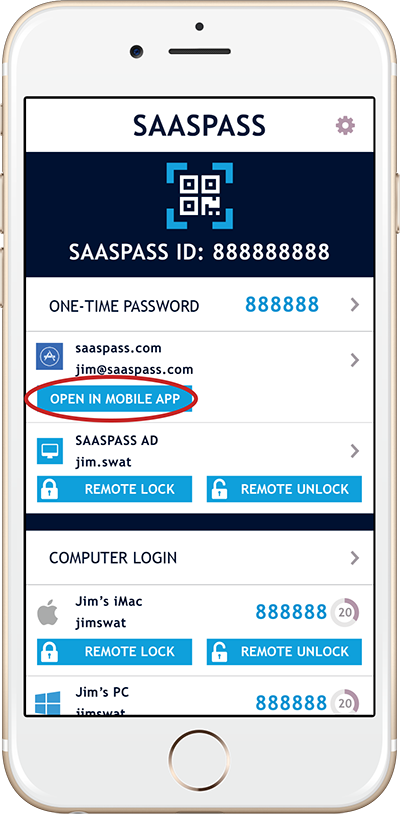
- Once SAASPASS checks the user credentials, the custom mobile app will get the information of the account to be logged in.
How To Get A Hashkey
On OS X :
keytool -exportcert -alias androiddebugkey -keystore ~/.android/debug.keystore | openssl sha1 -binary | openssl base64
On Windows :
keytool -exportcert -alias androiddebugkey -keystore %HOMEPATH%\.android\debug.keystore | openssl sha1 -binary | openssl base64
For development purposes, you may use different hashkeys working on debugging mode. Add them under application settings 'Hashkey' separated by ';;'. If you create a new debug hashkey, submit the password field empty. Only enter the password for the release hashkey generation. Don't forget to add the release hashkey on SAASPASS.
To get a Hashkey open Command Prompt(cmd) and execute the following cmd commands:
Account Management
Add Account
Add Account
public static bool AddAccount(string username, string grouplist, string accountowner, string companytoken)
{
    string urlForAddAcount = "https://www.saaspass.com/sd/rest/" + companyKey + "/addaccount?username=" + username + "&grouplist=" + grouplist + "&accountowner=" + accountowner + "&token=" + companytoken;
    return CheckResponse(urlForAddAcount);
}

public static bool CheckResponse(string url)
{
    try
    {
        WebRequest webRequest = WebRequest.Create(url);
        if (webRequest.GetResponse() != null)
        {
            HttpWebResponse response = (HttpWebResponse)webRequest.GetResponse();
            if (response.StatusCode == HttpStatusCode.OK)
            {
                if (response.GetResponseStream() != null)
                {
                    StreamReader reader = new StreamReader(response.GetResponseStream());
                    string jsonString = reader.ReadToEnd();
                    if (jsonString != null && !jsonString.Equals(""))
                    {
                        JToken tokenJtoken = JObject.Parse(jsonString);
                        ErrMessage = tokenJtoken.SelectToken("resultMessage") != null ? (string)tokenJtoken.SelectToken("resultMessage") : "";
                        ErrMessage += tokenJtoken.SelectToken("warning") != null ? " - " + (string)tokenJtoken.SelectToken("warning") : "";
                    }
                }
                return true;
            }
            else
                return false;
        }
        else
            return false;
    }
    catch (WebException e)
    {
        using (WebResponse response = e.Response)
        {
            HttpWebResponse httpResponse = (HttpWebResponse)response;
            if (httpResponse != null)
            {
                using (Stream data = response.GetResponseStream())
                using (var reader = new StreamReader(data))
                {
                    if (httpResponse.StatusCode.ToString()=="429")
                    {
                        ErrMessage = " X-Rate-Limit-Limit " + httpResponse.Headers["X-Rate-Limit-Limit"];
                        ErrMessage += " ### X-Rate-Limit-Remaining " + httpResponse.Headers["X-Rate-Limit-Remaining"];
                        ErrMessage += " ### X-Rate-Limit-Resets " + httpResponse.Headers["X-Rate-Limit-Resets"];
                    }
                    else
                        ErrMessage += reader.ReadToEnd();
                }
            }
        }
        return false;
    }
}
import org.springframework.http.ResponseEntity;
import org.springframework.web.client.RestTemplate;

public class AddAccount {

    private static final String API_URL = "https://www.saaspass.com/sd/rest";

    public SpResponse addaccount(String username, String accountowner, List<String> groups) {
        String grouplist = String.join(",", groups);
        String url = "%s/%s/addaccount?username=%s&accountowner=%s&grouplist=%s&token=%s";
        url = String.format(url, API_URL, COMPANY_KEY, username, accountowner, grouplist, getCompanyToken());
        ResponseEntity<?> r = call(url, SpResponse.class);
        return r.getStatusCode() == OK ? (SpResponse) r.getBody() : null;
    }

    private <T> ResponseEntity<?> call(String url, Class<T> responseType) {

        RestTemplate restTemplate = new RestTemplate();
        restTemplate.setErrorHandler(new ResponseErrorHandler());

        try {
            return ResponseEntity.ok(restTemplate.getForObject(url, responseType));
        } catch (ApiException e) {
            return ResponseEntity.status(e.getStatusCode()).body(e.getErrorResponse());
        }
    }
}

public class SpResponse {

    private String resultMessage;
    private boolean isVerified;
    private boolean isPendingOnEmail;
    private boolean isAccountOwnerBlocked;
    private String warning;

    public String getResultMessage() { return resultMessage; }
    public boolean getIsVerified() { return isVerified; }
    public boolean getIsPendingOnEmail() { return isPendingOnEmail; }
    public boolean getIsAccountOwnerBlocked() { return isAccountOwnerBlocked; }
    public String getWarning() { return warning; }
}
def addAccount(self, username, accountowner, grouplist):
   url = "%s/%s/addaccount?username=%s&accountowner=%s&grouplist=%s&token=%s" % (Constant.API_URL, Constant.COMPANY_KEY, username, accountowner, grouplist, self.companyToken.get())
   response = requests.get(url)
   if response.status_code == 'EXPIRED_TOKEN':
       self.companyToken.invalidate()
       self.addAccount(username, accountowner, grouplist)
   else:
       response.json()
   return response.json()


@app.route('/dashboard', methods=['GET', 'POST'])
def AddAccount():
   form = AddAccountForm(request.form)
   if request.method == 'POST' and form.validate_on_submit():
      result = companyService.addAccount(form.username.data, form.accountowner.data, form.grouplist.data)
      flash(result)
   return render_template('dashboard.html', title='Dashboard_AddNewAccount', form=form)
<?php
public static function AddAccount($uname, $grouplist, $accountowner1, $companytoken){
       $url = AppMethods::$myDom."/".AppMethods::$companyKey."/addaccount?username=$uname&grouplist=$grouplist&accountowner=$accountowner1&token=$companytoken";
       return AppMethods::AccManagment($url);
   }


public function AccManagment($url){
        $ch  = curl_init($url);
        curl_setopt($ch, CURLOPT_RETURNTRANSFER, true);
        $data = json_decode(curl_exec($ch),true);
        $flag = curl_close($ch);
        if(isset($data['name'])){
        if($data['name'] == 'EXPIRED_TOKEN'){
            $_SESSION['Atoken'] = AppMethods::getApplicationToken();
            $_SESSION['Ctoken'] = AppMethods::getCompanyToken();
            AppMethods::AccManagment($url);
        }
    }
        return $data;
    }
>
Add Account Request
| Service Name: | Add Account |
| URL: | [GET] /{company_key}/addaccount |
| Description: | It adds new user account to your company. |
| Scope: | Your Company |
| Parameters: | company_key as URL variable: Your company is represented with company_key in the URL. Find your key on your admin portal under Corporate Settings>Company Credentials. |
| token: required The pre-obtained token to call a service. This token should be company-scope and not expired. |
|
| username: required Username of account that you want to add. It can be a simple username, email or mobile number. |
|
| accountowner: optional If you want to verify the new account you are adding, you can provide verification data with this parameter. If you have direct information about the SAASPASS user that you want to verify the account for, provide his/her SAASPASS ID or his/her verified email or his/her verified Active Directory account or his/her verified phone number as 'accountowner'. If as 'accountowner', you provide an email that is not verified yet, SAASPASS will send a verification link to this email and when user verifies this link with her/his SAASPASS credentials, the account will be verified for that user. Not verified email can be provided only if 'username' refers to a simple username account or an Active Directory account (not email or phone number account) |
|
| grouplist: optional If you want to add the new account to specific group(s) (any custom group or application dedicated group), you can provide the name of these groups within this parameter. Group names should be comma separated. If you don't provide any group in this parameter, a new account will be created but it will not be added to any specific group (just to 'Everyone'). |
|
| Token Requirement: | It requires company-scope token. Read the Authentication section for more info |
| Example Request: | https://www.saaspass.com/sd/rest/u45aaaa1290z/addaccount?username=jane.doe\&grouplist=groupA%2CgroupB&accountowner=979538547\&token=6JCHH1CROH019TCSG0HSEPW7CXTLUV606A0E07EP5NXWF5D29RJL3MW3 |
| Response: | If the call to this resource is successful you will get a 200 (OK) HTTP response. Successful code means new account is created in your company. But it may not be successfully verified. Response that SAASPASS returns has detailed information within below JSON structure: |
{"resultMessage":"Successful","isVerified":true,"isPendingOnEmail":false,"isAccountOwnerBlocked":false,"warning":null}resultMessage (String): Contains message about result. It is "Successful" if operation is successful without any warning. It is "Successful with warning" if there is a warning message. isVerified (Boolean): 'true' if added account is verified for a user also. 'false' if it is not verified yet. isPendingOnEmail (Boolean): 'true' if account is not verified but it is pending on email verification. isAccountOwnerBlocked (Boolean): 'true' if the owner of account is blocked from logging in to the applications since it is waiting your approval of recovery operation that user did. You can approve her/his recovery and unblock from admin portal. warning (String): Contains warning message if there is a warning about added account. |
|
| If the call to this resource is unsuccessful, you will get a non-200 HTTP status code relative to the type of error. For more on this topic see our RESPONSES & ERROR HANDLING |
Details
Successful call will result in adding a new account to your company with given username.
- If 'username' refers to an Active Directory account, it cannot be added since AD type accounts can be added only via Active Directory Agent.
- You can provide 'accountowner' parameter to verify the account that you are adding, if this account is simple username or an email that belongs to your domain. Otherwise, it must be empty since you cannot verify the account that refers to a personal email or phone number.
- If the account you are adding is already verified in SAASPASS and if you are providing 'accountowner' parameter, this parameter must refer to the current owner of the account.
- Each group name that you might provide in 'grouplist ' parameter, must be name of a valid group in your company and this group can be an Application Group or Custom Group. Otherwise, adding account call will fail.
Rate Limit
You can call this service 100 times in any 10 minutes. If you exceed the rate limit, response will result in "Too many requests". For more on this topic see our RESPONSES & ERROR HANDLING
Verify Account
Verify Account
public static bool VerifyAccount(string username, bool isadaccount, string accountowner, string companytoken)
{
    string urlForVerifyAcount = "https://www.saaspass.com/sd/rest/" + companyKey + "/verifyaccount?username=" + username + "&isadaccount=" + isadaccount + "&accountowner=" + accountowner + "&token=" + companytoken;
    return CheckResponse(urlForVerifyAcount);
}

public static bool CheckResponse(string url)
{
    try
    {
        WebRequest webRequest = WebRequest.Create(url);
        if (webRequest.GetResponse() != null)
        {
            HttpWebResponse response = (HttpWebResponse)webRequest.GetResponse();
            if (response.StatusCode == HttpStatusCode.OK)
            {
                if (response.GetResponseStream() != null)
                {
                    StreamReader reader = new StreamReader(response.GetResponseStream());
                    string jsonString = reader.ReadToEnd();
                    if (jsonString != null && !jsonString.Equals(""))
                    {
                        JToken tokenJtoken = JObject.Parse(jsonString);
                        ErrMessage = tokenJtoken.SelectToken("resultMessage") != null ? (string)tokenJtoken.SelectToken("resultMessage") : "";
                        ErrMessage += tokenJtoken.SelectToken("warning") != null ? " - " + (string)tokenJtoken.SelectToken("warning") : "";
                    }
                }
                return true;
            }
            else
                return false;
        }
        else
            return false;
    }
    catch (WebException e)
    {
        using (WebResponse response = e.Response)
        {
            HttpWebResponse httpResponse = (HttpWebResponse)response;
            if (httpResponse != null)
            {
                using (Stream data = response.GetResponseStream())
                using (var reader = new StreamReader(data))
                {
                    if (httpResponse.StatusCode.ToString()=="429")
                    {
                        ErrMessage = " X-Rate-Limit-Limit " + httpResponse.Headers["X-Rate-Limit-Limit"];
                        ErrMessage += " ### X-Rate-Limit-Remaining " + httpResponse.Headers["X-Rate-Limit-Remaining"];
                        ErrMessage += " ### X-Rate-Limit-Resets " + httpResponse.Headers["X-Rate-Limit-Resets"];
                    }
                    else
                        ErrMessage += reader.ReadToEnd();
                }
            }
        }
        return false;
    }
}
import org.springframework.http.ResponseEntity;
import org.springframework.web.client.RestTemplate;

public class VerifyAccount {

    private static final String API_URL = "https://www.saaspass.com/sd/rest";

    public SpResponse verifyaccount(String username, String accountowner, boolean isadaccount) {
        String url = "%s/%s/verifyaccount?username=%s&accountowner=%s&isadaccount=%s&token=%s";
        url = String.format(url, API_URL, COMPANY_KEY, username, accountowner, isadaccount, getCompanyToken());
        ResponseEntity<?> r = call(url, SpResponse.class);
        return r.getStatusCode() == OK ? (SpResponse) r.getBody() : null;
    }

    private <T> ResponseEntity<?> call(String url, Class<T> responseType) {

        RestTemplate restTemplate = new RestTemplate();
        restTemplate.setErrorHandler(new ResponseErrorHandler());

        try {
            return ResponseEntity.ok(restTemplate.getForObject(url, responseType));
        } catch (ApiException e) {
            return ResponseEntity.status(e.getStatusCode()).body(e.getErrorResponse());
        }
    }
}
def verifyAccount(self, username, accountowner, isadaccount):
   url = "%s/%s/verifyaccount?username=%s&accountowner=%s&isadaccount=%s&token=%s" % (Constant.API_URL, Constant.COMPANY_KEY, username, accountowner, isadaccount, self.companyToken.get())
   response = requests.get(url)
   if response.status_code == 'EXPIRED_TOKEN':
       self.companyToken.invalidate()
       self.verifyAccount(username, accountowner, isadaccount)
   else:
       response.json()
   return response.json()


@app.route('/dashboard-verify', methods=['GET', 'POST'])
def VerifyAccount():
   form = VerifyAccountForm(request.form)
   if request.method == 'POST' and form.validate_on_submit():
      result = companyService.verifyAccount(form.username.data, form.accountowner.data, form.isadaccount.data)
      flash(result)
   return render_template('dashboard-verify.html', title='Dashboard_VerifyAccount', form=form)
<?php
public static function VerifyAccount($username,$isadaccount, $accountowner, $companytoken){
        $url = AppMethods::$myDom."/".AppMethods::$companyKey."/verifyaccount?username=$username&isadaccount=$isadaccount&accountowner=$accountowner&token=$companytoken";
        return AppMethods::AccManagment($url);
    }


public function AccManagment($url){
        $ch  = curl_init($url);
        curl_setopt($ch, CURLOPT_RETURNTRANSFER, true);
        $data = json_decode(curl_exec($ch),true);
        $flag = curl_close($ch);
        if(isset($data['name'])){
        if($data['name'] == 'EXPIRED_TOKEN'){
            $_SESSION['Atoken'] = AppMethods::getApplicationToken();
            $_SESSION['Ctoken'] = AppMethods::getCompanyToken();
            AppMethods::AccManagment($url);
        }
    }
        return $data;
    }
>
Verify Account Request
| Service Name: | Verify Account |
| URL: | [GET] /{company_key}/verifyaccount |
| Description: | Verifies existing account in your company. |
| Scope: | Your Company |
| Parameters: | company_key as URL variable: Your company is represented with company_key in the URL. Find your key on your admin portal under Corporate Settings>Company Credentials. |
| token: required The pre-obtained token to call a service. This token should be company-scope and not expired. |
|
| username: required Username of account that you want to add. It can be a simple username, email or mobile number. |
|
| accountowner: required If you want to verify the new account you are adding, you can provide verification data with this parameter. If you have direct information about the SAASPASS user that you want to verify the account for, provide his/her SAASPASS ID or his/her verified email or his/her verified Active Directory account or his/her verified phone number as 'accountowner'. If as 'accountowner', you provide an email that is not verified yet, SAASPASS will send a verification link to this email and when user verifies this link with her/his SAASPASS credentials, the account will be verified for that user. Not verified email can be provided only if 'username' refers to a simple username account or an Active Directory account (not email or mobile number account) |
|
| isadaccount: optional If the account you are trying to verify is an Active Directory account, this parameter must be 'true'. Otherwise it is 'false' by default. |
|
| Token Requirement: | It requires company-scope token. Read Authentication section for more info |
| Example Request: | https://www.saaspass.com/sd/rest/u45aaaa1290z/verifyaccount?username=jane.doe@mydomain.com\&isadaccount=false\&accountowner=979538547&token=6JCHH1CROH019TCSG0HSEPW7CXTLUV606A0E07EP5NXWF5D29RJL3MW3 |
| Response: | If the call to this resource is successful you will get a 200 (OK) HTTP response. Successful code means the account you provided is verified in your company or it is pending on email verification. But it may not be successfully verified. Response that SAASPASS returns has detailed information within below JSON structure: |
{"resultMessage":"Successful","isVerified":true,"isPendingOnEmail":false,"isAccountOwnerBlocked":false,"warning":null}resultMessage (String): Contains message about result. It is "Successful" if operation is successful without any warning. It is "Successful with warning" if there is a warning message. isVerified (Boolean): 'true' if added account is verified for a user also. 'false' if it is not verified yet. isPendingOnEmail (Boolean): 'true' if account is not verified but it is pending on email verification. isAccountOwnerBlocked (Boolean): 'true' if the owner of account is blocked from logging in to the applications since it is waiting your approval of recovery operation that user did. You can approve her/his recovery and unblock from admin portal. warning (String): Contains warning message if there is a warning about added account. |
|
| If the call to this resource is unsuccessful, you will get a non-200 HTTP status code relative to the type of error. For more on this topic see our RESPONSES & ERROR HANDLING |
Details
Successful call will result in verifying existing account in your company or setting it as pending on email verification. If the account you provided was already pending on an email, but you provided a different email in the 'accountowner' parameter, existing verification email will be invalidated and account will be pending on new email.
Rate Limit
You can call this service 100 times in any 10 minutes. If you exceed the rate limit, response will result in "Too many requests". For more on this topic see our RESPONSES & ERROR HANDLING
Remove Account
Remove Account
public static bool RemoveAccount(string username, string companyToken)
{
    string urlForRemoveAcount = "https://www.saaspass.com/sd/rest/" + companyKey + "/removeaccount?username=" + username + "&token=" + companyToken;
    return CheckResponse(urlForRemoveAcount);
}

public static bool CheckResponse(string url)
{
    try
    {
        WebRequest webRequest = WebRequest.Create(url);
        if (webRequest.GetResponse() != null)
        {
            HttpWebResponse response = (HttpWebResponse)webRequest.GetResponse();
            if (response.StatusCode == HttpStatusCode.OK)
            {
                if (response.GetResponseStream() != null)
                {
                    StreamReader reader = new StreamReader(response.GetResponseStream());
                    string jsonString = reader.ReadToEnd();
                    if (jsonString != null && !jsonString.Equals(""))
                    {
                        JToken tokenJtoken = JObject.Parse(jsonString);
                        ErrMessage = tokenJtoken.SelectToken("resultMessage") != null ? (string)tokenJtoken.SelectToken("resultMessage") : "";
                        ErrMessage += tokenJtoken.SelectToken("warning") != null ? " - " + (string)tokenJtoken.SelectToken("warning") : "";
                    }
                }
                return true;
            }
            else
                return false;
        }
        else
            return false;
    }
    catch (WebException e)
    {
        using (WebResponse response = e.Response)
        {
            HttpWebResponse httpResponse = (HttpWebResponse)response;
            if (httpResponse != null)
            {
                using (Stream data = response.GetResponseStream())
                using (var reader = new StreamReader(data))
                {
                    if (httpResponse.StatusCode.ToString()=="429")
                    {
                        ErrMessage = " X-Rate-Limit-Limit " + httpResponse.Headers["X-Rate-Limit-Limit"];
                        ErrMessage += " ### X-Rate-Limit-Remaining " + httpResponse.Headers["X-Rate-Limit-Remaining"];
                        ErrMessage += " ### X-Rate-Limit-Resets " + httpResponse.Headers["X-Rate-Limit-Resets"];
                    }
                    else
                        ErrMessage += reader.ReadToEnd();
                }
            }
        }
        return false;
    }
}
import org.springframework.http.ResponseEntity;
import org.springframework.web.client.RestTemplate;

public class RemoveAccount {

    private static final String API_URL = "https://www.saaspass.com/sd/rest";

    public SpResponse removeaccount(String username) {
        String url = "%s/%s/removeaccount?username=%s&token=%s";
        url = String.format(url, API_URL, COMPANY_KEY, username, getCompanyToken());
        ResponseEntity<?> r = call(url, SpResponse.class);
        return r.getStatusCode() == OK ? (SpResponse) r.getBody() : null;
    }

    private <T> ResponseEntity<?> call(String url, Class<T> responseType) {

        RestTemplate restTemplate = new RestTemplate();
        restTemplate.setErrorHandler(new ResponseErrorHandler());

        try {
            return ResponseEntity.ok(restTemplate.getForObject(url, responseType));
        } catch (ApiException e) {
            return ResponseEntity.status(e.getStatusCode()).body(e.getErrorResponse());
        }
    }
}
def removeAccount(self, username):
   url = "%s/%s/removeaccount?username=%s&token=%s" % (Constant.API_URL, Constant.COMPANY_KEY, username, self.companyToken.get())
   response = requests.get(url)
   if response.status_code == 'EXPIRED_TOKEN':
       self.companyToken.invalidate()
       self.removeAccount(username)
   else:
       response.json()
   return response.json()


@app.route('/dashboard-remove', methods=['GET', 'POST'])
def RemoveAccount():
   form = RemoveAccountForm(request.form)
   if request.method == 'POST' and form.validate_on_submit():
      result = companyService.removeAccount(form.username.data)
      flash(result)
   return render_template('dashboard-remove.html', title='Dashboard_RemoveAccount', form=form)
<?php
public static function remove($username,$token){
        $url = AppMethods::$myDom."/".AppMethods::$companyKey."/removeaccount?username=$username&token=$token";
        return AppMethods::AccManagment($url);
    }


public function AccManagment($url){
        $ch  = curl_init($url);
        curl_setopt($ch, CURLOPT_RETURNTRANSFER, true);
        $data = json_decode(curl_exec($ch),true);
        $flag = curl_close($ch);
        if(isset($data['name'])){
        if($data['name'] == 'EXPIRED_TOKEN'){
            $_SESSION['Atoken'] = AppMethods::getApplicationToken();
            $_SESSION['Ctoken'] = AppMethods::getCompanyToken();
            AppMethods::AccManagment($url);
        }
    }
        return $data;
    }
?>
Remove Account Request
| Service Name: | Remove Account |
| URL: | [GET] /{company_key}/removeaccount |
| Description: | Removes existing account from your company. |
| Scope: | Your Company |
| Parameters: | company_key as URL variable: Your company is represented with company_key in the URL. Find your key on your admin portal under Corporate Settings>Company Credentials. |
| token: required Obtained token to call a service. This token should be company-scope. |
|
| username: required Username of account that you want to remove. It can be a simple username, email, Active Directory account or phone number. This account must refer to an existing account in your company. |
|
| Token Requirement: | It requires company-scope token. Read the Authentication section for more info |
| Example Request: | https://www.saaspass.com/sd/rest/u45aaaa1290z/removeaccount?username=jane.doe@mydomain.com&token=6JCHH1CROH019TCSG0HSEPW7CXTLUV606A0E07EP5NXWF5D29RJL3MW3 |
| Response: | If the call to this resource is successful you will get a 200 (OK) HTTP response. Successful code means the account you provided is successfully deleted from your company. Response that SAASPASS returns has detailed information within below JSON structure: |
{"resultMessage":"Successful","isVerified":true,"isPendingOnEmail":false,"isAccountOwnerBlocked":false,"warning":null}resultMessage (String): Contains message about result. It is "Successful" if operation is successful without any warning. It is "Successful with warning" if there is a warning message. isVerified (Boolean): 'true' if added account is verified for a user also. 'false' if it is not verified yet. isPendingOnEmail (Boolean): 'true' if account is not verified but it is pending on email verification. isAccountOwnerBlocked (Boolean): 'true' if the owner of account is blocked from logging in to the applications since it is waiting your approval of recovery operation that user did. You can approve her/his recovery and unblock from admin portal. warning (String): Contains warning message if there is a warning about added account. |
|
| If the call to this resource is unsuccessful, you will get a non-200 HTTP status code relative to the type of error. For more on this topic see our RESPONSES & ERROR HANDLING |
Details
If the 'username' you provided refers to multiple accounts, call will fail. Be sure that 'username' refers to one account in your company.
Rate Limit
You can call this service 100 times in any 10 minutes. If you exceed the rate limit, response will result in "Too many requests". For more on this topic see our RESPONSES & ERROR HANDLING
Register Account By Admin
Register Account By Admin
public static bool RegistrationByAdmin(string username, bool isadaccount, string accountowner, string apptoken)
{
    string urlForRegistrationByAdmin = "https://www.saaspass.com/sd/rest/applications/" + apiKey + "/registerbyadmin?username=" + username + "&isadaccount=" + isadaccount + "&accountowner=" + accountowner + "&token=" + apptoken;
    return CheckResponse(urlForRegistrationByAdmin);
}

public static bool CheckResponse(string url)
{
    try
    {
        WebRequest webRequest = WebRequest.Create(url);
        if (webRequest.GetResponse() != null)
        {
            HttpWebResponse response = (HttpWebResponse)webRequest.GetResponse();
            if (response.StatusCode == HttpStatusCode.OK)
            {
                if (response.GetResponseStream() != null)
                {
                    StreamReader reader = new StreamReader(response.GetResponseStream());
                    string jsonString = reader.ReadToEnd();
                    if (jsonString != null && !jsonString.Equals(""))
                    {
                        JToken tokenJtoken = JObject.Parse(jsonString);
                        ErrMessage = tokenJtoken.SelectToken("resultMessage") != null ? (string)tokenJtoken.SelectToken("resultMessage") : "";
                        ErrMessage += tokenJtoken.SelectToken("warning") != null ? " - " + (string)tokenJtoken.SelectToken("warning") : "";
                    }
                }
                return true;
            }
            else
                return false;
        }
        else
            return false;
    }
    catch (WebException e)
    {
        using (WebResponse response = e.Response)
        {
            HttpWebResponse httpResponse = (HttpWebResponse)response;
            if (httpResponse != null)
            {
                using (Stream data = response.GetResponseStream())
                using (var reader = new StreamReader(data))
                {
                    if (httpResponse.StatusCode.ToString()=="429")
                    {
                        ErrMessage = " X-Rate-Limit-Limit " + httpResponse.Headers["X-Rate-Limit-Limit"];
                        ErrMessage += " ### X-Rate-Limit-Remaining " + httpResponse.Headers["X-Rate-Limit-Remaining"];
                        ErrMessage += " ### X-Rate-Limit-Resets " + httpResponse.Headers["X-Rate-Limit-Resets"];
                    }
                    else
                        ErrMessage += reader.ReadToEnd();
                }
            }
        }
        return false;
    }
}
import org.springframework.http.ResponseEntity;
import org.springframework.web.client.RestTemplate;

public class RegisterByAdmin {

    private static final String API_URL = "https://www.saaspass.com/sd/rest";

    public SpResponse registerbyadmin(String username, String accountowner, boolean isadaccount) {
        String url = "%s/applications/%s/registerbyadmin?username=%s&accountowner=%s&isadaccount=%s&token=%s";
        url = String.format(url, API_URL, APP_API_KEY, username, accountowner, isadaccount, getAppToken());
        ResponseEntity<?> r = call(url, SpResponse.class);
        return r.getStatusCode() == OK ? (SpResponse) r.getBody() : null;
    }

    private <T> ResponseEntity<?> call(String url, Class<T> responseType) {

        RestTemplate restTemplate = new RestTemplate();
        restTemplate.setErrorHandler(new ResponseErrorHandler());

        try {
            return ResponseEntity.ok(restTemplate.getForObject(url, responseType));
        } catch (ApiException e) {
            return ResponseEntity.status(e.getStatusCode()).body(e.getErrorResponse());
        }
    }
}
def registerAccountByAdmin(self, username, accountowner, isadaccount):
   url = "%s/applications/%s/registerbyadmin?username=%s&accountowner=%s&isadaccount=%s&token=%s" % (Constant.API_URL, Constant.APP_API_KEY, username, accountowner, isadaccount, self.appT.get())
   response = requests.get(url)
   if response.status_code == 'EXPIRED_TOKEN':
       self.appT.invalidate()
       self.registerAccountByAdmin(username, accountowner, isadaccount)
   else:
       response.json()
   return response.json()


@app.route('/dashboard-regacc', methods=['GET', 'POST'])
def RegisterAccountByAdmin():
   form = RegisterByAdminForm(request.form)
   if request.method == 'POST' and form.validate_on_submit():
       result = appService.registerAccountByAdmin(form.username.data, form.accountowner.data, form.isadaccount.data)
       flash(result)
   return render_template('dashboard-regacc.html', title='Dashboard_RegisterAccountByAdmin', form=form)
<?php
public static function RegistrationByAdmin($username, $isadaccount='false', $accountowner, $apptoken){
       $url = AppMethods::$mydomain."/".AppMethods::$apiKey."/registerbyadmin?username=$username&isadaccount=$isadaccount&accountowner=$accountowner&token=$apptoken";
       return AppMethods::AccManagment($url);
   }


public function AccManagment($url){
        $ch  = curl_init($url);
        curl_setopt($ch, CURLOPT_RETURNTRANSFER, true);
        $data = json_decode(curl_exec($ch),true);
        $flag = curl_close($ch);
        if(isset($data['name'])){
        if($data['name'] == 'EXPIRED_TOKEN'){
            $_SESSION['Atoken'] = AppMethods::getApplicationToken();
            $_SESSION['Ctoken'] = AppMethods::getCompanyToken();
            AppMethods::AccManagment($url);
        }
    }
        return $data;
    }
>
Register Account By Admin Request
| Service Name: | Register Account by Admin |
| URL: | [GET] /applications/{application_api_key}/registerbyadmin |
| Description: | Registers an account to your application. If the 'username' you provide refers to an existing account in your company, service registers this account. Otherwise it creates new account. |
| Scope: | Your Company |
| Parameters: | application_key as URL variable: Your application is represented with application_key in the URL. Find your key in your admin portal under your application. |
| token: required Obtained token to call a service. This token should be application-scope. |
|
| username: required Username of account that you want to register to the application. It can be simple username, email, Active Directory account or mobile number. |
|
| accountowner: optional If you want to verify the new account you are adding, you can provide a verification data with this parameter. If you have a direct information about the SAASPASS user that you want to verify the account for, provide his SAASPASS ID or his verified email or his verified Active Directory account or his verified phone number as 'accountowner'. If as 'accountowner', you provide an email that is not verified yet, SAASPASS will send verification link to this email and when user verifies this link with her/his SAASPASS credentials, the account will be verified for that user. But not verified email can be provided only if 'username' refers to a simple username account or an Active Directory account (not email or mobile number account) |
|
| isadaccount: optional If the account you are trying to register is Active Directory account, this parameter must be 'true'. Otherwise it is 'false' by default. |
|
| Token Requirement: | It requires application-scope token. Read Authentication section for more info |
| Example Request: | https://www.saaspass.com/sd/rest/applications/CPAYR1SL7VN51WQA/registerbyadmin?username=jane.doe&isadaccount=false&accountowner=779034663&token=0PIY25S32US3WYP9ZGUFCZBAYTEMIFSF8THRMWPC59NHD0BPCSXKSSODZSCNCLPY |
| Response: | If the call to this resource is successful you will get a 200 (OK) HTTP response. Successful code means account is registered to the application successfully and it is added to related Application Group. But it may not be successfully verified yet. Response that SAASPASS returns has detailed information within below JSON structure: |
{"resultMessage":"Successful","isVerified":true,"isPendingOnEmail":false,"isAccountOwnerBlocked":false,"warning":null}resultMessage (String): Contains message about result. It is "Successful" if operation is successful without any warning. It is "Successful with warning" if there is a warning message. isVerified (Boolean): 'true' if added account is verified for a user also. 'false' if it is not verified yet. isPendingOnEmail (Boolean): 'true' if account is not verified but it is pending on email verification. isAccountOwnerBlocked (Boolean): 'true' if the owner of account is blocked from logging in to the applications since it is waiting your approval of recovery operation that user did. You can approve her/his recovery and unblock from admin portal. warning (String): Contains warning message if there is a warning about added account. |
|
| If the call to this resource is unsuccessful, you will get a non-200 HTTP status code relative to the type of error. For more on this topic see our RESPONSES & ERROR HANDLING |
Details
- If you want to register an existing account to your application (meaning existing account in SAASPASS under your company), you can follow below logic to use the service:
- If account is an email account or phone number account or an Active Directory account, 'username' should be username of this account. If account is already verified, you don’t need to provide 'accountowner' parameter. But if you provide it anyway, it should refer to the owner of account.
- If account is a simple username account, there might be more than 1 account in your company with given 'username'. If you provide 'accountowner' that refers to the owner of a verified username account, service uses this one for registration. Otherwise, it will use the pending (not verified) username that exists in your company (or it will create new one if there is none).
- If 'username' does not refer to any account in your company, service creates new one for registration.
- If 'username' is simple username that is not verified in your company and you don't provide any 'accountowner' service will not be able to do registration and it will return VERIFICATION_DATA_IS_INVALID. So, if you are registering a simple username account, be sure either you are referring to a verified account or you are providing an 'accountowner' for it (which can be email address to).
- If the account you are registering is Active Directorty type ('isadacount' is true), 'username' must refer to existing AD account in your company. If it doesn’t exist, this call fails since AD type account cannot be created manually.
- If the account you are registering is already verified in SAASPASS and if you are providing 'accountowner' parameter, this parameter must refer to the current owner of the account.
Rate Limit
You can call this service 100 times in any 10 minutes. If you exceed the rate limit, response will result in "Too many requests". For more on this topic see our RESPONSES & ERROR HANDLING
Register Account By User
Register Account By User
public static bool RegistrationByUser(string username, bool isadaccount, string saaspassid, string otp, string apptoken)
{
    string urlForRegistrationByUser = "https://www.saaspass.com/sd/rest/applications/" + apiKey + "/registerbyuser?username=" + username + "&isadaccount=" + isadaccount + "&saaspassid=" + saaspassid + "&otp=" + otp + "&token=" + apptoken;
    return CheckResponse(urlForRegistrationByUser);
}

public static bool CheckResponse(string url)
{
    try
    {
        WebRequest webRequest = WebRequest.Create(url);
        if (webRequest.GetResponse() != null)
        {
            HttpWebResponse response = (HttpWebResponse)webRequest.GetResponse();
            if (response.StatusCode == HttpStatusCode.OK)
            {
                if (response.GetResponseStream() != null)
                {
                    StreamReader reader = new StreamReader(response.GetResponseStream());
                    string jsonString = reader.ReadToEnd();
                    if (jsonString != null && !jsonString.Equals(""))
                    {
                        JToken tokenJtoken = JObject.Parse(jsonString);
                        ErrMessage = tokenJtoken.SelectToken("resultMessage") != null ? (string)tokenJtoken.SelectToken("resultMessage") : "";
                        ErrMessage += tokenJtoken.SelectToken("warning") != null ? " - " + (string)tokenJtoken.SelectToken("warning") : "";
                    }
                }
                return true;
            }
            else
                return false;
        }
        else
            return false;
    }
    catch (WebException e)
    {
        using (WebResponse response = e.Response)
        {
            HttpWebResponse httpResponse = (HttpWebResponse)response;
            if (httpResponse != null)
            {
                using (Stream data = response.GetResponseStream())
                using (var reader = new StreamReader(data))
                {
                    if (httpResponse.StatusCode.ToString()=="429")
                    {
                        ErrMessage = " X-Rate-Limit-Limit " + httpResponse.Headers["X-Rate-Limit-Limit"];
                        ErrMessage += " ### X-Rate-Limit-Remaining " + httpResponse.Headers["X-Rate-Limit-Remaining"];
                        ErrMessage += " ### X-Rate-Limit-Resets " + httpResponse.Headers["X-Rate-Limit-Resets"];
                    }
                    else
                        ErrMessage += reader.ReadToEnd();
                }
            }
        }
        return false;
    }
}
import org.springframework.http.ResponseEntity;
import org.springframework.web.client.RestTemplate;

public class RegisterByUser {

    private static final String API_URL = "https://www.saaspass.com/sd/rest";

    public SpResponse registerbyuser(String username, String saaspassid, String otp, boolean isadaccount) {
        String url = "%s/applications/%s/registerbyuser?username=%s&saaspassid=%s&otp=%s&isadaccount=%s&token=%s";
        url = <String class=""></String>format(url, API_URL, APP_API_KEY, username, saaspassid, otp, isadaccount, getAppToken());
        ResponseEntity<?> r = call(url, SpResponse.class);
        return r.getStatusCode() == OK ? (SpResponse) r.getBody() : null;
    }

    private <T> ResponseEntity<?> call(String url, Class<T> responseType) {

        RestTemplate restTemplate = new RestTemplate();
        restTemplate.setErrorHandler(new ResponseErrorHandler());

        try {
            return ResponseEntity.ok(restTemplate.getForObject(url, responseType));
        } catch (ApiException e) {
            return ResponseEntity.status(e.getStatusCode()).body(e.getErrorResponse());
        }
    }
}
def registration(self, username, id, otp):
   url = "%s/applications/%s/registerbyuser?username=%s&saaspassid=%s&otp=%s&token=%s" \
            % (Constant.API_URL, Constant.APP_API_KEY, username, id, otp, self.appT.get())
   response = requests.get(url)
   if response.status_code == 'EXPIRED_TOKEN':
       self.appT.invalidate()
       self.registration(username, id, otp)
   else:
       response.json()
   return response.json()


@app.route('/registration', methods=['GET','POST'])
def Registration():
   form = RegisterByUserForm(request.form)
   if request.method == 'POST' and form.validate_on_submit():
      result = appService.registration(form.username.data, form.id.data, form.otp.data)
      flash(result)
   return render_template('registration.html', title='Registration', form=form)
<?php
public function AccManagment($url){
        $ch  = curl_init($url);
        curl_setopt($ch, CURLOPT_RETURNTRANSFER, true);
        $data = json_decode(curl_exec($ch),true);
        $flag = curl_close($ch);
        if(isset($data['name'])){
        if($data['name'] == 'EXPIRED_TOKEN'){
            $_SESSION['Atoken'] = AppMethods::getApplicationToken();
            $_SESSION['Ctoken'] = AppMethods::getCompanyToken();
            AppMethods::AccManagment($url);
        }
    }
        return $data;
    }


 public static function RegByUser($user,$isadacc,$saaspassID,$otp,$tokennn){
       $url = AppMethods::$mydomain ."/". AppMethods::$apiKey."/registerbyuser?username=$user&isadaccount=$isadacc&saaspassid=$saaspassID&otp=$otp&token=$tokennn";
       return AppMethods::AccManagment($url);
    }
>
Register Account By User Request
| Service Name: | Register Account by User |
| URL: | [GET] /applications/{application_api_key}/registerbyuser |
| Description: | Registers an account to your application and verifies it for user that is provided. If the 'username' you provide refers to an existing account in your company, service registers this account. Otherwise it creates new account. |
| Scope: | Your Company |
| Parameters: | application_key as URL variable: Your application is represented with application_key in the URL. Find your key in your admin portal under your application. |
| username: required Username of account that you want to register to the application. It can be simple username, email, Active Directory account or mobile number. |
|
| token: required Obtained token to call a service. This token should be application-scope. |
|
| isadaccount: optional If the account you are trying to register is Active Directory account, this parameter must be 'true'. Otherwise it is 'false' by default. |
|
| saaspassid: required SAASPASS ID of user that account will be verified for. |
|
| otp: required One-time password that is generated by user via user's SAASPASS |
|
| Token Requirement: | It requires application-scope token. Read Authentication section for more info |
| Example Request: | https://www.saaspass.com/sd/rest/applications/CPAYR1SL7VN51WQA/registerbyuser?username=xterser%40addomain.co\&isadaccount=true&saaspassid=079034663\&otp=12151\&token=0PIY25S32US3WYP9ZGUFCZBAYTEMIFSF8THRMWPC59NHD0BPCSXKSSODZSCNCLPY |
| Response: | If the call to this resource is successful you will get a 200 (OK) HTTP response. Successful code means account is registered to the application successfully and it is added to related Application Group. But it may not be successfully verified yet. Response that SAASPASS returns has detailed information within below JSON structure: |
{"resultMessage":"Successful","isVerified":true,"isPendingOnEmail":false,"isAccountOwnerBlocked":false,"warning":null}resultMessage (String): Contains message about result. It is "Successful" if operation is successful without any warning. It is "Successful with warning" if there is a warning message. isVerified (Boolean): 'true' if added account is verified for a user also. 'false' if it is not verified yet. isPendingOnEmail (Boolean): 'true' if account is not verified but it is pending on email verification. isAccountOwnerBlocked (Boolean): 'true' if the owner of account is blocked from logging in to the applications since it is waiting your approval of recovery operation that user did. You can approve her/his recovery and unblock from admin portal. warning (String): Contains warning message if there is a warning about added account. |
|
| If the call to this resource is unsuccessful, you will get a non-200 HTTP status code relative to the type of error. For more on this topic see our RESPONSES & ERROR HANDLING |
Details
- If you want to register an existing account to your application (meaning existing account in SAASPASS under your company), you can follow below logic to use the service:
- If account is an email account or phone number account or an Active Directory account, 'username' should be username of this account. If account is already verified, owner of account must be the user that is represented by provided 'saaspassid'.
- If account is a simple username account, service will check if there is a verified username account for given user and if there is, it will register this account. If there is no verified username for the user, it will use pending (not verified) username account if there is one in your company. Otherwise, it will create new one.
- If 'username' does not refer to any account in your company, service creates new one for registration.
- If the account you are registering is Active Directorty type ('isadacount' is true), 'username' must refer to existing AD account in your company. If it doesn’t exist, this call fails since AD type account cannot be created manually.
- If the account you are registering is already verified in SAASPASS, 'saaspassid' parameter must refer to the owner of the account.
Rate Limit
You can call this service 100 times in any 10 minutes. If you exceed the rate limit, response will result in "Too many requests". For more on this topic see our RESPONSES & ERROR HANDLING
Unregister Account
Unregister Account
public static bool UnRegistration(string username, string apptoken)
{
    string urlForRegistration = "https://www.saaspass.com/sd/rest/applications/" + apiKey + "/unregister?username=" + username + "&token=" + apptoken;
    return CheckResponse(urlForRegistration);
}

public static bool CheckResponse(string url)
{
    try
    {
        WebRequest webRequest = WebRequest.Create(url);
        if (webRequest.GetResponse() != null)
        {
            HttpWebResponse response = (HttpWebResponse)webRequest.GetResponse();
            if (response.StatusCode == HttpStatusCode.OK)
            {
                if (response.GetResponseStream() != null)
                {
                    StreamReader reader = new StreamReader(response.GetResponseStream());
                    string jsonString = reader.ReadToEnd();
                    if (jsonString != null && !jsonString.Equals(""))
                    {
                        JToken tokenJtoken = JObject.Parse(jsonString);
                        ErrMessage = tokenJtoken.SelectToken("resultMessage") != null ? (string)tokenJtoken.SelectToken("resultMessage") : "";
                        ErrMessage += tokenJtoken.SelectToken("warning") != null ? " - " + (string)tokenJtoken.SelectToken("warning") : "";
                    }
                }
                return true;
            }
            else
                return false;
        }
        else
            return false;
    }
    catch (WebException e)
    {
        using (WebResponse response = e.Response)
        {
            HttpWebResponse httpResponse = (HttpWebResponse)response;
            if (httpResponse != null)
            {
                using (Stream data = response.GetResponseStream())
                using (var reader = new StreamReader(data))
                {
                    if (httpResponse.StatusCode.ToString()=="429")
                    {
                        ErrMessage = " X-Rate-Limit-Limit " + httpResponse.Headers["X-Rate-Limit-Limit"];
                        ErrMessage += " ### X-Rate-Limit-Remaining " + httpResponse.Headers["X-Rate-Limit-Remaining"];
                        ErrMessage += " ### X-Rate-Limit-Resets " + httpResponse.Headers["X-Rate-Limit-Resets"];
                    }
                    else
                        ErrMessage += reader.ReadToEnd();
                }
            }
        }
        return false;
    }
}
import org.springframework.http.ResponseEntity;
import org.springframework.web.client.RestTemplate;

public class Unregister {

    private static final String API_URL = "https://www.saaspass.com/sd/rest";

    public SpResponse unregister(String username) {
        String url = "%s/applications/%s/unregister?username=%s&token=%s";
        url = String.format(url, API_URL, APP_API_KEY, username, getAppToken());
        ResponseEntity<?> r = call(url, SpResponse.class);
        return r.getStatusCode() == OK ? (SpResponse) r.getBody() : null;
    }

    private <T> ResponseEntity<?> call(String url, Class<T> responseType) {

        RestTemplate restTemplate = new RestTemplate();
        restTemplate.setErrorHandler(new ResponseErrorHandler());

        try {
            return ResponseEntity.ok(restTemplate.getForObject(url, responseType));
        } catch (ApiException e) {
            return ResponseEntity.status(e.getStatusCode()).body(e.getErrorResponse());
        }
    }
}
def unregister(self, username):
   url = "%s/applications/%s/unregister?username=%s&token=%s" % (Constant.API_URL, Constant.APP_API_KEY, username, self.appT.get())
   response = requests.get(url)
   if response.status_code == 'EXPIRED_TOKEN':
       self.appT.invalidate()
       self.unregister(username)
   else:
       response.json()
   return response.json()


@app.route('/dashboard-unregister', methods=['GET', 'POST'])
def UnregisterAccount():
   form = UnregisterAccountForm(request.form)
   if request.method == 'POST' and form.validate_on_submit():
       result = appService.unregister(form.username.data)
       flash(result)
   return render_template('dashboard-unregister.html', title='Dashboard_UnregisterAccount', form=form)
Unregister Account
| Service Name: | Unregister Accountr |
| URL: | [GET] /applications/{application_api_key}/unregister |
| Description: | Removes given account from the application. (Account stays in your company)account. Otherwise it creates new account. |
| Scope: | Your Application |
| Parameters: | application_key as URL variable:** Your application is represented with application_key in the URL. Find your key in your admin portal under your application. |
| token: required Obtained token to call a service. This token should be application-scope. |
|
| username: required Username of account that you want to unregister from the application. It can be simple username, email, Active Directory account or mobile number. |
|
| Token Requirement: | It requires application-scope token. Read Authentication section for more info |
| Example Request: | https://www.saaspass.com/sd/rest/applications/CPAYR1SL7VN51WQA/unregister?username=jane.doe%40emaild.com&token=0PIY25S32US3WYP9ZGUFCZBAYTEMIFSF8THRMWPC59NHD0BPCSXKSSODZSCNCLPY |
| Response: | If the call to this resource is successful you will get a 200 (OK) HTTP response. Successful code means account is removed from Application Group of given application. But if account is under some other group that is also assigned to same application, successful response will have warning about it. Response that SAASPASS returns has detailed information within below JSON struct: |
{"resultMessage":"Successful","isVerified":true,"isPendingOnEmail":false,"isAccountOwnerBlocked":false,"warning":null}resultMessage (String): Contains message about result. It is "Successful" if operation is successful without any warning. It is "Successful with warning" if there is a warning message. isVerified (Boolean): 'true' if added account is verified for a user also. 'false' if it is not verified yet. isPendingOnEmail (Boolean): 'true' if account is not verified but it is pending on email verification. isAccountOwnerBlocked (Boolean): 'true' if the owner of account is blocked from logging in to the applications since it is waiting your approval of recovery operation that user did. You can approve her/his recovery and unblock from admin portal. warning (String): Contains warning message if there is a warning about added account. |
|
| If the call to this resource is unsuccessful, you will get a non-200 HTTP status code relative to the type of error. For more on this topic see our RESPONSES & ERROR HANDLING |
Details
- The 'username' must refer to an existing account in your company that is assigned to the application via its Application Group. Otherwise process fails.
- The account might be assigned to the application via Application Group and also via some other group (s) (i.e. custom group). In this case, account will be removed from Application Group but it will still be assigned to application via other group and user can still login to your application with this account. In the response for this case, there will be 'warning' message that informs you about it and you will need to handle this case manually from your admin portal.
Rate Limit
You can call this service 100 times in any 10 minutes. If you exceed the rate limit, response will result in "Too many requests". For more on this topic see our RESPONSES & ERROR HANDLING
Tracker Id Validation
For security reasons SAASPASS offers to the custom backend server a way to validate any trackerID received after a login request.
TrackerID request
| Service Name: | TrackerID Validation |
| URL: | applications/{application_API_key}/trackers/{tracker_value}?token={token\\_value}&account={account\\_value} |
| Description: | It validates if the POST request received by application is coming from SAASPASS. |
| Scope: | Application Scope |
| Parameters: | application key: required Application key given for your Custom application. |
| token: required Obtained token to call a service. This token should be application-scope. |
|
| account: required User account for which the tracker was issued. |
|
| Token Requirement: | It requires application-scope token. Read Authentication section for more info |
| Example Request: | https://www.saaspass.com/sd/rest/applications/00de4v5ocd9v338w/trackers/b4097ed670833a83?token=HDFAIOANASDCJBKLHUFUIQWEJKUHSASD&account=john.s@yourdomain.com |
| Response: | If TrackerID is valid a 200 (OK) status HTTP response is sent and the user can be logged in. If TrackerID is not valid a non-200 HTTP status code is sent. Check them out in Responses & Error Handling section. |
TrackerID request
public static bool TrackerIdValidation(string username, string trackers, string appToken)
{
    string urlForTracker = "https://www.saaspass.com/sd/rest/applications/" + apiKey + "/trackers/" + trackers + "?token=" + appToken + "&account=" + username;
    return CheckResponse(urlForTracker);
}

public static bool CheckResponse(string url)
{
    try
    {
        WebRequest webRequest = WebRequest.Create(url);
        if (webRequest.GetResponse() != null)
        {
            HttpWebResponse response = (HttpWebResponse)webRequest.GetResponse();
            if (response.StatusCode == HttpStatusCode.OK)
            {
                if (response.GetResponseStream() != null)
                {
                    StreamReader reader = new StreamReader(response.GetResponseStream());
                    string jsonString = reader.ReadToEnd();
                    if (jsonString != null && !jsonString.Equals(""))
                    {
                        JToken tokenJtoken = JObject.Parse(jsonString);
                        ErrMessage = tokenJtoken.SelectToken("resultMessage") != null ? (string)tokenJtoken.SelectToken("resultMessage") : "";
                        ErrMessage += tokenJtoken.SelectToken("warning") != null ? " - " + (string)tokenJtoken.SelectToken("warning") : "";
                    }
                }
                return true;
            }
            else
                return false;
        }
        else
            return false;
    }
    catch (WebException e)
    {
        using (WebResponse response = e.Response)
        {
            HttpWebResponse httpResponse = (HttpWebResponse)response;
            if (httpResponse != null)
            {
                using (Stream data = response.GetResponseStream())
                using (var reader = new StreamReader(data))
                {
                    if (httpResponse.StatusCode.ToString()=="429")
                    {
                        ErrMessage = " X-Rate-Limit-Limit " + httpResponse.Headers["X-Rate-Limit-Limit"];
                        ErrMessage += " ### X-Rate-Limit-Remaining " + httpResponse.Headers["X-Rate-Limit-Remaining"];
                        ErrMessage += " ### X-Rate-Limit-Resets " + httpResponse.Headers["X-Rate-Limit-Resets"];
                    }
                    else
                        ErrMessage += reader.ReadToEnd();
                }
            }
        }
        return false;
    }
}
public class Tracker {

    private static final String API_URL = "https://www.saaspass.com/sd/rest";

    public HttpStatus validate(String tracker, String account) {
        String url = "%s/applications/%s/trackers/%s?account=%s%token=%s";
        url = String.format(url, API_URL, APP_API_KEY, tracker, account, getAppToken());
        ResponseEntity<?> r = call(url, TrackerResponse.class);
        return r.getStatusCode();
    }

    private <T> ResponseEntity<?> call(String url, Class<T> responseType) {

        RestTemplate restTemplate = new RestTemplate();
        restTemplate.setErrorHandler(new ResponseErrorHandler());

        try {
            return ResponseEntity.ok(restTemplate.getForObject(url, responseType));
        } catch (ApiException e) {
            return ResponseEntity.status(e.getStatusCode()).body(e.getErrorResponse());
        }
    }

    private class TrackerResponse {
    }
}
def trackerValidation(self, trackerid, username):
   url = "%s/applications/%s/trackers/%s?&token=%s&account=%s" % (Constant.API_URL, Constant.APP_API_KEY, trackerid, self.appT.get(), username)
   response = requests.get(url)
   if response.status_code == 'EXPIRED_TOKEN':
       self.appT.invalidate()
       self.trackerValidation(trackerid, username)
   else:
       response
   return response.status_code == 200
<?php
public static function checkTrackerId($tracker,$user,$tokenm){
       $url = AppMethods::$mydomain."/".AppMethods::$apiKey."/trackers/$tracker?token=$tokenm&account=$user";
       return AppMethods::getHttpCode($url);
    }


                      |               |
----------------------|---------------|
**Service Name:**     | TrackerID Validation
**URL:**              | `applications/{application_API_key}/trackers/{tracker_value}?token={token\\_value}&account={account\\_value}`
**Description:**      | It validates if the POST request received by application is coming from SAASPASS.
**Scope:**            | Application Scope
**Parameters:**       | **application key**: required<br><br> Application key given for your Custom application.
                      | **token**: required<br><br> Obtained token to call a service. This token should be application-scope.
                      | **account**: required<br><br> User account for which the tracker was issued.
**Token Requirement:**| It requires application-scope token. Read Authentication section for more info
**Example Request:**  | `https://www.saaspass.com/sd/rest/applications/00de4v5ocd9v338w/trackers/b4097ed670833a83?token=HDFAIOANASDCJBKLHUFUIQWEJKUHSASD&account=john.s@yourdomain.com`
**Response:**         | If TrackerID is valid a 200 (OK) status HTTP response is sent and the user can be logged in.<br><br>If TrackerID is not valid a non-200 HTTP status code is sent. Check them out in [Responses & Error Handling](#error-cases) section.

public function getHttpCode($url){
        $ch = curl_init($url);
        curl_setopt($ch, CURLOPT_RETURNTRANSFER, true);
        $data = json_decode(curl_exec($ch),true);
        $httpcode = curl_getinfo($ch, CURLINFO_HTTP_CODE);
        curl_close($ch);
        return $httpcode;
    }
>
Error Cases
HTTP Statuses
import com.fasterxml.jackson.core.JsonParseException;
import com.fasterxml.jackson.databind.ObjectMapper;
import org.springframework.http.client.ClientHttpResponse;
import org.springframework.web.client.DefaultResponseErrorHandler;
import java.io.IOException;

class ResponseErrorHandler extends DefaultResponseErrorHandler {

    @Override
    public void handleError(ClientHttpResponse response) throws IOException {
        try {
            ErrorResponse errorResponse = new ObjectMapper().readValue(response.getBody(), ErrorResponse.class);
            throw new ApiException(response.getStatusCode(), errorResponse);
        } catch (JsonParseException e) {
            String message = response.getRawStatusCode() + " - " + response.getStatusText();
            throw new ApiException(response.getStatusCode(), new ErrorResponse(message));
        }
    }
}

class ApiException extends RuntimeException {

    private HttpStatus statusCode;
    private ErrorResponse errorResponse;

    ApiException(HttpStatus statusCode, ErrorResponse errorResponse) {
        this.statusCode = statusCode;
        this.errorResponse = errorResponse;
    }

    HttpStatus getStatusCode() { return statusCode; }
    ErrorResponse getErrorResponse() { return errorResponse; }
}

public class ErrorResponse {

    private RestErrorEnum name;
    private String message;
    private String informationlink;

    public ErrorResponse() {}
    public ErrorResponse(String message) { this.message = message; }

    public RestErrorEnum getName() { return name; }
    public String getMessage() { return message; }
    public String getInformationlink() { return informationlink; }
}
| Error Code | Error Message |
|---|---|
| 200 | OK |
| 201 | Resource created |
| 400 | Bad request |
| 401 | Unauthorized |
| 403 | Forbidden |
| 404 | Resource not found |
| 429 | Too Many Requests |
| 500 | SAASPASS server error |
Rate Limit Headers
- Calling account management services has rate limiting (You can find rate limit of each services on their definition page).
- Rate limit for services has 10 minute Windows. New time window is opened every 10 minutes.
- If number of call for a service reaches to its limit in a time window, service call fails. The {ERROR NAME} in the response body is TOO_MANY_REQUEST and response has below headers (when response Error Code is 429).
| Response Headers | Definition |
|---|---|
| X-Rate-Limit-Limit | Maximum rate limit of the called service in a time window |
| X-Rate-Limit-Resets | Time info that next window will open (unix epoch - Long) |
| X-Rate-Limit-Remaining | Number of request remains in current window |
Error Codes
enum RestErrorEnum {

    CONNECTION_PROBLEMS("Connection problems."),
    INVALID_RESOURCE_ID("Invalid resource ID specified."),
    EMPTY_OR_NULL_VALUE("Empty or null parameter value."),
    MAX_LENGTH_EXCEEDED("Maximum parameter length exceeded."),
    INVALID_PARAMETER_VALUE("Invalid parameter value."),
    APPLICATION_NOT_FOUND("Application not found."),
    SAASPASS_SERVER_ERROR("SAASPASS internal server error. Please try again."),
    TRACKER_NOT_FOUND("The specified tracker was not found."),
    INVALID_OTP("The provided OTP is invalid."),
    NO_DEVICE_FOUND("No active device found for user."),
    INVALID_IP("Action not allowed from this IP address."),
    APPLICATION_NOT_ACTIVE("Application is not active."),
    TRACKER_EXPIRED("Tracker has expired."),
    INVALID_CREDENTIALS("Invalid authentication credentials."),
    EXPIRED_TOKEN("The provided token has expired. Please re-authenticate."),
    ACTION_FORBIDDEN_FOR_APPLICATION("Action forbidden for this application."),
    USER_NOT_ASSIGNED_TO_APPLICATION("User not assigned to application"),
    USER_NOT_ASSIGNED_TO_COMPANY("User not assigned to company."),
    INVALID_RDP_SESSION("Invalid RDP session."),
    EXPIRED_RDP_SESSION("Expired RDP session."),
    INVALID_REQUEST("Invalid JSON request body");

    private String message;

    RestErrorEnum(final String message) {
        this.message = message;
    }
}
SAASPASS RESTful API uses some of the standard HTTP status codes alongside a JSON response description.
JSON Structure in the response body:
{
"name": "{ERROR NAME}",
"message": "{Error description}",
"informationlink": "{Link to error documentation}"
}
> Generic Errors
| Error Code | Error Message | When It May Occur |
|---|---|---|
| INVALID_REQUEST | Invalid JSON request body | Invalid JSON request body |
| INVALID_RESOURCE_ID | Invalid resource ID | When the provided resource identificator does not exist. |
| EMPTY_OR_NULL_VALUE | Empty or null parameter value sent in request. | When a requested parameter has no value or an empty value, either as a URL parameter or a JSON field. |
| MAX_LENGTH_EXCEEDED | Maximum parameter length exceeded. | When a requested parameter value has exceeded the maximum length, either as a URL parameter or a JSON field. |
| INVALID_PARAMETER_VALUE | Invalid parameter value. | When a requested parameter has an invalid value. Most commonly, the value is not in its predefined format. |
| SAASPASS_SERVER_ERROR | SAASPASS internal server error. | Try the action again. If the problem persists, please inform our administrators. |
| TOO_MANY_REQUEST | Rate Limit exceeded for this service. Wait till time window resets | When same service calls reached to its rate limit in current time window (see Rate Limit section). |
> Credential Errors
| Error Code | Error Message | When It May Occur |
|---|---|---|
| INVALID_CREDENTIALS | Invalid authentication credentials. | When the credentials sent during service call are incorrect. When you receive this error it means that either your credential parameters (company credentials or application credentials are invalid or that your application has been deleted by your administrator. See detailed info on Authentication |
| INVALID_OTP | The provided OTP is invalid. | When the provided OTP value is invalid or expired. |
| NO_DEVICE_FOUND | No active device found for user. | When there is no active device found for the specified user, or the user itself is not active |
| TRACKER_NOT_FOUND | The specified tracker was not found | When the specified parameters in the request do not match any of our tracker records. |
| INCORRECT_CREDENTIALS | Incorrect credentials. If problem continues, check time/time zone of your mobile device | When calling Register Account By User service and user's SAASPASS credentials are not valid. |
> Token Errors
| Error Code | Error Message | When It May Occur |
|---|---|---|
| EXPIRED_TOKEN | The provided token is expired. Please re-authenticate | When the provided token has expired. You should generate new token and call the service with it. Token generation and expiration policy are different for company-scope and application-scope services. For more information about tokens, see Authentication |
| INVALID_TOKEN | The provided token has expired. Please re-authenticate. | When the provided token value is incorrect. You should generate new token and call the service with it. For more information about tokens, read Authentication API page. Token generation and expiration policy are different for company-scope and application-scope services. For more information about tokens, see Authentication |
> Application Errors
| Error Code | Error Message | When It May Occur |
|---|---|---|
| APPLICATION_NOT_FOUND | Application not found. | When an Application was not found due to one or more incorrect parameters. |
| APPLICATION_NOT_ACTIVE | Application is not active. | When the specified application is not active. |
| ACTION_FORBIDDEN_FOR_APPLICATION | Action forbidden for this application. | When the application doing the REST call does not have rights to perform the call. |
| INVALID_IP | Action not allowed from this IP address. | When the IP address of client that is calling a service does not match the setup IP filter for your application or your company. If the called service has application-scope (i.e OtpCheck, RegisterAccount by Admin…), check IP filtering setup in your application configuration. If the service has company-scope (i.e Add Account, Remove Account…), check IP filtering setup in your company's corporate settings. See IP Filtering info on Authentication |
> One-Time Password Login Specific Errors
| Error Code | Error Message | When It May Occur |
|---|---|---|
| LOGINFAIL_ACCOUNT_NOTASSIGNED_OR_NOTVERIFIED | User account is not assigned to the application or it is not verified | The user account sent in the request is not assigned to the application or not verified under SAASPASS portal by the admin. |
| LOGINFAIL_OTP_MANDATORY_FOR_ACCOUNT | OTP is mandatory for account that is assigned to application and verified | When the user account sent in the request is verifed and assigned to the application under SAASPASS portal by the admin must provide valid One-Time Password. In this case, OTP value is empty. |
| LOGINFAIL_UNVERIFIED_ASSIGNED_ACCOUNT_NOT_ALLOWED | Login with an unverified/assigned account is not allowed for the application | When administrator does not allow the login for NOT verified accounts which are assigned to the application in SAASPASS Portal. This setting can be changed from "Application Settings" on SAASPASS Portal. |
| LOGINFAIL_UNASSIGNED_ACCOUNT_NOT_ALLOWED | Login with an unverified account that is not assigned to the application is not allowed | When administrator does not allow the login for NOT verified accounts which are NOT assigned to the application in SAASPASS Portal. This setting can be changed from "Application Settings" on SAASPASS Portal. |
| LOGINFAIL_NONEXIST_ACCOUNT_NOT_ALLOWED | Login with non-existing account is not allowed for the application | When administrator does not allow the login for accounts which are NOT added to the company in SAASPASS Portal. This setting can be changed from "Application Settings" on SAASPASS Portal. |
| LOGINFAIL_ACCOUNT_BLOCKED | User account is blocked from login to applications | The user account requesting for login is blocked. Blocked accounts are not allowed to log into SAASPASS protected applications. Administrator is able to unblock the account from SAASPASS Portal. |
| LOGINFAIL_NOTASSIGNED_ALLOWED_IF_ACTIVE | Login with not-assigned account is allowed for application only if account is active | When administrator allow the login for accounts which are NOT assigned to the application if account is added and active in SAASPASS Portal. This setting can be changed from "Application Settings" on SAASPASS Portal. |
> Account Management Errors
| Error Code | Error Message | When It May Occur |
|---|---|---|
| ACCOUNT_ALREADY_EXISTS | Account already exists | When calling Adding Account service and the account already exists in your company. |
| ACCOUNT_IS_VERIFIED_FOR_ANOTHER_USER | Account is already verified and the owner is different than the verification data refers | When calling an account management service with already verified account and given 'accountowner' does not refer to the owner of this account. |
| VERIFICATION_DATA_IS_INVALID | Verification data is invalid | When calling an account management service with 'accountowner' parameter but value of parameter is invalid or it is SAASPASS ID that cannot be found. |
| PENDING_ACCOUNT_NOT_FOUND | Pending account not found | When calling Verify Account service but a pending account with given 'username' not found in your company to verify. |
| NOT_ALLOWED_TO_VERIFY_ACCOUNT | This type of account is not allowed to be verified manually | When calling Register Account By User service and user's SAASPASS credentials are not valid. |
| NOT_ALLOWED_TO_VERIFY_VIA_EMAIL | This type of account is not allowed to be verified via verification email | When calling an account management service with 'accountowner' parameter that is email address but the account type is also email address. If email address belongs to your domain, 'accountowner' parameter should refer to a SAASPASS user directly or it should be empty. |
| ACTION_NOT_SUCCESSFUL | Action is not successful. Check your parameters or developers page | When calling an account management service results in fail due to some reason. You should check your request and parameters. |
| NOT_ALLOWED_ADDING_TO_GROUP | Provided group is managed automatically. Adding account manually is not allowed | When calling an account management service with 'grouplist' parameter that contains a group which is not allowed to add account manually. Account can be added to custom groups or Application Group. |
| GROUP_NOT_FOUND | Group not found | When calling an account management service with 'grouplist' parameter that contains a group which cannot be found in your company. |
| NOT_ALLOWED_TO_DELETE_AD_ACCOUNT | AD type account cannot be deleted manually | When calling Remove Account service but the type of given account is Active Directory Account. AD accounts can be deleted from Active Directory and synced with AD agent to SAASPASS. |
| NOT_ALLOWED_TO_CREATE_AD_ACCOUNT | AD type account cannot be created manually | When calling Add Account, Register Account By Admin, Register Account By User services and given account type is Active Directory account. AD accounts can be created from Active Directory and synced with AD agent to SAASPASS. |
| USER_NOT_ASSIGNED_TO_APPLICATION | User not assigned to application. | When the username for which you are requesting OTP check is not assigned to SAASPASS as a user of your application. When you receive this message you can either block his login |
| USER_NOT_ASSIGNED_TO_COMPANY | User not assigned to company. | When the username for which you are requesting OTP check is not assigned to SAASPASS as a user of your company. |
| ACCOUNT_NOT_FOUND | Account not found | When calling an account management service that 'username' does not refer to an existing account in your company while it was required to be. |
| NO_UNIQUE_ACCOUNT_FOUND | No unique account found for given username | When calling an account management service that is not referring to unique account in your company. This generally can happen if 'username' parameter refers to multiple simple username account. If there are more than 1 account with same username and you want to use the verified one, you should provide owner of this account with 'accountowner' parameter. |
SAASPASS Connect
Integration
This section explains how you can add SAASPASS Connect button to your application web page and implement the authentication flow.
Authentication flow is implemented with OpenID Connect (and Oauth2.0) protocol. As developer, you will find required information in brief here about client implementation of OpenID Connect but for more details about protocol, you can refer to OpenID Connect Basic Client Implementer's Guide: http://openid.net/specs/openid-connect-basic-1_0.html
Note: The operation after successful authentication in your application side is up to your needs. For example you will get the email of the authenticated user after SAASPASS sends you a successful authentication response. And if you defined a proper scope to get the full user profile from SAASPASS, you MAY get the username that user defined on the profile (if user provided the username on profile). So you can decide to either use email or this username to be the account name of the user in your application. Also it is up to you to check if this account name exists in your database. So you can allow users that already exist in your system only (registered before) or you can just create a new user right after successful authentication.
Add SAASPASS Connect button to your login page:
String clientId = "{your_client_id}";
String redirectUri = "{your_redirect_url}";
String scopes = "{your_scope_list}";
String state = UUID.randomUUID().toString();
//Add to session since you will validate this later on server side
session.setAttribute("state", state);

<a href="https://www.saaspass.com/sd/oauth/authorize?response_type=code&client_id=<%=clientId%>&redirect_uri=<%=redirectUri%>&scope=<%=scopes%>&state=<%=state%>">
    <img src="assets/login_with-saaspass.png" alt="Sign in with SAASPASS"/a>
</a>
Coming Soon...
- Add this button to your login page of your application:
- User clicks the button and SAASPASS Connect authentication starts.
- At the end of authentication, you will receive an ID Token which contains basic information about authenticated user by SAASPASS.
Send authentication request to SAASPASS:
//On your servlet handler, get parameters that is sent to your callback URL
doGet(HttpServletRequest request, HttpServletResponse response) {
    String authorizationCode = request.getParameter("code");
    String stateValue = request.getParameter("state");
    //validate state value here. It should match with the one you generated for button
    String your_state_code = (String)request.getSession().getAttribute("state");
    If(!stateValue.equals(your_state_code) {
             //ERROR
    }
}
Coming Soon...
- Request Method: GET
- Authorization end point URL: https://www.saaspass.com/sd/oauth/authorize
- Request Parameters:
| Parameter | Value | Details |
|---|---|---|
| response_type | code | This parameter-value pair initiates Basic Flow that is asking a temporary code from SAASPASS that will be used to obtain tokens |
| client_id | [CLIENT_KEY] | This is the 'App Key' that is given to you in the Integration tab of the application |
| redirect_uri | [CALLBACK_URL] | This is the URL on which the user will be redirected back to your application. This URL should be configured already in the 'Callback URL' configuration of the application |
| scope | [SCOPE_LIST] e.g. openid email address |
'scope' defines the list of user information that your application wants to retrieve from SAASPASS about authenticated user. Replace [SCOPE_LIST] with list of scopes that you request. Scopes should be space separated. openid: This is mandatory scope to be provided to proceed with openid connect protocol. email: This is mandatory scope to be provided. It lets user's email to be returned inside ID Token that you will see in that section. phone: (optional) Add this scope to get verified phone number of user if provided. profile: (optional) Add this scope to get more profile information of user. This will include info like name, family name, full name, gender, birth date and updated time. address: (optional) Add this scope to get address information of user. This will include info like street address, city, country and postal code of user. |
| state | {STATE} e.g. 1xx9xx9f8bfxx1 |
This state can be used to protect your flow against cross-site request forgery like attacks. You can generate a random string and replace with {STATE} in the URL pattern. State will be returned back in the response as well so that you can validate it by comparing with the one you generated and sent in the request |
- Example request pattern: https://www.saaspass.com/sd/oauth/authorize?response_type=code&client_id={CLIENT_KEY}&redirect_uri={CALLBACK_URL}?v=oauth2&scope={SCOPE_LIST}&state={STATE}
- Response:
- If the user authenticated themself with SAASPASS and granted your application to access their profile, the response will be sent back to the CALLBACK URL that you provided in the request:
- Response is in simple query parameters format.
- {CALLBACK_URL}?v=oauth2&code={AUTH_CODE}&state={STATE}
- Response parameters:
- {STATE}: If you provided 'state' in your authentication request, this value should be same with the one you provided. So you should validate this state first.
- {AUTH_CODE}: This is an authorization code. Code should be used to exchange it with access token and ID Token as explained in further steps.
Get Access Token and ID Token:
- Now since authentication was completed and authorization code is received, you are ready to obtain these tokens that are used to get information about authenticated user.
- Request Method: POST
- Token end point URL: https://www.saaspass.com/sd/oauth/token
- Header parameters:
| PARAMETER | VALUE |
|---|---|
| Content-type | application/x-www-form-urlencoded |
| Accept | application/json |
- Request parameters in body:
| PARAMETER | VALUE | DETAILS |
|---|---|---|
| grant_type | authorization_code | The value is 'authorization_code' which refers to the grant type of the flow that is being used |
| code | [AUTHORIZATION_CODE] | This is the value of the authorization code that is received at the end of the authorization request |
| redirect_uri | [CALLBACK_URL] | This is the URL on which the user was redirected back to your application and it is used by Authorization Server to match the configured one |
| client_id | [CLIENT_KEY] | This is the 'App Key' that is given to you in the Integration tab of the application |
| client_secret | [CLIENT_SECRET] | This is the 'App Password' that is given to you in the Integration tab of the application |
An example response body is:
{
"access_token": "901f6bfc-9cd2-4d40-8509-c3616ca80707",
"token_type": "bearer",
"expires_in": 86399,
"scope": "openid email",
"id_token": "eyJhbGciOiJSUzI1NiIsInR5cCI6IkpXVCJ9.eyJzdWIiOiIxMjM0NTY3ODkwIiwibmFtZSI6IkpvaG4gRG9lIiwiYWRtaW4iOnRydWV9.EkN-DOsnsuRjRO6BxXemmJDm3HbxrbRzXglbN2S4sOkopdU4IsDxTI8jO19W_A4K8ZPJijNLis4EZsHeY559a4DFOd50_OqgHGuERTqYZyuhtF39yxJPAjUESwxk2J5k_4zM3O-vtd1Ghyo4IbqKKSy6J9mTniYJPenn5-HIirE",
"email": "useremail@emdomain.com"
}
- Response:
- Response is in JSON format.
| PARAMETER | VALUE |
|---|---|
| access_token | This is access token. Access token can be used to get more information about authenticated user. Check 'Getting User Information' section |
| token_type | It is type of token which is 'bearer' for this response |
| expires_in | Expiration time of access token in seconds |
| scope | Contains scope(s) that was provided during request |
| This is email of users that they chose for authentication with your application within a SAASPASS Profile. This email is already verified by SAASPASS and you can use this as username of user for this authentication | |
| id_token | This is JSON Web Token that includes authenticated user's identity and it is signed by SAASPASS. Check 'Handling ID Token' for details |
//Here it is used Apache Http components. It is up to you how to handle Http request-responses here.
URI uri = new URIBuilder().setScheme("https")
            .setHost("www.saaspass.com")
            .setPath("/sd/oauth/token")
            .setParameter("grant_type", "authorization_code")
            .setParameter("code", "{your_authorization_code}")
            .setParameter("redirect_uri", "{your_callback_url}")
            .setParameter("client_id", "{your_client_id}")
            .setParameter("client_secret", "{your_client_secret}")
            .build();
HttpPost postRequest = new HttpPost(uri);
postRequest.setHeader("Content-type", "application/x-www-form-urlencoded");
postRequest.setHeader("Accept", "application/json");

HttpClient client = HttpClientBuilder.create().build();
HttpResponse response = client.execute(postRequest);

//read response as you want, get as String

JsonParser parser = new JsonParser();    //used 'gson' as json library
JsonObject responseJson = (JsonObject)parser.parse(result.toString());
String token = responseJson.get("access_token").getAsString();
String idToken = responseJson.get("id_token").getAsString();
//read other attributes
Coming Soon...
- If as developer, you need the email of authenticated user only as username for your application, you can simply use email value and finish the authentication process.
- ID Token contains user's identity information (like first name and last name) and more information about the authentication. It is also signed by SAASPASS.
- So you can use ID Token to get these information if needed.
Handle ID Token:
Token is Base64 encoded value. Example value:
eyJhbGciOiJSUzI1NiIsInR5cCI6IkpXVCJ9.eyJzdWIiOiIxMjM0NTY3ODkwIiwibmFtZSI6IkpvaG4gRG9lIiwiYWRtaW4iOnRydWV9.EkN-DOsnsuRjRO6BxXemmJDm3HbxrbRzXglbN2S4sOkopdU4IsDxTI8jO19W_A4K8ZPJijNLis4EZsHeY559a4DFOd50_OqgHGuERTqYZyuhtF39yxJPAjUESwxk2J5k_4zM3O-vtd1Ghyo4IbqKKSy6J9mTniYJPenn5-HIirE
String[] idTokenParts = idToken.split("\\.");
String idTokenHeader = base64UrlDecode(idTokenParts[0]);
String idTokenDataAsJsonStr = base64UrlDecode(idTokenParts[1]);   //Using any base64 decoding library
byte[] idTokenSignature = base64UrlDecodeToBytes(idTokenParts[2]);
Coming Soon...
- ID Token comes within token response during authentication flow. It is JSON Web Token (JWT) that includes identity information of authenticated user.
- ID Token consists of 3 parts which are separated by period characters (.) You can split these parts, Base64 decode them separately and handle.
> Part-1: Headers
JsonParser parser = new JsonParser();
JsonObject headersJson = (JsonObject)parser.parse(idTokenHeader);
String keyId = headersJson.get("kid").getAsString();
String algorithm = headersJson.get("alg").getAsString();
Coming Soon...
| PARAMETER | VALUE |
|---|---|
| alg | This identifies the algorithm that was used for signing |
| kid | It is identifier for the key that was used for signing |
> Part-2: ID Token Claims
This is 2nd part of ID Token and contains main data. See attribute details below. You MAY want to validate some attributes against their expected value.
JsonObject idTokenData = (JsonObject)parser.parse(idTokenDataAsJsonStr);

//if you want to validate issuer
String issuer = idTokenData.get("iss").getAsString();
if(!issuer.equals("http://www.saaspass.com")) {
    //ERROR
}

//if you want to validate client id
String clientId = idTokenData.get("aud").getAsString();
if(!clientId.equals("{your_client_id}")) {
    //ERROR
}

//This is unique identifier of user's SAASPASS profile
String userProfileId = idTokenData.get("sub").getAsString();

//User's verified email that can be used as username
String userEmail = idTokenData.get("email").getAsString();

//Id token expiration time
Long expirationTime = idTokenData.get("exp").getAsLong();
Coming Soon...
| PARAMETER | VALUE |
|---|---|
| iss | Identifier of issuer. This should be 'http://www.saaspass.com' for the ID Tokens that come from SAASPASS |
| sub | Unique identifier of user's profile that was chosen by user during authentication. Note that SAASPASS users may have multiple profiles that can have different email or same email |
| aud | Contains {CLIENT_KEY} that you provided on SAASPASS Connect configuration |
| exp | Expiration time of ID Token in Unix time. This ID Token should be ignored if expiration time passed current time |
| iat | Time when ID Token was issued. It is in Unix time |
| jti | Unique identifier of the ID Token |
| Email of authenticated user. It can be used as username of user for your application | |
| saaspass_id | This is unique identifier of user's SAASPASS account. It is up to your need to use it in your system |
> Part-3: Signature
- Before using ID Token, you should decide if you want to validate the signature of token. - Validating signature will prove that the user information is provided by SAASPASS. You don’t really need to validate signature in this flow since authentication flow was executed between your application server and SAASPASS. But if you are getting this ID Token through some 3rd party application or another layer of your authentication process, it is recommended to validate ID Token). - Signature is represented by Base64 decoded of 3rd part of ID Token. Token is signed using private key that is specific to your SAASPASS Connect that you configured on SAASPASS Admin Portal. So to validate signature, you can use public key that is given to you on DEVELOPERS tab under that SAASPASS Connect.
//Using boucnycastle to read public key
import org.bouncycastle.util.io.pem.PemObject;
import org.bouncycastle.util.io.pem.PemReader;

import java.security.PublicKey;
import java.security.spec.PKCS8EncodedKeySpec;
import java.security.spec.X509EncodedKeySpec;

//...

validateIdTokenSignature() {
    byte[] idTokenData = (idTokenParts[0] + "." + idTokenParts[1]).getBytes(StandardCharsets.UTF_8);
    String publicKeyAsStr = "{your_public_key}";
    PublicKey publicKey = getAsPublicKey(publicKeyAsStr);

    boolean isValidSignature = isValidSignature(idTokenData, idTokenSignature, publicKey);
    If(!isValidSignature) {
        //ERROR
    }
}

boolean isValidSignature(byte[] data, byte[] signature, PublicKey pubKey) throws GeneralSecurityException {
        Signature sig = Signature.getInstance("SHA256withRSA");
        sig.initVerify(pubKey);
        sig.update(data);

        return sig.verify(signature);
 }

PublicKey getAsPublicKey(final String publicKeyAsString) {
        final KeyFactory factory = KeyFactory.getInstance("RSA", "BC");
        final byte[] keyContentAsByte = getKeyContentAsByte(publicKeyAsString);
        final X509EncodedKeySpec pubKeySpec = new X509EncodedKeySpec(keyContentAsByte);
        return factory.generatePublic(pubKeySpec);
 }

byte[] getKeyContentAsByte(final String keyAsString) {
        final StringReader reader = new StringReader(keyAsString);
        final PemReader pemReader = new PemReader(reader);
        PemObject pemObject = null;
        try {
            pemObject = pemReader.readPemObject();
        } finally {
            pemReader.close();
        }
        return pemObject.getContent();
 }
Coming Soon...
Get User Information:
URI uri = new URIBuilder().setScheme("https")
        .setHost("www.saaspass.com")
        .setPath("/sd/oauth/userinfo")
        .build();
HttpGet getRequest = new HttpGet(uri);
getRequest.setHeader("Authorization", "Bearer "+accessToken);  //access token that you received before
getRequest.setHeader("Accept", "application/jwt");

HttpClient client = HttpClientBuilder.create().build();
HttpResponse response = client.execute(getRequest);

//... read response as you want, get as String

String[] jwtResponseParts = result.toString().split("\\.");
String userInfoAsJsonStr = base64UrlDecode(jwtResponseParts[1]);
JsonParser parser = new JsonParser();
JsonObject userInfoData = (JsonObject)parser.parse(userInfoAsJsonStr);
String profileId = userInfoData.get("sub").getAsString();
String country = userInfoData.get("address").getAsJsonObject().get("country").getAsString();
//...other attributes
Coming Soon...
- If user data that is given to you within access token response and ID Token is not enough you want to retrieve more information about user from SAASPASS, you should define scopes for those information as explained in previous steps. If you defined these scopes properly, you are able to get more information about user. For this, see how you can get info below.
- Request Method: GET
- User Info end point URL: https://www.saaspass.com/sd/oauth/userinfo
- Header parameters:
| PARAMETER | VALUE | DETAILS |
|---|---|---|
| "Authorization" | "Bearer " + access_token | access_token is the Access Token that you received in token response |
| "Accept" | "application/jwt" | Response will be in JWT format. This header is optional, see response details. |
- Response:
- Response format depends on your requirement and request. By default, user info is given in plain JSON format. But it is recommended this info to be returned as JWT (just like ID Token) so that you will have option to get data signed by SAASPASS and validate this signature.
- If you don’t send 'Accept' header parameter or if you send it as 'application/json', response will be in plain JSON format. But if you send it as 'application/jwt', then response will be in JWT format.
- So if you requested as JWT, response will contain algorithm part, user info data part and signature part. You can handle as handling ID Token and you can again consider validating signature if needed. User info data part contains parameters that are listed below. If you requested as simple JSON, response will contain user info data parameters that are listed below.
- But remember that data that will return is limited with scopes that you defined in configuration and user granted. You will see below for each data which scope is needed.
- Also user is required to provide email only as mandatory data in the SAASPASS profile. Others are optional. So if user didn’t provide first name for example, you will NOT get 'given_name'.
| PARAMETER | REQUIRED | SCOPEDETAILS |
|---|---|---|
| sub | N.A | Unique identifier of user's profile that was chosen by user during authentication. Note that SAASPASS users may have multiple profiles that can have different email or same email |
| given_name | profile | First name of user |
| family_name | profile | Family name of user |
| name | profile | Full name of user. Consists of given name and family name |
| preferred_username | profile | This is username that user may define in the profile. It is your decision to use this or email as account name of user in your application |
| gender | profile | Gender of user. (values: Male, Female, Unknown) |
| birthdate | profile | Birth date of user in yyyy-MM-dd format |
| updated_at | profile | Last update time of the user profile in 'long' type (millisecond) |
| Verified email of user | ||
| email_verified | It will come 'true' since email of user is already verified by SAASPASS | |
| phone_number | phone | Verified phone number of user |
| phone_number_verified | phone | It will come 'true' since phone number of user is already verified by SAASPASS |
| address | address | This contains address information of user. Fields below are inside address section of response: street_address: address of user locality: City of user country: Country of user postal_code: Postal code of user |
Example response data for user info:
{
  "sub": "248289761001",
  "given_name": "Jane",
  "family_name": "Doe",
  "name": "Jane Doe",
  "preferred_username": "j.doe",
  "gender": "Female",
  "birthdate": "1980-12-19",
  "updated_at": 1482497922045,  "email": "janedoe@example.com",
  "email_verified": true,
  "phone_number": "+1092911232",
  "phone_number_verified": true,
  "address": {
    "street_address": "100 main st",
    "locality": "Seattle",
    "country": "US",
    "postal_code": "98104"
  }
}
SAASPASS Connect Demo
Sample Application is currently offered for Java.
SAASPASS Connect Sample Application
Generic OAuth2
Overview
SAASPASS supports OAuth2 protocol with MFA security for your applications. This section explains how you can integrate your client applications that support OAuth2 protocol with SAASPASS, using Generic OAuth2 application in the applications gallery in SAASPASS Admin Portal. Some applications are supporting OAuth2 protocol as predefined option and you can integrate them easily with SAASPASS following the steps under 'Integration' tab of the Generic OAuth2 application. But if the client application is not supporting OAuth2 by default, you will find necessary information to integrate it with development.
There are several grant types (mainly authorization flows) supported for OAuth2 protocol and the flow to authorize a user for an application depends on capabilites and requirements of the application. Grant types that are supported on SAASPASS are explained below.
Authorization Code
This is the most common and recommended grant type. The Generic OAuth2 application supports this flow by default. The client application receives an authorization code after user is redirected back from SAASPASS authorization endpoint and this code is used to request an access token.
Send authentication request to SAASPASS:
- Request Method: GET
- Authorization end point URL: https://www.saaspass.com/sd/oauth/authorize
- Request Parameters:
| Parameter | Value | Details |
|---|---|---|
| response_type | code | This parameter-value pair initiates Basic Flow that is asking a temporary code from SAASPASS that will be used to obtain tokens |
| client_id | [CLIENT_KEY] | This is the 'App Key' that is given to you in the Integration tab of the application |
| redirect_uri | [CALLBACK_URL] | This is the URL on which the user will be redirected back to your application. This URL should be configured already in the 'Callback URL' configuration of the application |
| scope | [SCOPE_LIST] e.g. email profile |
'scope' defines the list of user information that your application wants to retrieve from SAASPASS about authenticated user. Replace [SCOPE_LIST] with list of scopes that you request. Scopes should be space separated. email: This is to provide user's email if available. profile: (optional) Add this scope to get more profile information of user. This will include info like name, family name, full name, gender, birth date and updated time. |
| state | {STATE} e.g. 1xx9xx9f8bfxx1 |
This state can be used to protect your flow against cross-site request forgery like attacks. You can generate a random string and replace with {STATE} in the URL pattern. State will be returned back in the response as well so that you can validate it by comparing with the one you generated and sent in the request |
Example request pattern: https://www.saaspass.com/sd/oauth/authorize?response_type=code&client_id={CLIENT_KEY}&redirect_uri={CALLBACK_URL}?scope={SCOPE_LIST}&state={STATE}
Response:
- If the user authenticated themself with SAASPASS and granted your application to access their profile, the response will be sent back to the CALLBACK URL that you provided in the request:
- Response is in simple query parameters format.
- {CALLBACK_URL}?code={AUTH_CODE}&state={STATE}
- Response parameters:
- {STATE}: If you provided 'state' in your authentication request, this value should be same with the one you provided. So you should validate this state first.
- {AUTH_CODE}: This is an authorization code. Code should be used to exchange it with access token and ID Token as explained in further steps.
Get Access Token:
Now since authentication was completed and authorization code is received, you are ready to obtain access token.
Request Method: POST
Token end point URL: https://www.saaspass.com/sd/oauth/token
Header parameters:
| PARAMETER | VALUE |
|---|---|
| Content-type | application/x-www-form-urlencoded |
| Accept | application/json |
- Request parameters in body:
| PARAMETER | VALUE | DETAILS |
|---|---|---|
| grant_type | authorization_code | The value is 'authorization_code' which refers to the grant type of the flow that is being used |
| code | [AUTHORIZATION_CODE] | This is the value of the authorization code that is received at the end of the authorization request |
| redirect_uri | [CALLBACK_URL] | This is the URL on which the user was redirected back to your application and it is used by Authorization Server to match the configured one |
| client_id | [CLIENT_KEY] | This is the 'App Key' that is given to you in the Integration tab of the application |
| client_secret | [CLIENT_SECRET] | This is the 'App Password' that is given to you in the Integration tab of the application |
An example response body is:
{
"access_token": "901f6bfc-9cd2-4d40-8509-c3616ca80707",
"token_type": "bearer",
"expires_in": 86399,
"scope": "openid email",
}
- Response:
- Response is in JSON format.
| PARAMETER | VALUE |
|---|---|
| access_token | This is access token. Access token can be used to get more information about authenticated user. Check 'Getting User Information' section |
| token_type | It is type of token which is 'bearer' for this response |
| expires_in | Expiration time of access token in seconds |
| scope | Contains scope(s) that was provided during request |
| This is email of users that they chose for authentication with your application within a SAASPASS Profile. This email is already verified by SAASPASS and you can use this as username of user for this authentication |
//Here it is used Apache Http components. It is up to you how to handle Http request-responses here.
URI uri = new URIBuilder().setScheme("https")
            .setHost("www.saaspass.com")
            .setPath("/sd/oauth/token")
            .setParameter("grant_type", "authorization_code")
            .setParameter("code", "{your_authorization_code}")
            .setParameter("redirect_uri", "{your_callback_url}")
            .setParameter("client_id", "{your_client_id}")
            .setParameter("client_secret", "{your_client_secret}")
            .build();
HttpPost postRequest = new HttpPost(uri);
postRequest.setHeader("Content-type", "application/x-www-form-urlencoded");
postRequest.setHeader("Accept", "application/json");

HttpClient client = HttpClientBuilder.create().build();
HttpResponse response = client.execute(postRequest);

//read response as you want, get as String

JsonParser parser = new JsonParser();    //used 'gson' as json library
JsonObject responseJson = (JsonObject)parser.parse(result.toString());
String token = responseJson.get("access_token").getAsString();
//read other attributes
Coming Soon...
Authorization Code with PKCE
This is the recommended grant type for applications that cannot securely store client secret (i.e single web apps, native apps, mobile apps). The client secret is used here to identify the client, not to authenticate. The client application generates the Code Verifier and the Code Challenge. It sends the code challenge to receive an authorization code and sends the verifier to receive an access token. SAASPASS validates the verifier before returning the access token.
Send authentication request to SAASPASS:
- Request Method: GET
- Authorization end point URL: https://www.saaspass.com/sd/oauth/authorize
- Request Parameters:
| Parameter | Value | Details |
|---|---|---|
| response_type | code | This parameter-value pair initiates Basic Flow that is asking a temporary code from SAASPASS that will be used to obtain tokens |
| client_id | [CLIENT_KEY] | This is the 'App Key' that is given to you in the Integration tab of the application |
| code_challenge | [CODE_CHALLENGE_VALUE] | The code challenge value that is generated on the client application. This is SHA-256 hash of the code_verifier value which later is used in exchange for an access token. code_verifier is a random cryptographic value. |
| code_challenge_method | SHA-256 | This is the algorith used to generate code_challenge. It should be SHA-256. |
| redirect_uri | [CALLBACK_URL] | This is the URL on which the user will be redirected back to your application. This URL should be configured already in the 'Callback URL' configuration of the application |
| scope | [SCOPE_LIST] e.g. openid email address |
'scope' defines the list of user information that your application wants to retrieve from SAASPASS about authenticated user. Replace [SCOPE_LIST] with list of scopes that you request. Scopes should be space separated. openid: This is mandatory scope to be provided to proceed with openid connect protocol. email: This is mandatory scope to be provided. It lets user's email to be returned inside ID Token that you will see in that section. profile: (optional) Add this scope to get more profile information of user. This will include info like name, family name, full name, gender, birth date and updated time. |
| state | {STATE} e.g. 1xx9xx9f8bfxx1 |
This state can be used to protect your flow against cross-site request forgery like attacks. You can generate a random string and replace with {STATE} in the URL pattern. State will be returned back in the response as well so that you can validate it by comparing with the one you generated and sent in the request |
Example request pattern: https://www.saaspass.com/sd/oauth/authorize?response_type=code&client_id={CLIENT_KEY}&redirect_uri={CALLBACK_URL}?scope={SCOPE_LIST}&state={STATE}&code_challenge={CODE_CHALLENGE_VALUE}&code_challenge_method=SHA-256
Response:
- If the user authenticated themself with SAASPASS and granted your application to access their profile, the response will be sent back to the CALLBACK URL that you provided in the request:
- Response is in simple query parameters format.
- {CALLBACK_URL}?code={AUTH_CODE}&state={STATE}
- Response parameters:
- {STATE}: If you provided 'state' in your authentication request, this value should be same with the one you provided. So you should validate this state first.
- {AUTH_CODE}: This is an authorization code. Code should be used to exchange it with access token and ID Token as explained in further steps.
Get Access Token:
- Now since authentication was completed and authorization code is received, you are ready to obtain access token.
- Getting access token is almost same with Authorization Code flow and SAASPASS Connect. But there is an additional parameter in the request, which is 'code_verifier'.
Note: For the response parameters, check Authorization Code flow section as they are same.
Request parameters in body:
| PARAMETER | VALUE | DETAILS |
|---|---|---|
| grant_type | authorization_code | The value is 'authorization_code' which refers to the grant type of the flow that is being used |
| code | [AUTHORIZATION_CODE] | This is the value of the authorization code that is received at the end of the authorization request |
| code_verifier | [CODE_VERIFIER_VALUE] | Code verifier that is generated on the client side before sending the authorization code request. It is a random cryptographic value |
| redirect_uri | [CALLBACK_URL] | This is the URL on which the user was redirected back to your application and it is used by Authorization Server to match the configured one |
| client_id | [CLIENT_KEY] | This is the 'App Key' that is given to you in the Integration tab of the application |
| client_secret | [CLIENT_SECRET] | This is the 'App Password' that is given to you in the Integration tab of the application |
Implicit
Some public clients that cannot store application secret key securely (i.e. single web apps) and cannot support Authorization Code with PKCE, can use this grant type to receive an access token without an authorization code. This grant is not recommended and should be used within the known risks if the application cannot follow authorization code grant. For such applications, Authorization code grant with PKCE is recommended. Generic OAuth2 application supports this grant with 'token' response type.
Send authentication request to SAASPASS:
- Request Method: GET
- Authorization end point URL: https://www.saaspass.com/sd/oauth/authorize
- Request Parameters:
| Parameter | Value | Details |
|---|---|---|
| response_type | token id_token | At the end of successful authentication, the response will contain access token and ID token for the authenticated user |
| client_id | [CLIENT_KEY] | This is the 'App Key' that is given to you in the Integration tab of the application |
| redirect_uri | [CALLBACK_URL] | This is the URL on which the user will be redirected back to your application. This URL should be configured already in the 'Callback URL' configuration of the application |
| state | {STATE} e.g. 1xx9xx9f8bfxx1 |
This state can be used to protect your flow against cross-site request forgery like attacks. You can generate a random string and replace with {STATE} in the URL pattern. State will be returned back in the response as well so that you can validate it by comparing with the one you generated and sent in the request |
Example request pattern: https://www.saaspass.com/sd/oauth/authorize?response_type=token&client_id={CLIENT_KEY}&redirect_uri={CALLBACK_URL}&state={STATE}
Response:
- If the user authenticated themself with SAASPASS and granted your application to access their profile, the response will be sent back to the CALLBACK URL that you provided in the request
- {CALLBACK_URL}#access_token={ACCESS_TOKEN}&state={STATE}&token_type=bearer&expires_in={EXPIRES_IN}
- Response parameters:
- {ACCESS_TOKEN}: This is the access token for authenticated user.
- {EXPIRES_IN}: The expiration time of the access token in seconds
- {STATE}: If you provided 'state' in your authentication request, this value should be same with the one you provided. So you should validate this state first.
- Pay attention that the response parameters are provided after the '#' and they are not query parameters. The fragment parameters can be obtained by the web page (frontend) only.
- The access token -unlike in other flows- should be used for validation of the authenticated user only and not for API calls
Client Credentials
- Client Credentials Flow is used for machine-to-machine communication. This grant can be used to make calls to application specific methods of SAASPASS HTTP API which is described in 'App Integration Services' above.
- Getting the access token within this grant is not supported on the token endpoint that is given above. Instead, the token is given from application scope token endpoint (Check here)
- So, implementing this grant to call SAASPASS APIs requires custom development in the client as is explained in the developer site. For Generic OAuth2 application, this grant can be useful to assign/remove user access to the app on SAASPASS via the HTTP API.
- It can also be useful for applications that cannot redirect the user to SAASPASS for authentication, but can provide the SAASPASS HTTP API the username and OTP of the user after getting them from the user on the client application interface. Such OTP authentication can be added to application's login layer as a second step factor. See: OTP Check
Token Exchange
Token Exchange is an extension to OAuth2 protocol. This grant can be used to exchange existing access token for a new one. This is different than refreshing token as the new token might have downgraded scopes list if needed.
Request Method: POST
Token end point URL: https://www.saaspass.com/sd/oauth/token
Header parameters:
| PARAMETER | VALUE |
|---|---|
| Content-type | application/x-www-form-urlencoded |
| Accept | application/json |
- Request parameters in body:
| PARAMETER | VALUE | DETAILS |
|---|---|---|
| grant_type | urn:ietf:params:oauth:grant-type:token-exchange | The value is 'urn:ietf:params:oauth:grant-type:token-exchange' which refers to the grant type of token exchange. |
| subject_token | [ACCESS_TOKEN] | This is the value of access token that must be valid to exhange for a new one. |
| redirect_uri | [CALLBACK_URL] | This is the URL on which the user was redirected back to your application and it is used by Authorization Server to match the configured one |
| scope | [SCOPE_LIST] | Scope list of new token. Scopes should be space separated. If this parameter is not given, scopes of new token will be same as scopes of subject token. Providing new scope that subject token doesn't have is not allowed. |
An example response body is:
{
"access_token": "901f6bfc-9cd2-4d40-8509-c3616ca80707",
"token_type": "bearer",
"expires_in": 86399,
"scope": "openid email",
}
- Response:
- Response is in JSON format.
Dynamic Client Registration
Dynamic Client Registration (DCR) endpoint allows dynamically registering Generic OIDC / Generic Oauth2 applications. To use this endpoint, DCR must be enabled in the company by admin.
- Request Method: POST
- Token end point URL: https://www.saaspass.com/sd/oauth/{YOUR_COMPANY_KEY}/register
- {YOUR_COMPANY_KEY} is the key provided in the Company Settings section of SAASPASS Admin Portal
- Header parameters:
| PARAMETER | VALUE |
|---|---|
| Content-type | application/x-www-form-urlencoded |
| Accept | application/json |
| Authorization | Bearer {DCR_TOKEN} |
{DCR_TOKEN} is registration token that is provided in the Company Settings section of SAASPASS Admin Portal when DCR is enabled.
Request parameters in body:
| PARAMETER | VALUE | DETAILS |
|---|---|---|
| client_name | [APPLICATION_NAME] | Name of the application to be created. |
| redirect_uris | [CALLBACK_URLs] | These are the URL list for the application that user redirection is allowed. |
| scope | [SCOPE_LIST] e.g. email profile |
'scope' defines the list of user information that your application wants to retrieve from SAASPASS about authenticated user. Replace {SCOPE_LIST} with list of scopes that you request. Scopes should be space separated. email: This is to provide user's email if available. profile: (optional) Add this scope to get more profile information of user. This will include info like name, family name, full name, gender, birth date and updated time. |
| grant_types | [GRANT_TYPES] | List of grant types that the application should have. Available grants are authorization_code, authorization_code_with_pkce, implicit, client_credentials, token_exchange |
An example response body is:
{
    "scope": "email",
    "client_name": "dcr_app5",
    "redirect_uris": [
        "http://saaspass.com/dsrtest1",
        "http://saaspass.com/dsrtest2"
    ],
    "grant_types": [
        "authorization_code",
        "authorization_code_with_pkce"
    ],
    "client_id": "6VXTX7HAP5200000",
    "client_secret": "CVRL1D8BY7TX0000000"
}
- Response:
- Response is in JSON format.
Generic OIDC
Overview
SAASPASS supports OpenID Connect (OIDC) protocol with MFA security for your applications. This section explains how you can integrate your client applications that support OIDC protocol with SAASPASS, using Generic OIDC application in the applications gallery in SAASPASS Admin Portal. Some applications are supporting OIDC protocol as predefined option and you can integrate them easily with SAASPASS following the steps under 'Integration' tab of the Generic OIDC application. But if the client application is not supporting OIDC by default, you will find necessary information to integrate it with development.
There are several grant types (mainly authorization flows) supported for OIDC protocol and the flow to authorize a user for an application depends on capabilites and requirements of the application. Grant types that are supported on SAASPASS are explained below.
Authorization Code
This is the most common and recommended grant type. The Generic OIDC application supports this flow by default. The client application receives an authorization code after user is redirected back from SAASPASS authorization endpoint and this code is used to request an access token.
Send authentication request to SAASPASS:
- Request Method: GET
- Authorization end point URL: https://www.saaspass.com/sd/oauth/authorize
- Request Parameters:
| Parameter | Value | Details |
|---|---|---|
| response_type | code | This parameter-value pair initiates Basic Flow that is asking a temporary code from SAASPASS that will be used to obtain tokens |
| client_id | [CLIENT_KEY] | This is the 'App Key' that is given to you in the Integration tab of the application |
| redirect_uri | [CALLBACK_URL] | This is the URL on which the user will be redirected back to your application. This URL should be configured already in the 'Callback URL' configuration of the application |
| scope | {SCOPE_LIST} e.g. openid email address |
'scope' defines the list of user information that your application wants to retrieve from SAASPASS about authenticated user. Replace {SCOPE_LIST} with list of scopes that you request. Scopes should be space separated. openid: This is mandatory scope to be provided to proceed with openid connect protocol. email: This is mandatory scope to be provided. It lets user's email to be returned inside ID Token that you will see in that section. profile: (optional) Add this scope to get more profile information of user. This will include info like name, family name, full name, gender, birth date and updated time. |
| state | {STATE} e.g. 1xx9xx9f8bfxx1 |
This state can be used to protect your flow against cross-site request forgery like attacks. You can generate a random string and replace with {STATE} in the URL pattern. State will be returned back in the response as well so that you can validate it by comparing with the one you generated and sent in the request |
Example request pattern: https://www.saaspass.com/sd/oauth/authorize?response_type=code&client_id={CLIENT_KEY}&redirect_uri={CALLBACK_URL}?scope={SCOPE_LIST}&state={STATE}
Response:
- If the user authenticated themself with SAASPASS and granted your application to access their profile, the response will be sent back to the CALLBACK URL that you provided in the request:
- Response is in simple query parameters format.
- {CALLBACK_URL}?code={AUTH_CODE}&state={STATE}
- Response parameters:
- {STATE}: If you provided 'state' in your authentication request, this value should be same with the one you provided. So you should validate this state first.
- {AUTH_CODE}: This is an authorization code. Code should be used to exchange it with access token and ID Token as explained in further steps.
Get Access Token and ID Token:
Now since authentication was completed and authorization code is received, you are ready to obtain access token and ID token. Notice that access token in OIDC protocol comes within ID token unline in OAuth2 protocol and it has self-contained authentication data about the user.
Request Method: POST
Token end point URL: https://www.saaspass.com/sd/oauth/token
Header parameters:
| PARAMETER | VALUE |
|---|---|
| Content-type | application/x-www-form-urlencoded |
| Accept | application/json |
- Request parameters in body:
| PARAMETER | VALUE | DETAILS |
|---|---|---|
| grant_type | authorization_code | The value is 'authorization_code' which refers to the grant type of the flow that is being used |
| code | [AUTHORIZATION_CODE] | This is the value of the authorization code that is received at the end of the authorization request |
| redirect_uri | [CALLBACK_URL] | This is the URL on which the user was redirected back to your application and it is used by Authorization Server to match the configured one |
| client_id | [CLIENT_KEY] | This is the 'App Key' that is given to you in the Integration tab of the application |
| client_secret | [CLIENT_SECRET] | This is the 'App Password' that is given to you in the Integration tab of the application |
An example response body is:
{
"access_token": "901f6bfc-9cd2-4d40-8509-c3616ca80707",
"token_type": "bearer",
"expires_in": 86399,
"scope": "openid email",
"id_token": "eyJhbGciOiJSUzI1NiIsInR5cCI6IkpXVCJ9.eyJzdWIiOiIxMjM0NTY3ODkwIiwibmFtZSI6IkpvaG4gRG9lIiwiYWRtaW4iOnRydWV9.EkN-DOsnsuRjRO6BxXemmJDm3HbxrbRzXglbN2S4sOkopdU4IsDxTI8jO19W_A4K8ZPJijNLis4EZsHeY559a4DFOd50_OqgHGuERTqYZyuhtF39yxJPAjUESwxk2J5k_4zM3O-vtd1Ghyo4IbqKKSy6J9mTniYJPenn5-HIirE",
"email": "useremail@emdomain.com"
}
- Response:
- Response is in JSON format.
| PARAMETER | VALUE |
|---|---|
| access_token | This is access token. Access token can be used to get more information about authenticated user. Check 'Getting User Information' section |
| token_type | It is type of token which is 'bearer' for this response |
| expires_in | Expiration time of access token in seconds |
| scope | Contains scope(s) that was provided during request |
| This is email of users that they chose for authentication with your application within a SAASPASS Profile. This email is already verified by SAASPASS and you can use this as username of user for this authentication | |
| id_token | This is JSON Web Token that includes authenticated user's identity and it is signed by SAASPASS. Check 'Handling ID Token' for details |
//Here it is used Apache Http components. It is up to you how to handle Http request-responses here.
URI uri = new URIBuilder().setScheme("https")
            .setHost("www.saaspass.com")
            .setPath("/sd/oauth/token")
            .setParameter("grant_type", "authorization_code")
            .setParameter("code", "{your_authorization_code}")
            .setParameter("redirect_uri", "{your_callback_url}")
            .setParameter("client_id", "{your_client_id}")
            .setParameter("client_secret", "{your_client_secret}")
            .build();
HttpPost postRequest = new HttpPost(uri);
postRequest.setHeader("Content-type", "application/x-www-form-urlencoded");
postRequest.setHeader("Accept", "application/json");

HttpClient client = HttpClientBuilder.create().build();
HttpResponse response = client.execute(postRequest);

//read response as you want, get as String

JsonParser parser = new JsonParser();    //used 'gson' as json library
JsonObject responseJson = (JsonObject)parser.parse(result.toString());
String token = responseJson.get("access_token").getAsString();
String idToken = responseJson.get("id_token").getAsString();
//read other attributes
Coming Soon...
Get User Information
- The integration steps of getting user information are explained under SAASPASS Connect section. Please refer to that section as the steps to follow are same. Go to Section
Authorization Code with PKCE
This is the recommended grant type for applications that cannot securely store client secret (i.e single web apps, native apps, mobile apps). The client secret is used here to identify the client, not to authenticate. The client application generates the Code Verifier and the Code Challenge. It sends the code challenge to receive an authorization code and sends the verifier to receive an access token. SAASPASS validates the verifier before returning the access token.
Send authentication request to SAASPASS:
- Request Method: GET
- Authorization end point URL: https://www.saaspass.com/sd/oauth/authorize
- Request Parameters:
| Parameter | Value | Details |
|---|---|---|
| response_type | code | This parameter-value pair initiates Basic Flow that is asking a temporary code from SAASPASS that will be used to obtain tokens |
| client_id | [CLIENT_KEY] | This is the 'App Key' that is given to you in the Integration tab of the application |
| code_challenge | [CODE_CHALLENGE_VALUE] | The code challenge value that is generated on the client application. This is SHA-256 hash of the code_verifier value which later is used in exchange for an access token. code_verifier is a random cryptographic value. |
| code_challenge_method | SHA-256 | This is the algorith used to generate code_challenge. It should be SHA-256. |
| redirect_uri | [CALLBACK_URL] | This is the URL on which the user will be redirected back to your application. This URL should be configured already in the 'Callback URL' configuration of the application |
| scope | {SCOPE_LIST} e.g. openid email address |
'scope' defines the list of user information that your application wants to retrieve from SAASPASS about authenticated user. Replace {SCOPE_LIST} with list of scopes that you request. Scopes should be space separated. openid: This is mandatory scope to be provided to proceed with openid connect protocol. email: This is mandatory scope to be provided. It lets user's email to be returned inside ID Token that you will see in that section. profile: (optional) Add this scope to get more profile information of user. This will include info like name, family name, full name, gender, birth date and updated time. |
| state | {STATE} e.g. 1xx9xx9f8bfxx1 |
This state can be used to protect your flow against cross-site request forgery like attacks. You can generate a random string and replace with {STATE} in the URL pattern. State will be returned back in the response as well so that you can validate it by comparing with the one you generated and sent in the request |
Example request pattern: https://www.saaspass.com/sd/oauth/authorize?response_type=code&client_id={CLIENT_KEY}&redirect_uri={CALLBACK_URL}?scope={SCOPE_LIST}&state={STATE}&code_challenge={CODE_CHALLENGE_VALUE}&code_challenge_method=SHA-256
Response:
- If the user authenticated themself with SAASPASS and granted your application to access their profile, the response will be sent back to the CALLBACK URL that you provided in the request:
- Response is in simple query parameters format.
- {CALLBACK_URL}?code={AUTH_CODE}&state={STATE}
- Response parameters:
- {STATE}: If you provided 'state' in your authentication request, this value should be same with the one you provided. So you should validate this state first.
- {AUTH_CODE}: This is an authorization code. Code should be used to exchange it with access token and ID Token as explained in further steps.
Get Access Token and ID Token:
- Now since authentication was completed and authorization code is received, you are ready to obtain access token and ID token. Notice that access token in OIDC protocol comes within ID token unline in OAuth2 protocol and it has self-contained authentication data about the user.
- Getting access token is almost same with Authorization Code flow and SAASPASS Connect. But there is an additional parameter in the request, which is 'code_verifier'.
Note: For the response parameters, check Authorization Code flow section as they are same.
Request parameters in body:
| PARAMETER | VALUE | DETAILS |
|---|---|---|
| grant_type | authorization_code | The value is 'authorization_code' which refers to the grant type of the flow that is being used |
| code | [AUTHORIZATION_CODE] | This is the value of the authorization code that is received at the end of the authorization request |
| code_verifier | [CODE_VERIFIER_VALUE] | Code verifier that is generated on the client side before sending the authorization code request. It is a random cryptographic value |
| redirect_uri | [CALLBACK_URL] | This is the URL on which the user was redirected back to your application and it is used by Authorization Server to match the configured one |
| client_id | [CLIENT_KEY] | This is the 'App Key' that is given to you in the Integration tab of the application |
| client_secret | [CLIENT_SECRET] | This is the 'App Password' that is given to you in the Integration tab of the application |
Get User Information
- The integration steps of getting user information are explained under SAASPASS Connect section. Please refer to that section as the steps to follow are same. Go to Section
Implicit
Some public clients that cannot store application secret key securely (i.e. single web apps) and cannot support Authorization Code with PKCE, can use this grant type to receive an access token without an authorization code. This grant is not recommended and should be used within the known risks if the application cannot follow authorization code grant. For such applications, Authorization code grant with PKCE is recommended. Generic OIDC application supports this grant with 'token' response type.
Send authentication request to SAASPASS:
- Request Method: GET
- Authorization end point URL: https://www.saaspass.com/sd/oauth/authorize
- Request Parameters:
| Parameter | Value | Details |
|---|---|---|
| response_type | token id_token | At the end of successful authentication, the response will contain access token and ID token for the authenticated user |
| client_id | [CLIENT_KEY] | This is the 'App Key' that is given to you in the Integration tab of the application |
| redirect_uri | [CALLBACK_URL] | This is the URL on which the user will be redirected back to your application. This URL should be configured already in the 'Callback URL' configuration of the application |
| state | {STATE} e.g. 1xx9xx9f8bfxx1 |
This state can be used to protect your flow against cross-site request forgery like attacks. You can generate a random string and replace with {STATE} in the URL pattern. State will be returned back in the response as well so that you can validate it by comparing with the one you generated and sent in the request |
Example request pattern: https://www.saaspass.com/sd/oauth/authorize?response_type=token&client_id={CLIENT_KEY}&redirect_uri={CALLBACK_URL}&state={STATE}
Response:
- If the user authenticated themself with SAASPASS and granted your application to access their profile, the response will be sent back to the CALLBACK URL that you provided in the request
- {CALLBACK_URL}#access_token={ACCESS_TOKEN}&state={STATE}&token_type=bearer&expires_in={EXPIRES_IN}
- Response parameters:
- {ACCESS_TOKEN}: This is the access token for authenticated user.
- {EXPIRES_IN}: The expiration time of the access token in seconds
- {STATE}: If you provided 'state' in your authentication request, this value should be same with the one you provided. So you should validate this state first.
- Pay attention that the response parameters are provided after the '#' and they are not query parameters. The fragment parameters can be obtained by the web page (frontend) only.
- The access token -unlike in other flows- should be used for validation of the authenticated user only and not for getting an ID Token or API calls
Client Credentials
- Client Credentials Flow is used for machine-to-machine communication. This grant can be used to make calls to application specific methods of SAASPASS HTTP API which is described in 'App Integration Services' above.
- Getting the access token within this grant is not supported on the token endpoint that is given above. Instead, the token is given from application scope token endpoint (Check here)
- So, implementing this grant to call SAASPASS APIs requires custom development in the client as is explained in the developer site. For Generic OIDC application, this grant can be useful to assign/remove user access to the app on SAASPASS via the HTTP API.
- It can also be useful for applications that cannot redirect the user to SAASPASS for authentication, but can provide the SAASPASS HTTP API the username and OTP of the user after getting them from the user on the client application interface. Such OTP authentication can be added to application's login layer as a second step factor. See: OTP Check
Token Exchange
Token Exchange is an extension to OIDC protocol. This grant can be used to exchange existing access token for a new one. This is different than refreshing token as the new token might have downgraded scopes list if needed.
Request Method: POST
Token end point URL: https://www.saaspass.com/sd/oauth/token
Header parameters:
| PARAMETER | VALUE |
|---|---|
| Content-type | application/x-www-form-urlencoded |
| Accept | application/json |
- Request parameters in body:
| PARAMETER | VALUE | DETAILS |
|---|---|---|
| grant_type | urn:ietf:params:oauth:grant-type:token-exchange | The value is 'urn:ietf:params:oauth:grant-type:token-exchange' which refers to the grant type of token exchange. |
| subject_token | [ACCESS_TOKEN] | This is the value of access token that must be valid to exhange for a new one. |
| redirect_uri | [CALLBACK_URL] | This is the URL on which the user was redirected back to your application and it is used by Authorization Server to match the configured one |
| scope | [SCOPE_LIST] | Scope list of new token. Scopes should be space separated. If this parameter is not given, scopes of new token will be same as scopes of subject token. Providing new scope that subject token doesn't have is not allowed. |
An example response body is:
{
"access_token": "901f6bfc-9cd2-4d40-8509-c3616ca80707",
"token_type": "bearer",
"expires_in": 86399,
"scope": "openid email",
}
- Response:
- Response is in JSON format.
Dynamic Client Registration
Dynamic Client Registration (DCR) endpoint allows dynamically registering Generic OIDC / Generic Oauth2 applications. To use this endpoint, DCR must be enabled in the company by admin. Request to this endpoint and response parameters are explained in Generic OAuth2 application section above. The only difference is that, to register an OIDC application, scope list in the request parameter must include 'openid'.
Integration Tools
Sample App
SAASPASS offers a sample project of an application with the different SAASPASS services integrated.
Download the project and import it into your workspace. Check how an application should call SAASPASS HTTP API for manual login, how to handle Instant Login, Instant Registration of how to call for new account registrations.
Sample Application is currently offered for Java, .NET and Python.
Java Sample Application .Net Sample Application Python Application
Download Android Sample App Download iOS Sample App
Reverse Ajax Implementation
Reverse Ajax
///This block of code should be in Example.aspx for receive message from server
 <!-- Receive messages -->
    <asp:ScriptManager ID="ScriptManager1" runat="server" AsyncPostBackTimeout="2147483647">
        <Services>
            <asp:ServiceReference Path="~/Dispatcher.asmx" />
        </Services>
    </asp:ScriptManager>
    <script type="text/javascript">
        function waitEvent() {
            CustomApplication.Dispatcher.WaitMessage("<%= Session["session"] %>",
            function (response) {
                displayMessage(response);
                setTimeout(waitEvent, 0);
            },
            function () {
                setTimeout(waitEvent, 0);
            });
        }
        function displayMessage(message) {
            if (message != null) {
                window.location.href = "/Default.aspx?username=" + message;
            }
        }
    </script>


///This block of code should be in Example.aspx.cs
 protected void Page_PreRender(object sender, EventArgs e)
{
    if (Session["session"] != null)
    {
        ClientScript.RegisterStartupScript(this.GetType(), "ActivateWaitingLoop", "waitEvent();", true);
    }
}

///This block of code should be in Dispatcher.asmx.cs service for getting messages
using System.Web.Services;
namespace CustomApplication
{
    /// This web service contains methods that help dispatching events to the client.
    [WebService(Namespace = "http://tempuri.org/")]
    [WebServiceBinding(ConformsTo = WsiProfiles.BasicProfile1_1)]
    [System.ComponentModel.ToolboxItem(false)]
    [System.Web.Script.Services.ScriptService]
    public class Dispatcher : System.Web.Services.WebService
    {
        /// Dispatch the new message event.
        /// <param name="userName">The loged in user name</param> <returns>the message content</returns>
        [WebMethod]
        public string WaitMessage(string session)
        {
            return ClientAdapter.Instance.GetMessage(session);
        }
    }
}

///This block of code should be in ClientAdapter.cs
using System.Collections.Generic;
namespace CustomApplication
{
    /// This class is used to send events/messages to multiple clients.
    public class ClientAdapter
    {
        /// The recipient list.
        private Dictionary<string, Client> recipients = new Dictionary<string, Client>();
        /// Send a message to a particular recipient.
        public void SendMessage(Message message)
        {
            if (recipients.ContainsKey(message.reqSession))
            {
                Client client = recipients[message.reqSession];
                client.EnqueueMessage(message);
            }
        }
        /// Called by a individual recipient to wait and receive a message. <returns>The message content</returns>
        public string GetMessage(string session)
        {
            string username = string.Empty;
            if (recipients.ContainsKey(session))
            {
                Client client = recipients[session];
                username = client.DequeueMessage().reqUsername;
                string a = username;
            }
            return username;
        }
        /// Join a user to the recipient list.
        public void Join(string session)
        {
            recipients[session] = new Client();
        }
        public static ClientAdapter Instance = new ClientAdapter();
        private ClientAdapter() { }
    }
}

///This block of code should be in Client.cs
using System.Collections.Generic;
using System.Threading;
namespace CustomApplication
{
    public class Client
    {
        private ManualResetEvent messageEvent = new ManualResetEvent(false);
        private Queue<Message> messageQueue = new Queue<Message>();

        /// This method is called by a sender to send a message to this client.
        public void EnqueueMessage(Message message)
        {
            lock (messageQueue)
            {
                messageQueue.Enqueue(message);

                // Set a new message event.
                messageEvent.Set();
            }
        }
        /// This method is called by the client to receive messages from the message queue.
        /// If no message, it will wait until a new message is inserted. <returns>the unread message</returns>
        public Message DequeueMessage()
        {
            // Wait until a new message.
            messageEvent.WaitOne();
            lock (messageQueue)
            {
                if (messageQueue.Count == 1)
                {
                    messageEvent.Reset();
                }
                return messageQueue.Dequeue();
            }
        }
    }
}

///This block of code should be in Message.cs
namespace CustomApplication
{
    public class Message
    {
        public string reqSession { get; set; }
        public string reqTracker { get; set; }
        public string reqUsername { get; set; }
    }
}
Some of the SAASPASS services are triggered directly from the SAASPASS mobile application by the user interaction. This ends up with SAASPASS server sending a login response to a web application which didn't request anything.
In order to let the user log in automatically to its session, developer should integrate the Reverse Ajax to let the browser session to take an action for the request received from SAASPASS Servers.
SAASPASS Services requiring Reverse Ajax implementation are:
- Scan Barcode
- Proximity
- Instant Registration
For more information about Reverse Ajax: https://en.wikipedia.org/wiki/Comet_(programming)
iOS SDK
Introduction
SAASPASS SDK allows to set up the communication between the custom mobile app and the SAASPASS mobile app.
This communication is part of the user authentication process. At the end point, the custom mobile app will receive the login response through the SDK.
Steps for Integration in iOS.
- Download SAASPASS SDK
- Import SDK into your Xcode Project.
- 'Login with SAASPASS' Integration
Terminology
- BundleID of the custom mobile application.
- Suffixes used by the custom mobile application.
iOS SDK
SAASPASS SDK VERSION: 1.0.0
- Follow the instructions below for a proper set up and integration.
- Keep your SDK always up-to-date.
Download iOS SDK Download iOS Sample App Download iOS Swift Sample App
Import SAASPASS SDK To Xcode Project(Objective-c)
- Navigate to where you downloaded the SDK and Open it
- Drag the SaasPassSDK.framework to Frameworks in Project Navigator. Create a new group Frameworks if it does not exist.
- Choose Create groups for any added folders.
- Select Copy items into destination group's folder. This copying the SDK into your app.
The SDK automatically loads its framework and resource dependencies.
'Login with Saaspass' - Integration
1) GET THE APPLICATION KEY
2) CONFIGURE THE .plist FOR YOUR PROJECT
Schema:
<key>CFBundleURLTypes</key>
<array>
    <dict>
        <array>
            <key> CFBundleURLSchemes</key>
            <string>saaspasssdk-appKey-urlSchemeSuffix</string>
        </array>
    </dict>
</array>
Parameters:
| appKey | required | Application key given for your Custom application. |
| urlSchemeSuffix | optional | (Suffix) String that is appended to the base URL scheme used for SaasPass login.(Optional) |
3) ADD API KEY AND SUFFIXES TO THE .plist
Example:
<key>CFBundleURLTypes</key>
<array>
<dict>
<array>
<key> CFBundleURLSchemes</key>
<string>saaspasssdk-123456789-testVersion</string>
</array>
</dict>
</array>
4) EXTRA CONFIGURATION FOR IOS9
In iOS 9 you have to whitelist any URL schemes your App wants to query in Info.plist under the LSApplicationQueriesSchemes key (an array of strings).
Add the following to your application's .plist:
<key>LSApplicationQueriesSchemes</key>
<array>
<string>saaspass-auth</string>
</array>
5) CONNECT APPLICATION DELEGATE
To post process the results from SaasPass Login (or any action that requires switching over to the native SAASPASS app) you need to conenct your AppDelegate to the SPSDKManager.
In your AppDelegate.m add:
// AppDelegate.m
#import <SaasPassSDK/SaasPassSDK.h>

-(BOOL)application:(UIApplication *)application openURL:(NSURL *)url sourceApplication:(NSString *)sourceApplication annotation:(id)annotation {

return [[SPSDKManager sharedInstance] application:application openURL:url sourceApplication:sourceApplication annotation:annotation];
}
6) ADD 'LOGIN WITH SAASPASS' BUTTON CODE
To add a SaasPass-branded login button to your app add the following code snippet to a view controller.
// Add this to the header file, e.g. in ViewController.h
#import <SaasPassSDK/SaasPassSDK.h>

// Add this delegate into your view controller
@interface ViewController : UIViewController <SPSDKLoginButtonDelegate>

// Add this to the header of your file, e.g. in ViewController.m
// after #import "ViewController.h"
// Add this to the body

@implementation ViewController

- (void)viewDidLoad {
[super viewDidLoad];
// Add a SAASPASS-branded login button to your app
SPSDKLoginButton *loginButton = [[SPSDKLoginButton alloc] init];
// Set delegate for SPSDKLoginButton
loginButton.delegate = self;
// Optional: Place the button in the center of your view.
loginButton.center = self.view.center;
[self.view addSubview:loginButton];

}
@end
7) ADD 'LOGIN WITH SAASPASS' BUTTON FROM INTERFACE BUILDER
1) Add new UIButton in the Interface Builder and set its type as 'Custom'. 2) In 'Show the attributes inspector', under 'Button' section, select 'Custom' as Type.
3) In 'Show Identity Inspector', under 'Custom Class' section, select 'SPSDKLoginButton' as Class.
4) In 'Show the Connections Inspector', set the delegate for the SPSDKLoginButton. (You can also set delegate programmatically after adding SPSDKLoginButton as IBOutlet to your ViewController)
8) HANDLE RECEIVED RESPONSE
Add this method for handling responses or some error in the SPSDKLoginButton delegate:
//Method for received results from login action

-(void) loginButton:(SPSDKLoginButton *)loginButton

didCompleteWithResult:(SPSDKLoginResult *)result withError:(NSError*)error

{
if (error) {
//Process error
} else if (result.isCanceled) {
//Cancelled
}else {
//Logged in
}
}
'Open In Mobile App' - Integration
Once your login is integrated with SAASPASS; your users have a second way to log in to the custom mobile application.
They can open SAASPASS mobile app and tap on the 'Open in mobile app' button displayed in the user account of your application:
Once SAASPASS checks the user credentials, the custom mobile app will get the information of the account to be logged in.
Integration
Make sure you have completed steps 1 to 5 on ‘Login With SAASPASS’ - Integration section. Later proceed with these extra steps
6) CONNECT APPLICATION DELEGATE AS SPSDKMANAGER DELEGATE
To handle ‘Open In Mobile App’ requests you need to set your AppDelegate as SPSDKManagerDelegate
// Add this delegate into your Application Delegate
@interface AppDelegate : UIResponder <UIApplicationDelegate, SPSDKManagerDelegate>
// Add this on your applicationDidFinishLaunchingWithOptions method
-(BOOL)application:(UIApplication *)application
didFinishLaunchingWithOptions:(NSDictionary *)launchOptions {
// Set delegate method for SPSDKManager
[SPSDKManager sharedInstance].delegate = self;
}
7) HANDLE RECEIVED LOGIN REQUESTS
Add this method for handling ‘Open In Mobile App’ requests in your AppDelegate (SPSDKManagerDelegate)
//Method for handling 'Open In Mobile App' requests
-(void) didLoginRequestReceivedWithResult:(SPSDKLoginResult *)result
withError:(NSError*)error
{
if (error) {
//Process error
} else {
//Log user in
}
}
Import SAASPASS SDK To Xcode Project(Swift)
Add bridging header to use the SDK in your Swift Project
- Add a new Objective C file to your project and you will be asked if you would like to add a bridging header. For more information visit this link: https://developer.apple.com/library/content/documentation/Swift/Conceptual/BuildingCocoaApps/MixandMatch.html https://developer.apple.com/library/content/documentation/Swift/Conceptual/BuildingCocoaApps/Art/bridgingheader_2x.png
- Into the Header file write: #import
‘Login With SAASPASS’ - Integration
Add ‘login with saaspass’ button code
// AppDelegate

func application(_ application: UIApplication, open url: URL, sourceApplication: String?, annotation: Any) -> Bool {
        return sharedInstance.application(application, open: url, sourceApplication: sourceApplication, annotation: annotation)
    }
Add ‘login with saaspass’ button from interface builder
// Make AppDelegate a delegate of SPSDKManagerDelegate
// Code:
class LoginViewController: UIViewController, SPSDKLoginButtonDelegate {}

// Add this to the body
override func viewDidLoad() {
        super.viewDidLoad()

//        Add a SaasPass-branded login button to your app
//        let loginButton = SPSDKLoginButton.init(frame: CGRect.init(x: 60, y: 440, width: 200, height: 50))
//        Optional: Place the button in the center of your view.
//        loginButton.center = self.view.center
//        self.view.addSubview(loginButton)
    }
Handle received response
// Code:
func loginButton(_ loginButton: SPSDKLoginButton!, didCompleteWith result: SPSDKLoginResult!, withError error: Error?) {
        if error != nil {
            // Process error
        } else if (result.isCanceled) {
            // Cancelled
        } else {
            // Logged in
        }
    }
Swift integration
Connect application delegate as spsdkmanager delegate
// Code:
    // Add this delegate into your Application Delegate
class AppDelegate: UIResponder, UIApplicationDelegate, SPSDKManagerDelegate {}

    // Add this on your applicaton(,didFinishLaunchingWithOptions)
func application(_ application: UIApplication, didFinishLaunchingWithOptions launchOptions: [UIApplicationLaunchOptionsKey: Any]?) -> Bool {
        sharedInstance.delegate = self
        return true
    }
Handle received login requests
// Code:
func performLogin(result: SPSDKLoginResult) {
        // Logged in
        let controller = self.window?.rootViewController?.storyboard?.instantiateViewController(withIdentifier: "SuccessfulLoginViewController")
        self.window?.rootViewController?.present(controller!, animated: true, completion: nil)
        AppDelegate.loggedIn = true
    }

    func didLoginRequestReceived(with result: SPSDKLoginResult!, withError error: Error!) {
        if (AppDelegate.loggedIn) {
            if ((result) != nil) {
                self.performLogin(result: result)
            }
        }
    }
Android SDK
Introduction
SAASPASS SDK allows to set up the communication between the custom mobile app and the SAASPASS mobile app.
This communication is part of the user authentication process. At the end point, the custom mobile app will receive the login response through the SDK.
Steps for Integration in Android.
- Import SDK in your Android Studio via Gradle dependencies.
- 'Login with SAASPASS' Integration
- 'Open in Mobile App' Integration
Terminology
- App Namespace: Namespace of the custom mobile application.
- Hashkey: Key hash used by the custom mobile application. It is 28 characters long (for more info check how to get a hashkey section below).
Android SDK
SAASPASS SDK VERSION: 1.0.0
- Follow the instructions below for a proper set up and integration.
- Keep your SDK always up-to-date.
Android Studio Set Up
1) Take the downloaded package and place it in the libs folder.
- If you don’t have libs folder under the application module you need to create one.
2) In gradle.build file add the following code:
repositories{
    flatDir {
        dirs 'libs'
    }
}
3) Under dependencies add:
compile(name:'saaspassSDK', ext:'aar')
4) Sync your project and the SDK is ready to use.
'Login with Saaspass' - Integration
1) Get the application key
2) Open the androidmanifest.xml
- In Activity declaration add
as follows:
<activity android:name="com.example.custom.MainActivity" android:label="@string/app_name">
<intent-filter>
<action android:name="android.intent.action.VIEW" />
<category android:name="android.intent.category.DEFAULT" />
<category android:name="android.intent.category.BROWSABLE" />
<data android:scheme="saaspasssdk-applicationKey" />
</intent-filter>
</activity>
If Activity is a LAUNCHER activity, add two intent filters instead:
<activity android:name="com.example.custom.MainActivity" android:label="@string/app_name">
<intent-filter>
<action android:name="android.intent.action.MAIN" />
<category android:name="android.intent.category.LAUNCHER" />
</intent-filter>
<intent-filter>
<action android:name="android.intent.action.VIEW" />
<category android:name="android.intent.category.DEFAULT" />
<category android:name="android.intent.category.BROWSABLE" />
<data android:scheme="saaspasssdk-applicationKey" />
</intent-filter>
</activity>
Enter the Application Key got in step 1 instead of applicationKey
3) Create an activity
Define the 'Login With SAASPASS' button in the Layout:
<com.saaspass.widget.SaasPassLoginButton"
android:id="@+id/btnlogin"
android:layout_width="match_parent"
android:layout_height="wrap_content"
android:layout_alignParentBottom="true"
android:layout_centerHorizontal="true"/>
Add imports:
import com.saaspass.controller.SaasPassInitializer;
import com.saaspass.interfaces.SaasPassCallback;
import com.saaspass.login.LoginResult;
import com.saaspass.widget.SaasPassLoginButton;
In Activity class declare the widgets you defined in the activity's layout as fields of this class:
private SaasPassLoginButton loginButton;
The SDK needs to be initialized. Define the instance in Activity class:
private SaasPassInitializer saasPassInitializer;
In onCreate() using findViewById initialize the widget:
saasPassInitializer = new SaasPassInitializer(this);
loginButton = (SaasPassLoginButton) findViewById(R.id.btnlogin);
loginButton.setOnClickListener(this);
In onCreate() method after initializing SaasPassInitializer put the following code:
loginButton = (SaasPassLoginButton) findViewById(R.id.btnlogin);
loginButton.setOnClickListener(this);
saasPassInitializer.login(this, new SaasPassCallback <LoginResult>() {
@Override
public void onLoadFinishCallback(LoginResult result) {
username = result.getUsername();
trackerId = result.getTrackerId();
//after getting username and trackerId handle the login process
}
@Override
public void onCancel() {
Toast.makeText(getApplicationContext(), "Action Canceled!",Toast.LENGTH_SHORT).show();
}
@Override
public void onError(String error) {
Toast.makeText(getApplicationContext(), error, Toast.LENGTH_SHORT).show();
}
});
In onClick() method for login button create and register callback like follow:
saasPassInitializer.initCallback(this, appKey);
'Open In Mobile App' - Integration
Once your login is integrated with SAASPASS; your users have a second way to log in to the custom mobile application.
They can open SAASPASS mobile app and tap on the 'Open in mobile app' button displayed in the user account of your application:
- Once SAASPASS checks the user credentials, the custom mobile app will get the information of the account to be logged in.
How To Get A Hashkey
On OS X :
keytool -exportcert -alias androiddebugkey -keystore ~/.android/debug.keystore | openssl sha1 -binary | openssl base64
On Windows :
keytool -exportcert -alias androiddebugkey -keystore %HOMEPATH%\.android\debug.keystore | openssl sha1 -binary | openssl base64
For development purposes, you may use different hashkeys working on debugging mode. Add them under application settings 'Hashkey' separated by ';;'. If you create a new debug hashkey, submit the password field empty. Only enter the password for the release hashkey generation. Don't forget to add the release hashkey on SAASPASS.
To get a Hashkey open Command Prompt(cmd) and execute the following cmd commands:
Javascript SDK
Instructions
Integrate your JavaScript Web App with SAASPASS
- You can secure login of your JavaScript Web application with SAASPASS in few steps. Here you will see details about the required steps.
- Note: Your application login may require user to authenticate themselves with username/password + SAASPASS or just username + SAASPASS. So if your login flow has username-password authentication, you should do this authentication first and then start SAASPASS authentication that is explained below.
- Note about JavaScript SDK sample project:
- GitHub: https://github.com/saaspass/javascript-sdk
- You will find usage of SAASPASS JavaScript SDK that is available with running implementation of each step as example.
- It is maven project that can be executed standalone by running 'SdkRunTest.java'. This is using Jetty server that is integrated with eclipse IDE. It uses port 4000 and backend side that represents your app server (YourAppRest.java) is using Java REST implementation.
- The project has frontend pages under /resources/static folder. 'index.html' represents your app login page that will ask user to authenticate with SAASPASS and 'success.html' represents app landing page after user authenticated successfully.
- Project has backend classes. 'myorganization.appserver' package contains YourAppRest.java that will handle the submit from login page for SAASPASS authentication and 'saaspass' package contains SAASPASS SDK classes that are for handling SAASPASS authentication.
Integration Steps
- If you haven't created yet, go to your SAASPASS admin portal and create a custom application for this integration. Create user accounts under Groups & Users section and assign these accounts to your application. From the application management section, get your App Key and App Password which you will need during integration.
- On your login page that will require users to authenticate with SAASPASS, inject SAASPASS login widget that is asking SAASPASS authentication. Use iframe to load widget which is here: 'https://www.saaspass.com/sd/widget/' This requires App Key of your custom application as parameter. This iframe will load the SAASPASS login widget and wait for user to authenticate himself with username and SAASPASS account.
- On JavaScript SDK Project:
- In 'index.html' , there is:
- On JavaScript SDK Project:
<iframe  src="https://www.saaspass.com/sd/widget/?appKey=LAJC2CYB5SZNCDPW"
            onload="saaspassWidgetLoaded(this)" id="widgetId"></iframe>
- If before asking SAASPASS authentication, you already know which user you want to authenticate (prior to this step, you might already validate username and password of user; so would know the username), you can post this username to SAASPASS widget, so that it will fill the username automatically in the input and user won't need to enter username again.
- On JavaScript SDK Project:
- In 'index.html' , there is:
- On JavaScript SDK Project:
function saaspassWidgetLoaded(iframe) {
    var username = getUrlParam('username');
           if (username) {
                    iframe.contentWindow.postMessage({username: username}, iframe.src);
           }
}
- Now user needs to authenticate with SAASPASS. After successful authentication, SAASPASS login widget will post back the response to the caller page of your application. This response is JWT (JSON Web Token) that contains info (claims) about authenticated user and it is signed by SAASPASS using your App Password (secret). So you need to handle this response on the caller page and post it to your application server to continue. (If you don't have a backend in your application, then you should do JWT validation and use the user claims in your web page to continue)
- On JavaScript SDK Project:
- In 'index.html' , there is: function doPostBack(response) {}
- This function creates a hidden input, sets response from SAASPASS as value of the input and posts it to the backend server.
- Server class that handles this will be YourAppRest.java and the request path for this is defined as '../api/apprest/consume'.
- On JavaScript SDK Project:
- Now you have the JWT that returned by SAASPASS on your application server. Validate this JWT using your App Password and if it is valid, get user claims inside it.
- Claim attributes are: 'username' that keeps the username of authenticated user and 'timestamp' that keeps the time that SAASPASS authenticated the user.
- On JavaScript SDK Project:
- In 'YourAppRest.java > consume()' , there is:
- On JavaScript SDK Project:
SaaspassJwtClaims loggedInUserClaims = SaaspassJwtValidator.validateJwtAndReturnClaims(jwt, yourAppSecret);
* SaaspassJwtValidator.java is a util class provided in sample project that takes JWT and App Password to validate JWT and returns user claims with SaaspassJwtClaims object.
- Note: If in the beginning of the flow you passed username parameter to SAASPASS widget, then it is recommended you to validate if username you received from SAASPASS is the same with username you provided.
- Use the claims as you need and complete the authentication.
- On JavaScript SDK Project:
- In 'YourAppRest.java > consume()' , there is:
- On JavaScript SDK Project:
String successPage = "/success.html";
String contextPath = request.getContextPath();
String usernameParam = "?username="+loggedInUserClaims.getUsername();
response.sendRedirect(contextPath + successPage+usernameParam);
* This uses username of authenticated user and redirects user to 'success.html' in the project which welcomes user with his username.